- LevelIntermediate
- Time4-6 hours
- Hook5 mm
- YarnBulky
About This Pattern
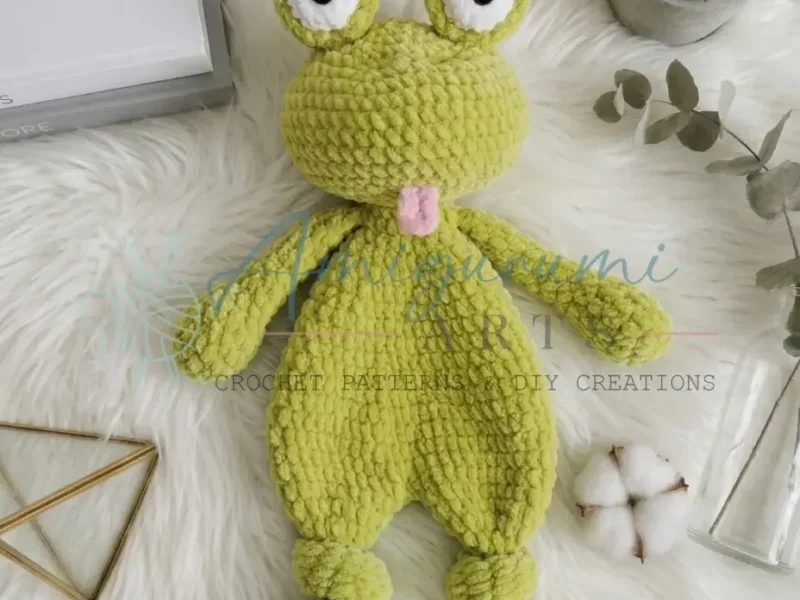
There's something a little cheeky about this one. A frog with velvet skin and a soft chenille tongue sitting right there on its face, no shyness about it. It's a playful make, and I think it knows exactly how cute it is.
Your hands stay busy but never confused here. You're working hdc and sc in continuous spiral rounds, building the arms and legs from a foundation chain oval, then shaping the head up from a simple magic ring. The eye sockets and tongue are quick flat pieces you make on the side and set aside until assembly.
Once it's stuffed and the pieces are joined, this frog sits with real presence on a shelf or a kid's bed. The velvet yarn catches the light in a way that plain worsted never does. It reads as soft and a little bit fancy at the same time.
This pattern is written in US crochet terminology.
Gauge is not critical for this project, but your fabric should be dense enough that stuffing does not show through. If you can see light through your stitches, try going down a hook size.
- Start with both arms, working them in the contrasting sock color from a foundation chain oval.
- Move to the legs, shaping each one from the same kind of foundation oval before closing it down to a narrower base.
- Continue straight from the second leg into the body, working it in one unbroken spiral so there's no seam to join later.
- Build the head separately from a magic ring, increasing outward into a round shape over many rounds.
- Make the small flat pieces on the side: two eye whites, two contrasting eye sockets, and the chenille tongue.
- Stuff the arms, legs, body, and head firmly with fiberfill before closing up any open edges.
- Pin and sew the eye sockets onto the head between the middle rounds, then embroider the nostrils just below them.
- Attach the tongue, arms, and legs to finish, checking everything sits centered before you weave in the last ends.
On the desk
- Yarn (Main Color): YarnArt Dolce, color 799 — Bulky weight velvet yarn
- Yarn (Eye Sockets): YarnArt Dolce, color 741 — contrasting shade
- Yarn (Tongue): Himalaya Dolphin Baby, color 80303 — Bulky weight chenille
Hook
- US H-8 / 5 mm
Safety Eyes
- 12 mm, 2 pieces
Stuffing
- Polyfill / fiberfill
- Stitch Marker
- Yarn Needle / Tapestry Needle
- Scissors
Stitch shorthand
- ch — Chain
- dec — Invisible Decrease (insert hook into front loops of next 2 sts, pull up loop, yarn over, pull through all loops)
- hdc — Half Double Crochet
- inc — Increase (2 hdc in same stitch)
- sc — Single Crochet
- sl st — Slip Stitch
- st / sts — Stitch / Stitches
Velvet frog amigurumi pattern for beginners
Arms (Make 2)
- Round 1
Ch 6. Working along the foundation chain: 4 hdc, 3 hdc in last st; working back along the other side: 3 hdc, 3 hdc in first st. (13)
- Round 2
Inc, 4 hdc, 2 inc, 5 hdc, inc. (17)
- Round 3
17 hdc. (17)
- Round 4
Dec, 6 hdc, dec, 7 hdc. (15)
- Round 5
(1 hdc, dec) × 5. (10)
- Round 6
Dec, 3 hdc, dec, 3 hdc. (8)
- Rounds 7–12
8 hdc. (8) — work 6 rounds total. Work 1 additional hdc to shift your position if needed, then fold the arm flat and join both layers together by working 4 sc through both walls. Do not stuff the arms.
Legs (Make 2)
- Round 1
Ch 9. Working along the foundation chain: 7 hdc, 4 hdc in last st; working back along the other side: 6 hdc, 4 hdc in first st. (21)
- Round 2
Inc, 7 hdc, inc, 1 hdc, inc, 8 hdc, inc, 1 hdc. (25)
- Round 3
25 hdc. (25)
- Round 4
Dec, 8 hdc, 2 dec, 9 hdc, dec. (21)
- Round 5
(1 hdc, dec) × 7. (14)
- Round 6
Dec, 4 hdc, 2 dec, 2 hdc, dec. (10)
- Round 7
Dec, 3 hdc, dec, 3 hdc. (8)
Lightly stuff the foot section now.
- Rounds 8–28
8 hdc. (8) — work 21 rounds total.
- Round 29
8 inc. (16)
- Round 30
(1 hdc, inc) × 7. (24)
Note: Work one extra hdc if needed so that the last stitch of this round lands at the center back of the leg.
- Round 31
24 hdc. (24)On the first leg: fasten off and weave in the end. On the second leg: do not fasten off — continue directly to the body.
Body (Continued from Second Leg)
Joining Round: Sl st to join both legs together. Adjust your stitch position so the join sits at the center between the two legs.
- Round 32
24 hdc across first leg, 1 hdc in the sl st join, 24 hdc across second leg, 1 hdc in the sl st join. (50)
- Round 33
Inc, 11 hdc, inc, 12 hdc, inc, 11 hdc, inc, 12 hdc. (54) Increases fall at each side and at the center front and back.
- Round 34
(8 hdc, inc) × 6. (60)
- Rounds 35–36
60 hdc. (60)
- Round 37
(8 hdc, dec) × 6. (54)
- Round 38
(7 hdc, dec) × 6. (48)
- Round 39
(6 hdc, dec) × 6. (42)
- Rounds 40–41
42 hdc. (42)
- Round 42
(5 hdc, dec) × 6. (36)
- Round 43
(4 hdc, dec) × 6. (30)
- Round 44
30 hdc. (30)
- Round 45
(3 hdc, dec) × 6, then work 5 additional hdc to shift position for arm attachment. (24 + 5 shift sts)
- Round 46
(2 hdc, dec) × 6. (18)
- Round 47
4 hdc, then work 4 hdc simultaneously through body and first arm (holding the arm against the body and inserting your hook through both layers), 6 hdc, then work 4 hdc simultaneously through body and second arm, end of round. (18)
- Round 48
18 hdc, then work 2 additional hdc, sl st to close. (18)Fasten off, leaving a long yarn tail for sewing the head.
Head
- Round 1
Magic Ring, 6 sc into ring, pull ring closed. (6)
- Round 2
6 inc. (12)
- Round 3
(1 sc, inc) × 6. (18)
- Round 4
(2 sc, inc) × 6. (24)
- Round 5
(3 sc, inc) × 6. (30)
- Round 6
(4 sc, inc) × 6. (36)
- Round 7
(5 sc, inc) × 6. (42)
- Round 8
(6 sc, inc) × 6. (48)
- Round 9
(7 sc, inc) × 6. (54)
- Rounds 10–14
54 sc. (54)
- Round 15
9 sc, (1 sc, dec) × 3, 18 sc, (1 sc, dec) × 3, 9 sc. (48)
- Round 16
(6 sc, dec) × 6. (42)
- Round 17
(5 sc, dec) × 6. (36)
- Round 18
(4 sc, dec) × 6. (30)
- Round 19
(3 sc, dec) × 6. (24)
- Round 20
(2 sc, dec) × 6. (18)
- Round 21
(1 sc, dec) × 6. (12)
- Round 22
6 dec. (6)Pull the opening closed with your yarn tail, fasten off, and weave in the end.
Eye Whites (Make 2)
- Round 1
Magic Ring, 6 sc into ring, pull ring closed. (6)
- Round 2
6 inc. (12)
- Round 3
(1 sc, inc) × 6. (18)Fasten off and cut yarn. Insert a 12 mm safety eye through the center of each eye white and secure the backing.
Eye Sockets (Make 2)
Work in the contrasting color (Dolce 741).
- Round 1
Magic Ring, 6 sc into ring, pull ring closed. (6)
- Round 2
6 inc. (12)
- Round 3
(1 sc, inc) × 6. (18)
- Rounds 4–6
18 sc. (18)Place the assembled eye white (with safety eye) inside the socket, then join the socket and white together by working 18 sc through both layers simultaneously, closing them as one unit.
Tongue
Work in Himalaya Dolphin Baby.
- Round 1
Ch 5. Working along both sides of the foundation chain: 3 sc, 3 sc in last st, 3 sc back along the other side. Fasten off, leaving a yarn tail for sewing.
Where it goes
- A nursery or playroom shelf piece that pairs well with other soft-bodied animal amigurumi for a mixed display.
- A thoughtful handmade gift for a frog lover, especially paired with a small knit blanket or a storybook.
- A tactile sensory toy for a toddler, since the velvet body and chenille tongue give two different textures to touch.
- A photo prop for craft fairs or shop displays, where the velvet finish photographs richer than standard worsted yarn.
Color ideas
- Classic garden frog Main color 799 covers the arms' base rounds, the legs, the body, and the entire head, while contrasting color 741 is reserved just for the eye sockets and the first round of the arms before the main color takes over.
- Two-tone contrast pop Keep the body, legs, and head in main color 799, but let the contrasting 741 carry both eye sockets and continue into the full arm rounds for a bolder two-color split between limbs and torso.
Care
Hand wash the finished frog in cool water since both the velvet main yarn and the chenille tongue can mat or shed if machine washed.
Reshape the pieces gently while damp and lay the frog flat to air dry, as heat from a dryer can flatten the velvet pile permanently.
Store it stuffed and upright rather than folded, so the velvet texture on the arms and legs doesn't get pressed down in storage.
Assembly
- Step 1 Attach the eye sockets to the head. Pin them in position between Rounds 3 and 6 of the head, centered on the face. Sew in place using the yarn tail and a yarn needle, working around the full outer edge of each socket.
- Step 2 Embroider the nostrils between Rounds 6 and 7 of the head, centered between the two eyes, spacing them 3 stitches apart. Use a length of main color yarn and your needle to create two small vertical stitches, then pull gently to create a subtle indent.
- Step 3 Attach the tongue by sewing it to the head between Rounds 18 and 19, centered below the nose. Use the yarn tail and secure it firmly so the tongue sits flat and slightly forward.
- Step 4 Stuff the head firmly and evenly, shaping it as you go.
- Step 5 Sew the head to the body using the long yarn tail left at the top of the body. Align the center of the face with the center front of the body and sew all the way around the base of the head, adding extra stuffing to the neck area if needed before closing completely.
- Step 6 Weave in all remaining ends.
Easy to get wrong
Losing the spiral between legs and body
Keep a stitch marker in the first stitch of each round so you can tell exactly where the body continues from the second leg without a jump or a gap.
Overstuffing the flat eye sockets
The eye sockets and tongue are meant to lie flat, so stuff them lightly or not at all before sewing them down, or they will bulge instead of sitting smooth against the head.
Placing nostrils too far from center
Embroider the two nostril stitches only after both eye sockets are pinned in place between rounds 3 and 6, so you can center them evenly and keep the 3-stitch spacing accurate.
Loose stitches in the foundation ovals
Velvet and chenille yarn are wonderfully forgiving in texture, but loose stitches around the oval foundation rows of the paws can create gaps. Work each stitch with a firm, controlled pull to keep your tension snug throughout.
Rushing the Round 47 arm join
Sewing the arms through the body rounds is the trickiest moment in this pattern. Pin each arm in place with a stitch marker at Round 47 before you begin working through both layers, and go slowly.
Between the songs
- The velvet yarn is the whole draw for me. Dolce has that brushed, fuzzy surface that makes a plain hdc round look plush and finished, with no extra texture work required on your part. I love that the body grows straight out of the legs in one continuous spiral, so you skip a seam most amigurumi makers have to sew. The contrast-color eye sockets and the chenille tongue are small, fast flat pieces, which means the detail work feels like a reward rather than a slog. By the time you're embroidering nostrils and setting the eyes between those middle head rounds, the frog already has its personality. That's the satisfying part: watching a blob become a face.
Listener questions
Why does the body attach directly to the legs instead of being sewn on?
The pattern works the body in continuous spiral rounds straight off the second leg, so there's no seam between legs and torso. It saves a sewing step and keeps the join invisible.
Do I need two different yarn brands for this project?
Yes, the body and eye sockets use the velvet Dolce yarn in two colors, while the tongue uses a separate chenille baby yarn for a softer, different texture. The contrast is part of the design.
What size safety eyes does this pattern call for?
The materials list calls for 12 mm safety eyes, two pieces total, to be set into the contrasting eye sockets. Pin them before sewing the sockets down so placement stays even.
Is this frog a good first amigurumi project?
It's approachable if you've made at least one amigurumi before, since the spiral shaping and increase and decrease patterns move quickly. A total beginner might find the continuous body-to-leg join a bit much at first.
Original pattern: https://amigurumiarts.com/velvet-yarn-amigurumi-frog-free-crochet-pattern/
About the Author

Marisol QuinteroWho runs Crochet Obsessed, why a stitch count sits at the end of every round, how a pattern gets written here, and the things this site will never do.
More Patterns
- IntermediateNo. 01

Rose Granny Square Tote Crochet Pattern
Rose granny square tote crochet pattern made from 18 dimensional rose squares for a sturdy, romantic everyday bag.
- IntermediateNo. 02
Tropical octopus baby blanket crochet pattern with appliqués
Tropical octopus baby blanket crochet pattern: a cream filet base with coral and turquoise octopus appliqués, leaves, and…
- IntermediateNo. 03
Sunny lemon couple amigurumi crochet pattern
Sunny lemon couple amigurumi crochet pattern with embroidered slices and safety eyes for a cheerful handmade shelf pair.


