- LevelIntermediate
- Time15-20 hours
- Hook4.0 mm
- YarnWorsted
About This Pattern
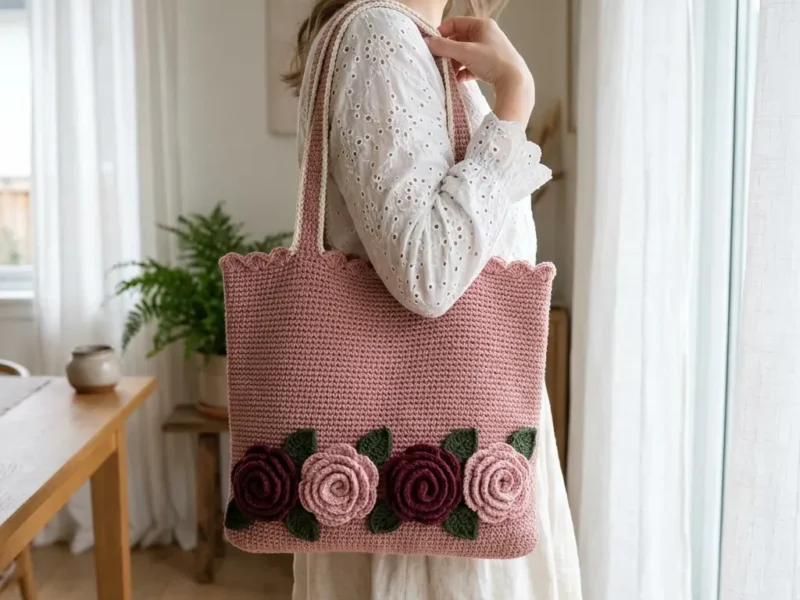
This one has a soft, romantic hum to it, like a radio ballad instead of a pop single. Eighteen little roses, each one its own small bloom, add up to something that feels handmade in the best way. There's nothing rushed about this bag, and that's exactly the point.
Your hands get a rhythm here: curl a rose, build a square, set it down, pick up the next one. You're working in rounds the whole time, which means your fingers learn the pattern of the stitches before your brain catches up. It's repetitive in the most satisfying sense, not a slog.
Picture this tote on a hook by the door, lilac squares catching the light, the rose centers giving it real dimension. It holds its shape on a chair back or a shelf just as well as it does on your arm. It's a piece that looks intentional in any room, not just useful in one.
The finished tote measures approximately 34 x 38 cm (13.4 x 15 inches) with a 24 cm strap drop. Gauge is 17 stitches x 11 rows = 10 x 10 cm (4 x 4 inches) in double crochet, and each finished granny square should measure about 11.5 cm (4 1/2 inches) square after blocking - always make a gauge swatch first so your finished bag matches the intended size. This pattern is rated intermediate and takes roughly 15 to 20 hours to complete, which the modular motifs make easy to fit into spare moments.
- Crochet eighteen dimensional roses first, working each one from the center outward in layered petal rounds.
- Build eighteen solid lilac granny squares separately, keeping every side's stitch count consistent for easy joining later.
- Sew each finished rose onto the center of its own granny square using the long fastening-off tail.
- Arrange and join the squares into two matching panels before working on the edges.
- Crochet the scalloped top edge along each panel using shells of double crochet for a pretty finish.
- Seam the two panels together along the sides and bottom to form the tote body.
- Make two straps separately and attach them for a comfortable drop.
- Weave in every tail from the roses and squares for a clean, finished interior.
On the desk
- You’ll need 100% cotton yarn in worsted/aran weight (#4) . Here’s the breakdown by colour:
- Colour Use Yards Metres
- A: Lilac Squares, edge, straps ~600 ~549
- B: Blush Outer rose petals ~160 ~146
- C: Rose Rose centres ~120 ~110
- D: Sage Leaves (Colorway B only) ~60 ~55
- These estimates include a small buffer. If you’re making Colorway A, you can skip colour D entirely. I’d recommend buying one extra ball of the lilac main colour just to be safe. Dye lots vary, and running out partway through is frustrating.
- Lion Brand 24/7 Cotton is mercerized with crisp stitch definition that makes the rose petals really pop. Best choice for a polished, professional look.
- Paintbox Yarns Cotton Aran offers a huge colour range, making it easy to match lilac, blush, rose, and sage. It’s also budget-friendly.
- Bernat Handicrafter or Lily Sugar’n Cream gives you a matte, sturdy finish that’s widely available. This creates a cosier, more rustic aesthetic.
- Any smooth #4 worsted/aran 100% cotton that meets gauge will work. Mercerized cotton shows the 3D petals best. A cotton-acrylic blend makes a lighter, softer bag but holds shape less crisply. Consider adding a fabric lining if you want more structure with blended yarn.
Hook
- 4.0 mm (US G/6). Keep a smaller hook handy for tight rose centres if you crochet loosely.
Optional
- fabric for lining
Tools
- Tapestry needle for seaming and weaving ends
- Scissors
- Stitch markers
Stitch shorthand
- ch — chain
- sl st — slip stitch
- sc — single crochet (insert hook, yarn over, pull through, yarn over, pull through both loops)
- hdc — half double crochet
- dc — double crochet (yarn over, insert hook, pull through, yarn over, pull through two loops twice)
- st(s) — stitch(es)
- sp — space
- lp(s) — loop(s)
- MR — magic ring
- BLO — back loop only
- RS/WS — right side/wrong side
- rep — repeat
- ( ) — work instructions in same stitch or space
- * * — repeat section as directed
- Layered petals — Each rose is built in graduated petal layers. After completing a petal round, you fold the petals forward and work the next loop round into the posts of an earlier round, sitting behind the petals. This creates that beautiful dimensional effect.
- Magic ring (MR) — Used to start each rose. This technique keeps the centre hole closed tight. If you’re not familiar with the magic ring, there are many video tutorials available online.
- Whip-stitch join — Seams are worked with a tapestry needle through the outer loops of two pieces held together. This creates a neat, nearly invisible join.
- Left-handed crocheters — Everything in this pattern works left-handed. Simply reverse the direction of each round by working right-to-left instead of left-to-right. Read "clockwise" as "counter-clockwise." All stitch counts, layers, and assembly instructions remain identical. A helpful tip: hold a small mirror beside any photo and the orientation will match your hands.
Rose Granny Square Tote Crochet Pattern
Part 1: The 3D Layered Rose
Make 18 roses total, one for each square. The rose is worked from the centre outward in three petal layers, then sewn to a square later. Leave a long tail when you fasten off.
For Colorway A: Work Rounds 1-4 in C (Rose), then Rounds 5-7 in B (Blush).
For Colorway B: Work the entire rose in B (Blush). You can add a rose-coloured centre if you prefer.
- Round 1
With first colour, MR; ch 1, 6 sc into ring; join with sl st to first sc. Pull ring closed. *(6 sc)*
- Round 2
Ch 1, sc in same st, ch 3; \*sc in next sc, ch 3; rep from \* around; join to first sc. *(6 sc, 6 ch-3 loops)*
- Round 3
In each ch-3 loop work (sc, hdc, 3 dc, hdc, sc); sl st to first sc. *(6 small petals)*
- Round 4
Ch 1. Working behind the Round 3 petals, \*sc around the post of the next Round 2 sc, ch 4; rep from \* around; join. *(6 ch-4 loops)*
- Round 5
(Change to B for Colorway A.) In each ch-4 loop work (sc, hdc, 5 dc, hdc, sc); sl st to first sc. *(6 medium petals)*
- Round 6
Ch 1. Working behind the Round 5 petals, \*sc around the post of the next Round 4 sc, ch 5; rep from \* around; join. *(6 ch-5 loops)*
- Round 7
In each ch-5 loop work (sc, hdc, 7 dc, hdc, sc); sl st to first sc. Fasten off, leaving a 30 cm (12 inch) tail. *(6 large petals, 18 petals total)* Pro tip: Keep the "behind" rounds (Rounds 4 and 6) a touch tight so the petals cup forward and stay raised. A light steam block after finishing opens the layers beautifully.
Part 2: The Sage Leaf (Colorway B Only)
Make 2 leaves per square (36 total) for the leafy version. Skip this section entirely for Colorway A.
Leaf: With D (Sage), ch 7.
- Pass 1
Starting in 2nd ch from hook: sc, hdc, dc, dc, hdc; then (sc, ch 1, sc) in last ch for the tip.
- Pass 2
Continue along the opposite side of the foundation chain: hdc, dc, dc, hdc, sc; sl st to base. Fasten off, leaving a tail. *(one pointed leaf approximately 4 cm long)*
Part 3: The Lilac Granny Square
Make 18 squares with A (Lilac). This is a solid granny square with double crochet in every stitch, creating a sturdy, smooth tote fabric.
- Round 1
MR; ch 3 (counts as first dc), 2 dc in ring, ch 2; \*3 dc in ring, ch 2; rep from \* twice; join to top of ch 3. *(12 dc, 4 corner spaces, 3 dc each side)*
- Round 2
Sl st to a corner ch-2 space; ch 3, (2 dc, ch 2, 3 dc) in same space; \*dc in each of next 3 dc, (3 dc, ch 2, 3 dc) in next corner space; rep from \* twice; dc in last 3 dc; join. *(9 dc per side including corners)*
- Round 3
Sl st to a corner space; ch 3, (2 dc, ch 2, 3 dc) in same space; \*dc in each dc to next corner, (3 dc, ch 2, 3 dc) in corner space; rep from \* around; dc in remaining dc; join. *(15 dc per side)*
- Round 4
Repeat Round 3. Fasten off. *(approximately 21 dc per side, square measures approximately 11.5 cm / 4½ inches)* Sizing note: Work more or fewer rounds to hit the 11.5 cm measurement at your tension. The corner is always (3 dc, ch 2, 3 dc) and the sides are always 1 dc in each dc. Note your final per-side stitch count because you’ll match it when joining.
Part 5: Scalloped Top Edge
Work this along the top edge of each panel before joining the panels together. Count your top-edge stitches first. The repeat uses multiples of 6, so add or skip a stitch at the ends to fit.
- Row 1
Join A (Lilac) to the top-right corner of a panel; sc evenly across the top edge. Turn.
- Row 2
Ch 1, sc in first st; \*skip 2 sts, 5 dc in next st, skip 2 sts, sc in next st; rep from \* across. Fasten off. *(one shell equals one scallop)* Repeat for the second panel.
Part 6: The Straps (Make 2)
These firm ribbed straps are worked in back loops for nice texture. The length creates a 24 cm (9.4 inch) drop.
Set-up: With A (Lilac), ch 8.
- Row 1
Hdc in 3rd ch from hook and in each ch across. Turn. *(6 hdc, approximately 4 cm wide)*
- Row 2+
Ch 2, hdc in BLO of each st across. Turn. Repeat Row 2 until the strap measures 54 cm (21¼ inches). Fasten off, leaving a long tail.
Want a longer drop? Add approximately 5 cm of strap length for every extra 2.5 cm of drop you’d like. For a crossbody feel, lengthen to 70-80 cm.
Where it goes
- An everyday market tote that carries groceries or a change of clothes without losing its shape.
- A project bag for carrying a current crochet work-in-progress along with hooks and spare yarn.
- A statement handbag for a daytime outing, paired with simple denim so the rose squares stand out.
- A gift bag for someone who loves textured, handmade accessories over mass-produced ones.
Color ideas
- Antique Rose (Colorway A) Lilac (A) for all granny squares, the edge, and the straps; deeper Rose (C) for the first rounds of each rose center; soft Blush (B) for the outer petal rounds; no leaves worked.
- Blush & Sage (Colorway B) Lilac (A) for squares, edge, and straps; the entire rose worked in Blush (B) from center to outer petals; two Sage (D) leaves tucked under each rose for a garden-inspired accent.
Care
Hand wash the finished tote in cool water since it's worked entirely in 100% cotton, which holds color but can shrink slightly in heat.
Lay it flat to dry rather than hanging it, so the weight of a damp bag doesn't pull the granny square panels out of shape.
Reshape the squares and rose petals gently with your fingers while still damp, then store the tote stuffed with tissue paper to hold its form.
Assembly
- Colour Placement Quick Reference: Part Colorway A Colorway B
- Squares, edge, straps A: Lilac A: Lilac
- Rose centres C: Rose B: Blush
- Rose outer petals B: Blush B: Blush
- Leaves None D: Sage (×2)
Easy to get wrong
Rose curls flat instead of dimensional
Keep your tension a little looser on the petal rounds so each layer has room to fold forward over the last. If your roses still lie flat, try a smaller hook only for the tight center rounds.
Granny square corners drift off-count
Always work the corner as three dc, chain two, three dc, and count your per-side dc before moving to the next round. Note your final side count once all four squares reach the target size so every square matches when you join them.
Scalloped edge shells land unevenly
Count your top-edge stitches before starting Row 2, since the shell repeat works in multiples of six. Add or skip a single stitch at the panel ends rather than mid-row so the scallops stay balanced.
Between the songs
- What makes this one satisfying is the layered construction of the 3D rose, where each petal round sits on top of the last and curls forward instead of lying flat. You're not just making a flower, you're sculpting one in rounds of single and double crochet with contrast colors doing real work. Pair that with the solid granny square, dc in every stitch, no gaps, and you get fabric sturdy enough to carry things. The scalloped top edge is the finishing flourish, five double crochet shells that turn a plain seam into something pretty. Eighteen small, repeatable projects inside one big one means you always know exactly where you left off.
Listener questions
Can I mix the two colorways on the same tote?
Yes, nothing stops you from working some squares in the Antique Rose colors and others in Blush & Sage. Just keep in mind the leaves only belong to Colorway B, so plan which squares get them before you start.
Do I need to finish all eighteen roses before starting the squares?
No, the pattern is modular, so you can crochet a rose, then its square, then move to the next pair. Many people prefer batching all eighteen roses first since the rhythm of the petal rounds gets faster with repetition.
What if my granny squares come out a different size than stated?
Work more or fewer rounds until your square reaches the target measurement at your own tension, since the corner and side stitch pattern stays the same throughout. Just note your final per-side stitch count so all eighteen squares join up evenly.
Is a cotton-acrylic blend yarn a problem for this pattern?
A blend will make the bag lighter and softer but the granny squares won't hold their shape as crisply as with pure cotton. If you go that route, consider adding a fabric lining for extra structure.
Why does the materials list mention keeping a smaller hook on hand?
The rose centers are worked tightly to keep the first rounds compact, and loose crocheters sometimes need to drop down a hook size there. It's just for those first few rounds of the rose, not the whole project.
Original pattern: https://bunnypatterns.com/lavender-rose-granny-square-tote-free-crochet-pattern/
About the Author

Marisol QuinteroWho runs Crochet Obsessed, why a stitch count sits at the end of every round, how a pattern gets written here, and the things this site will never do.
More Patterns
- IntermediateNo. 01

Tropical octopus baby blanket crochet pattern with appliqués
Tropical octopus baby blanket crochet pattern: a cream filet base with coral and turquoise octopus appliqués, leaves, and…
- IntermediateNo. 02
Sunny lemon couple amigurumi crochet pattern
Sunny lemon couple amigurumi crochet pattern with embroidered slices and safety eyes for a cheerful handmade shelf pair.
- IntermediateNo. 03
Rose applique tote bag crochet pattern for market days
Rose applique tote bag crochet pattern using single crochet, coiled roses and a scallop edge for a soft,…