- LevelIntermediate
- Time4-6 hours
- Hook4.0 mm
- YarnWorsted
About This Pattern
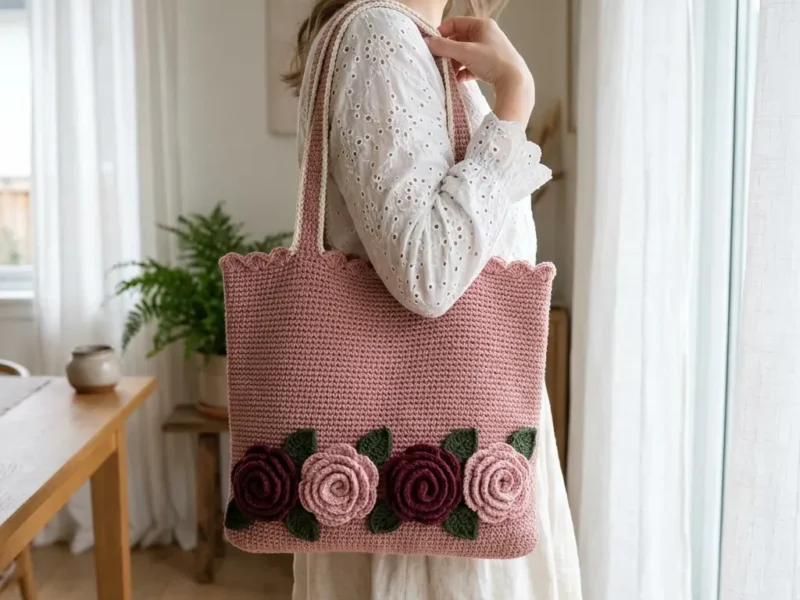
There is something unhurried about this one, like a Sunday morning errand instead of a rush. The blush and burgundy roses sit quiet on a soft pink body, nothing shouting for attention. It is the kind of piece you make while half listening to a podcast, satisfied without being showy.
Your hands mostly just move single crochet, row after row, round after round, which frees up your brain for everything else. The real engagement comes later, coiling the rose strips and angling the leaves into their V shape. It asks for patience in the body and a light touch in the finishing.
Set it on a kitchen chair or hang it by the door and it reads like something you found, not something you made in an evening of television. The scallop edge catches light along the opening, and the roses give it a hand-finished softness. It belongs anywhere a canvas tote feels too plain.
- Start with a flat single crochet rectangle that becomes the bottom panel of the bag.
- Pick up stitches around all four edges of that panel in one continuous round, no turning from here on.
- Build the bag body upward in single crochet rounds without any further shaping.
- Finish the top opening with a scallop edge made from clusters of double crochet separated by slip stitches.
- Crochet two flat strips in Handle Color, fold them into thirds, and whipstitch them into firm ropes.
- Make the coiled rose strips and simple leaves as separate small pieces.
- Pin the roses and leaves onto the front panel in a V arrangement before sewing anything down.
- Attach the handles and sew the embellishments in place to finish the bag.
On the desk
Yarn (Worsted Weight Cotton, Weight 4)
- Main Color (MC): Dusty rose or blush pink, approximately 650 yards
- Color A (CA): Deep burgundy or wine, approximately 60 yards
- Color B (CB): Light dusty rose or pale blush, approximately 60 yards
- Color C (CC): Forest green, approximately 45 yards
- Handle Color (HC): Natural or off white cream, approximately 120 yards
Recommended Yarn Options
- Lion Brand 24/7 Cotton works beautifully for this project. The mercerized finish creates a polished, firm fabric. Drops Paris is another excellent choice and comes in a wonderful color range. Any worsted weight cotton that achieves gauge will work well.
Hooks
- US Size G-6 (4.0 mm) for the body and appliques
- US Size H-8 (5.0 mm) optional for handles if you prefer a different texture
Notions
- At least 4 stitch markers
- Tapestry needle
- Scissors
- Blocking mat and rust proof pins
Optional
- bag insert or cardboard base cut to 4 x 14 inches for extra structure
Stitch shorthand
- ch — chain
- sc — single crochet
- hdc — half double crochet
- dc — double crochet
- sl st — slip stitch
- sc2tog — single crochet two together (a decrease that joins two stitches into one)
- st(s) — stitch(es)
- rnd — round
- RS — right side
- WS — wrong side
- rep — repeat
- sk — skip
- MC — Main Color (dusty rose)
- CA — Color A (burgundy)
- CB — Color B (pale rose)
- CC — Color C (forest green)
- HC — Handle Color (cream)
Rose applique tote bag crochet pattern for market days
Section 1: Bottom Panel
The bottom panel is worked flat in rows. It measures 14 inches wide by 4 inches deep when finished.
With MC and your G-6 hook, chain 64.
- Round 1
(RS): Sc in second ch from hook and in each ch to end. Turn. (63 sc)
- Round 2
through 22: Ch 1, sc in each st across. Turn. (63 sc each row) After Row 22, your panel should measure approximately 4 inches tall and 14 inches wide. Do not fasten off. You will continue directly into the perimeter round.
Section 2: Picking Up Stitches Around the Bottom Panel
Now you will work one round of sc around all four sides of your bottom panel. This creates the foundation for the bag body. From this point forward, you work in continuous rounds with no turning.
- Round 1(182)
Pick Up Round Do not turn. Working along the top edge of Row 22, ch 1, work 63 sc evenly across. At the corner, work 3 sc in the corner stitch. Rotate 90 degrees and work 1 sc in each of the 22 row ends along the short right edge. (22 sc) Work 3 sc in the corner. Work 63 sc along the bottom of the foundation chain, picking up in the unused loops. Work 3 sc in the corner. Work 22 sc along the remaining short left edge. Work 3 sc in the final corner. Place a stitch marker in the first stitch. Do NOT join. (182 sc total)Checkpoint: Count your stitches. You should have exactly 182. The math: 63 + 3 + 22 + 3 + 63 + 3 + 22 + 3 = 182.
Section 5: Handles (Make 2)
Each handle is worked as a flat strip, then folded and seamed into a firm rope.
With HC and your G-6 hook, chain 10.
- Round 1
Sc in second ch from hook and in each ch across. Turn. (9 sc)
- Round 2
through 90: Ch 1, sc in each sc across. Turn. (9 sc each row) Your strip measures approximately 16.5 inches long. Fasten off, leaving a 24 inch tail.Fold the strip in thirds lengthwise. Using your tapestry needle and the long tail, whipstitch the seam closed. Your finished handle will be firm and approximately 0.7 inches wide.
Make 2 handles.
Handle Attachment: Position each handle so the inner edges are approximately 3 inches from each side seam. The handles should overlap the top edge by about 2 inches before the scallop edging. Sew each handle end to the inside of the bag securely, stitching a rectangle pattern then an X across it for maximum strength.
Section 3: Bag Body (Worked in the Round)
You will now work 66 rounds of sc in a continuous spiral. The first 5 rounds include corner decreases to create the structured rectangular shape.
- Round 2
Sc in each sc around, working sc2tog over each center corner stitch and the stitch immediately before it. You will make 4 decreases total. (178 sc)
- Round 3
Sc in each sc around, working sc2tog at each of the 4 corner positions. (174 sc)
- Round 4
Sc in each sc around, working sc2tog at each of the 4 corner positions. (170 sc)
- Round 5
Sc in each sc around, working sc2tog at each of the 4 corner positions. (166 sc)
- Round 6
Sc in each sc around, working sc2tog at each of the 4 corner positions. (162 sc)
Corner shaping is now complete. Place additional stitch markers at each corner to help track the four sides.
- Round 7(162)
through 72: Sc in each sc around. No increases or decreases. (162 sc each round)
This is 66 rounds of plain single crochet. Put on a podcast or audiobook and enjoy the repetitive rhythm. At your gauge, these rounds create approximately 12 inches of body height.
Checkpoint: Your bag body should measure approximately 12 inches from the bottom panel to the top edge.
Section 4: Scallop Edging
- Round 73
(Scallop Round): With MC continuing from Round 72, sl st in next st to anchor. Work 5 dc in the same st. Skip next 2 sts. Sl st in next st. Skip next 2 sts. Repeat (work 5 dc in next st, skip 2, sl st in next st, skip 2) 26 more times until all 162 sts are used. Join with sl st to the first sl st of the round. (27 scallops)Fasten off and weave in ends.
Section 6: Roses (Make 4)
Follow the Crochet Rose instructions above. Make 2 in CA (burgundy) and 2 in CB (pale rose). Leave 12 inch tails for sewing.
Section 7: Leaves (Make 8)
Follow the Crochet Leaf instructions above with CC. Leave 10 inch tails for sewing.
Where it goes
- A farmers market bag that holds produce without sagging, thanks to the sturdy single crochet body.
- An everyday carryall for library books or knitting projects, paired with a canvas jacket or denim.
- A gift tote for someone who loves flowers, filled with seed packets or garden gloves.
- A bedroom or entryway catch-all for scarves and gloves, hung by its handles near the door.
Color ideas
- Classic rose garden Dusty rose Main Color for the bottom panel and bag body, burgundy Color A and pale blush Color B alternating across the four roses, forest green Color C for all the leaves, and natural cream Handle Color for both handles.
- Soft tonal blush Keep the bag body in Main Color dusty rose, work every rose in pale blush Color B only, skip the burgundy entirely, and let the forest green leaves and cream handles stay as the only contrast.
Care
Hand wash in cool water since this bag is worked entirely in cotton, and lay it flat to dry so the handles do not stretch under wet weight.
Reshape the bag while damp, patting the bottom panel flat and smoothing the scallop edging with your fingers before it dries completely.
Store it stuffed with tissue paper or a folded towel to help it hold its shape, away from direct sun so the dusty rose and burgundy stay true.
Assembly
- Step 1 Lay your blocked bag flat with the front panel facing up.
- Step 2 Rose and Leaf Placement:
- Step 3 The four roses sit in a horizontal row approximately 2.5 inches above the base of the bag. Center them on the front panel. Arrange from left to right: CA rose, CB rose, CA rose, CB rose. Space them about 0.5 inches apart.
- Step 4 For each rose, position 2 leaves beneath and slightly to either side, angling them outward in a V shape. Pin everything before sewing.
- Step 5 Use your tapestry needle and the long tails to sew each piece securely. Pull tails to the inside and weave in firmly.
- Step 6 Blocking:
- Step 7 Wet blocking is highly recommended for cotton. Submerge the bag in cool water, gently press out excess water with a towel, and stuff with plastic bags or a rolled towel to hold its shape. Pin out the scallop edging to open the shells. Allow 24 to 48 hours to dry completely.
- Step 8 Block your roses and leaves flat before attaching.
- Step 9 Optional Base Insert:
- Step 10 Cut a piece of cardboard or plastic canvas to 3.75 x 13.5 inches. Wrap in fabric if desired and insert into the base for extra structure.
Easy to get wrong
Losing the stitch count at corners
When you pick up stitches around the bottom panel, pause at each corner and confirm you worked the 3 sc increase there. Use a stitch marker right after the first stitch so you always know where your round starts.
Uneven scallop peaks along the opening
Check that your total stitch count divides evenly by 6 before you start the scallop edging round. If a scallop looks flatter than the rest, recount the skipped stitches on either side of that peak.
Roses that uncoil after sewing
Pin the coiled rose strip in several spots before you stitch, not just at the center, so the spiral cannot loosen while you sew. Tack through multiple layers of the coil, not only the outer edge.
Between the songs
- What I love here is how the single crochet body stays completely calm so the embellishments can do the talking. You are not juggling colorwork or cables, just building a sturdy fabric in Main Color while your focus sits ready for later. Then the roses arrive, flat coiled strips that twist into something that looks far more technical than it is. The scallop edging along the top opening is the other quiet win, five double crochets clustered into each peak with slip stitches anchoring the gaps between. Picking up stitches around that bottom panel to turn a flat rectangle into a bag worked in continuous rounds feels like the moment the project clicks into shape. It is a small set of real skills, repeated with confidence.
Listener questions
Can I use a different worsted weight cotton than the ones listed?
Yes, any worsted weight cotton that achieves gauge will work well. The mercerized cotton options give a firmer, more polished fabric, but a softer cotton blend will still hold up fine.
Do I need the cardboard base insert?
It is listed as an option for extra structure, not a requirement. If you want the bag to hold its shape when loaded with books or produce, cutting a base to fit the bottom panel helps a lot.
Can I place the roses differently than the pattern suggests?
Absolutely, the horizontal row of four roses in alternating colors is just the suggested layout. Since the roses and leaves are separate pieces, you can pin them wherever suits your panel before committing to the sewing.
Original pattern: https://crochr.com/rose-romance-tote-bag-free-crochet-pattern/
About the Author

Marisol QuinteroWho runs Crochet Obsessed, why a stitch count sits at the end of every round, how a pattern gets written here, and the things this site will never do.
More Patterns
- IntermediateNo. 01

Rose Granny Square Tote Crochet Pattern
Rose granny square tote crochet pattern made from 18 dimensional rose squares for a sturdy, romantic everyday bag.
- IntermediateNo. 02
Tropical octopus baby blanket crochet pattern with appliqués
Tropical octopus baby blanket crochet pattern: a cream filet base with coral and turquoise octopus appliqués, leaves, and…
- IntermediateNo. 03
Sunny lemon couple amigurumi crochet pattern
Sunny lemon couple amigurumi crochet pattern with embroidered slices and safety eyes for a cheerful handmade shelf pair.


