- LevelIntermediate
- Time4-6 Hours
- Hook7 mm
- YarnSuper Bulky (6)
About This Pattern
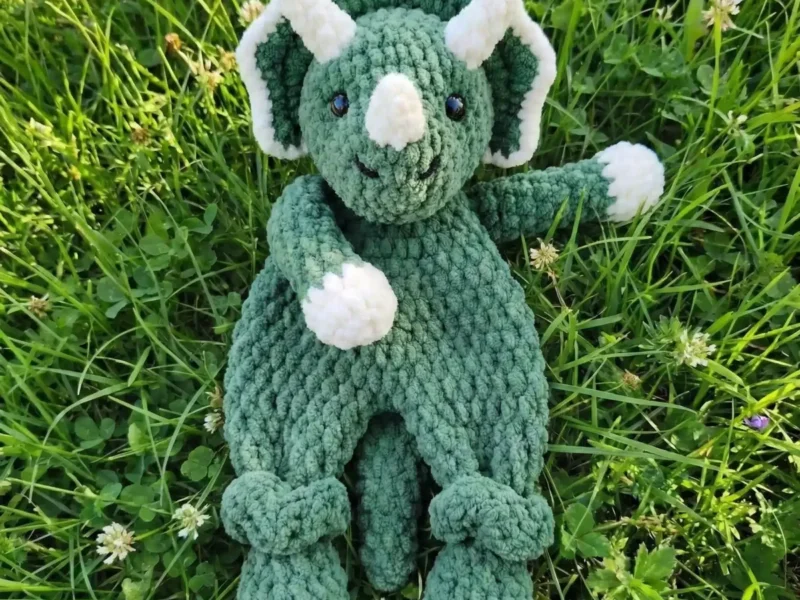
This triceratops crochet lovey combines a huggable stuffed head with a soft, unstuffed blanket body, creating the ultimate comfort companion for babies and toddlers. What makes this design so special is the way the dimensional frill and pair of little horns instantly read as 'dinosaur' while keeping every shape simple enough for a confident beginner. It's the perfect project for anyone who wants to make a meaningful handmade gift for a new baby, a dino-obsessed toddler, or a nursery shelf that needs more personality.
You'll work primarily in continuous spiral rounds using chenille or velvet yarn, which means no slip stitches or turning chains to fuss over on the head, frill, and horns. The lovey body legs and tail add a little more shaping practice with increases and decreases, but nothing beyond an advanced beginner or intermediate crocheter can handle. Expect to spend roughly 4-6 hours total, split comfortably across a couple of relaxed evenings or one focused weekend session.
The finished piece measures approximately 40 cm (15.7 inches) long, with a plush stuffed head balanced by a flat, cuddle-friendly body that lies smoothly across a stroller or crib. The chenille yarn gives it an irresistibly soft, velvety texture that feels wonderful against baby skin. Because it's both a toy and a blanket in one, it makes a thoughtful, huggable gift that toddlers will want to carry everywhere.
- Crochet the rounded triceratops head first, shaping it with increases before it's ready for stuffing.
- Add the small horns and layered frill pieces separately, since these attach onto the head later.
- Position and secure the 18mm safety eyes partway through the head rounds, before the top closes up.
- Stuff the head firmly for a huggable, structured shape while keeping it soft enough to cuddle.
- Work the flat lovey body and legs without any stuffing so it drapes like a real blanket.
- Crochet the pair of arms and the tail as their own small pieces to attach during assembly.
- Join the legs together to form the base of the lovey body, connecting it to the head.
- Sew all the small parts — frill, horns, arms, and tail — onto the assembled body to finish.
Materials
Yarn
- Alize Velluto (100g/68m) or similar chenille/velvet yarn in Main Color (Dinosaur Green): approximately 80g
- Accent Color (Cream/White): approximately 15g
- Horn Color (Brown/Gray): approximately 5g
Alternative Yarn Options
- Bernat Blanket
- Premier Parfait XL
- Premier Basix Chenille
- Any super bulky (weight 6) chenille yarn
Other Supplies
- 7 mm crochet hook
- 18 mm black safety eyes
- Toy stuffing (fiberfill)
- Tapestry needle
- Scissors
- Stitch markers
- Sewing pins
Finished Size
- Approximately 40 cm (15.7 inches)
Skill Level
- Beginner to Intermediate
Crochet Abbreviations
- MR
- Magic Ring
- Ch
- Chain Stitch
- Sc
- Single Crochet
- Hdc
- Half Double Crochet
- Dc
- Double Crochet
- Inc
- Increase (2 stitches in one stitch)
- Dec
- Decrease (crochet 2 stitches together)
- BLO
- Back Loop Only
- FLO
- Front Loop Only
- BL
- Both Loops
Triceratops Crochet Lovey Pattern – Dinosaur Baby Blanket Tutorial
Triceratops Head Instructions
Start at the front of the head and finish at the back, using your main color (dinosaur green) yarn throughout.
- Round 1
sc 8 into a MR
- Round 2
inc x 8
- Round 3
(sc 1, inc) x 8
- Round 4-6
sc around (3 rounds)
- Round 7
sc 6, (sc 1, inc) x 6, sc 6
- Round 8
sc 9, (sc 1, inc) x 6, sc 9
- Round 9-12
sc around (4 rounds)
- Round 13
sc 7 into BL, sc 22 into BLO, sc 7 into BL ★ Mark first and last FLO stitch with stitch markers – these will be used for the headpiece (frill)
- Round 14
(sc 4, dec) x 6
- Round 15
(sc 3, dec) x 6
- Round 16
(sc 2, dec) x 6
Triceratops Headpiece (Frill)
The frill is the distinctive collar-like feature behind a Triceratops head that makes this dinosaur so recognizable. Work onto the 22 unworked FLO stitches from round 13 of the head using your main color yarn.
- Round 1
Perform standing sc in first unworked FLO stitch (this counts as first sc), then sc into next 21 sts
- Round 2
Ch 1, Turn. Sc 2, (sc 1, inc, sc 1) x 6, sc 2
- Round 3
Ch 1, Turn. Sc 4, (sc 2, inc, sc 2) x 4, sc 4 Tie off and hide yarn tails. Remove stitch markers.
Optional Decorative Border Using your accent color (cream), you can add a decorative border around the frill to make it stand out beautifully. Face the head toward you and work from right to left. Start on the short edge with a standing sc around side post of row 1, then sc around side post of row 2. Put 3sc into the corner stitch, then work along the top edge repeating this sequence 6 times: sc, sc, 3dc into the same single stitch, sc, sc. Put 3sc into the corner stitch and sc 2 down the short edge to finish. Tie off and hide yarn tails.
Back Horns (Make 2)
The three horns are what make the Triceratops instantly recognizable. Use your horn color (brown/gray) yarn for all three horns.
These are the larger horns that sit above the eyes, starting at the tip and finishing at the base.
- Round 1
sc 6 into MR
- Round 2
sc around
- Round 3
(sc 2, inc) x 2
- Round 4
sc around Tie off and leave a long tail for sewing. Stuff horns lightly.
Front Horn (Make 1)
This is the smaller horn on the nose – the most recognizable feature of the Triceratops face.
- Round 1
sc 6 into MR
- Round 2-3(2)
sc around (2 rounds) Tie off and leave a long tail for sewing. Stuff horn lightly.
First Leg
- Round 1
Using accent color (cream) for the foot, sc 6 into MR ★ Now switch to working with HDC (half double crochet). All increases will be hdc increases.
- Round 2(12)
(inc) x 6 [12 hdc]
- Round 3-5
12 hdc around (3 rounds)
- Round 6
(dec) x 6 Change to main color (dinosaur green) for the leg.
- Round 7-17
6 hdc around (11 rounds)
- Round 18
(inc) x 6
- Round 19
(1 hdc, inc) x 6
- Round 20
(8 hdc, inc) x 2
- Round 21
20 hdc around Fasten off first leg. ★ LEGS ARE NOT STUFFED – they remain flat.
Second Leg
Repeat Rounds 1-21 exactly as for first leg. Do NOT fasten off – continue to join legs.
Arms (Make 2)
The Triceratops has small but sturdy arms. Use accent color (cream) for hands and main color (green) for arms.
- Round 1
Using accent color (cream) for the hand, sc 5 into MR ★ Now switch to working with HDC.
- Round 2(10)
(inc) x 5 [10 hdc]
- Round 3-4
10 hdc around (2 rounds)
- Round 5
3 hdc, dec, 3 hdc, dec Change to main color (dinosaur green) for the arm.
- Round 6-10
8 hdc around (5 rounds) Fold arm flat and sc through both layers to close (4 sc total) . Tie off and leave a long tail for sewing.
Tail
Every dinosaur needs a tail. Use accent color (cream) for the tip and main color (green) for the tail body.
- Round 1
Using accent color (cream) for the tail tip, sc 4 into MR
- Round 2
(inc) x 4
- Round 3
8 sc around
- Round 4
(dec) x 4 Change to main color (dinosaur green).
- Round 5-7
4 sc around (3 rounds) Fold tail flat and sc through both layers to close (2 sc total) . Tie off and leave a long tail for sewing.
Eye Installation
Insert 18mm safety eyes between rounds 7 and 8, spacing them 6 stitches apart (counted on round 7). Position eyes centered to the marked FLO stitches where the headpiece will attach, and secure with washers on the inside before continuing. For young children, embroider eyes with black yarn after completing the entire toy instead.
★ STUFF THE HEAD FIRMLY ★ Start from the nose and work toward the back. Don’t overstuff – the head should be firm but cuddly.
- Round 17
(sc 1, dec) x 6
- Round 18
dec x 6 Tie off and close the opening. Hide yarn tails inside the head.
Join Legs and Form Lovey Body
- Round 22
Ch 1. Work 20 hdc on first leg, 1 hdc in the chain, 20 hdc on second leg, 1 hdc in back of chain
- Round 23
42 hdc around
- Round 24
(12 hdc, dec) x 3
- Round 25
39 hdc around
- Round 26
(11 hdc, dec) x 3
- Round 27-29
36 hdc around (3 rounds)
- Round 30
(3 hdc, dec) x 6
- Round 31
24 hdc around
- Round 32
(2 hdc, dec) x 6
- Round 33
18 sc around Fold body flat and sc through both layers to close (9 sc total) . Tie off and leave a long tail for sewing.
★ BODY REMAINS FLAT (not stuffed) to function as a comfort blanket. If there’s a gap between legs, it can be sewn closed later.
Assembly Instructions
- Info Follow these steps carefully to bring your Triceratops Lovey to life.
- Step 1: Attach Horns to Head Sew the small front horn (nose horn) to the center of the face over rounds 3-4, positioning it on the snout area. Sew the two large back horns (brow horns) over rounds 10-11, spacing them 6 stitches apart so they sit directly behind the eyes and point slightly upward. Use the yarn tails left from making the horns, sew securely all around the base of each horn, and hide yarn tails inside the head.
- Step 2: Attach Head to Body Locate the top center of the lovey body and position the head at rounds 11-12 of the body. The eyes should face forward and the headpiece (frill) should face upward to frame the head. Pin in place before sewing to ensure proper positioning, then sew securely all around the neck. Add extra stuffing to the head through the opening if needed, making sure the attachment is very secure as this is a stress point. Hide all yarn tails.
- Step 3: Attach Arms Position arms on either side of the body between rounds
Important Notes
- 💡 Use a 7mm hook with your super bulky chenille yarn to match the pattern's gauge — sizing down can make the stitches too tight to work with this thicker yarn.
- 💡 Keep a stitch marker on the first stitch of every single round, especially through the head, frill, and horns, since everything is worked in continuous spirals.
- 💡 For babies under 3 years old, skip the 18mm safety eyes entirely and embroider the eyes with black yarn or floss instead to avoid any choking hazard.
- 💡 Stuff the head firmly but stop before it feels overly hard — the lovey body itself stays completely unstuffed so it can fold and drape like a real blanket.
- 💡 Pin the legs, arms, and tail in place with sewing pins before stitching them down during assembly, so you can double-check symmetry while the lovey lies flat.
Common Mistakes and Fixes
- Losing track of the beginning
Place a stitch marker in the first stitch of every round and move it up as you go — this is essential since there's no slip stitch to mark the round's end.
- Stuffing the head either too firmly
Aim for firm-but-squeezable stuffing, checking by gently pressing the sides; it should hold its round shape without feeling rock hard, since a lovey needs to stay soft for cuddling.
- Installing the 18mm safety eyes
Wait until rounds 7-8 as the pattern specifies, holding the eyes up to the piece before securing the washers to check spacing and symmetry from the front.
- Working the lovey body with the same
Keep your tension relaxed and even on the flat body rounds since this section is never stuffed — a looser drape here helps it lie flat like a true blanket.
- Forgetting that the Back Horns
Make and set aside all small parts — frill, both horns, arms, and tail — before you begin assembling, so you're not searching for missing pieces at the end.
- Using a smooth cotton or acrylic yarn
Stick with a chenille or velvet-style yarn like Alize Velluto, Bernat Blanket, or Premier Basix Chenille — the soft pile is what gives this pattern its signature huggable texture.
Variations
- This pattern is wonderfully easy to customize once you understand the basic shapes. For a girl-themed version, try swapping the Dinosaur Green main color for a soft lavender or blush pink Bernat Blanket yarn, with a cream accent frill and pastel gray horns. Boys' rooms often look great with a deep teal or navy body paired with a mustard-yellow frill for high contrast. If you want a true stegosaurus cousin, work the Back Horns pattern in triple the quantity and space small plates along the spine instead of a tail. To make a mini nursery-mobile-sized version, drop down to a 5mm hook with worsted weight yarn like Premier Basix Chenille and expect the finished lovey to shrink to roughly 10-11 inches. For an extra-huggable jumbo lovey, size up to Premier Parfait XL with an 8mm hook, which will stretch the finished length closer to 18-20 inches — just add a bit more stuffing to keep the head proportional. Seasonal fans can lean into fall by using a burnt-orange main color with brown horns, or go pastel rainbow by making each leg a different accent shade for a whimsical, unexpected twist. If safety eyes make you nervous for very young babies, embroider a simple satin-stitch eye instead using black embroidery floss — it keeps the sweet expression without any small parts. Finally, consider mixing in a coordinating crocheted blanket square border around the flat body edges using the Accent Color for a finished, quilted-blanket look that pairs beautifully with a nursery color scheme.
- I adore how this triceratops lovey turns a handful of simple amigurumi techniques into something genuinely adorable and useful. Working the head in continuous spirals with chenille yarn is so satisfying — the stitches practically disappear into the velvety texture, giving that irresistible plush look with almost no effort. The three-round frill is my favorite detail; it's quick to stitch up but instantly transforms a plain round head into an unmistakable triceratops. I also love that the lovey body stays flat and unstuffed, so it drapes like an actual blanket while the head stays huggably firm. Shaping the two little back horns taught me to appreciate how a few extra rounds can add so much personality. Attaching the 18mm safety eyes between rounds 7-8 is a small but exciting milestone — suddenly your work-in-progress has a face! And because the legs, arms, and tail are worked in manageable, separate pieces before assembly, you always feel like you're making steady progress instead of staring down one giant marathon project.
Frequently Asked Questions
What yarn works best for this triceratops lovey pattern?
Any super bulky (weight 6) chenille or velvet-style yarn works beautifully, such as Alize Velluto, Bernat Blanket, or Premier Parfait XL. The soft, velvety pile is what gives the finished dinosaur its signature plush, huggable texture.
Is this pattern safe for a newborn or very young baby?
children under 3, the pattern recommends embroidering the eyes with yarn or floss instead of using the 18mm safety eyes to eliminate any small-part risk. Always supervise young children with any stuffed toy or lovey.
Do I need to stuff the entire lovey body?
No — only the head is stuffed firmly to hold its rounded shape. The lovey body itself is worked flat and left unstuffed so it drapes softly like an actual mini blanket.
How big is the finished triceratops lovey?
The finished piece measures approximately 40 cm, or about 15.7 inches, from the top of the head to the end of the blanket body. This makes it a great stroller- or crib-friendly size.
What skill level do I need to make this pattern?
This pattern is rated beginner to intermediate, since most of it uses simple continuous-spiral rounds with basic increases and decreases. The small horn and frill pieces add just enough shaping practice to keep it interesting without being overwhelming.
Original pattern: https://amigurumicorner.com/triceratops-crochet-pattern-free-dinosaur-baby-blanket-tutorial/
About the Author

Marisol QuinteroWho runs Crochet Obsessed, why a stitch count sits at the end of every round, how a pattern gets written here, and the things this site will never do.
More Patterns
- IntermediateNo. 01

Slouchy everyday beanie worked flat in half double crochet
Crochet beanie pattern for a slouchy everyday look worked flat with hdc rows, then seamed into a soft,…
- IntermediateNo. 02
Crochet amigurumi doll with dress, shoes, and hat
Crochet amigurumi doll pattern with dress, shoes, and hat details for a soft, huggable keepsake you build one…
- IntermediateNo. 03
Chunky moss stitch crochet sweater with raglan-free shoulders
Chunky crochet sweater pattern using moss stitch, worked flat with a 10mm hook for a soft, fast, cool-weather…


