- LevelIntermediate
- Time4-6 hours
- Hook3.5 mm
- YarnWorsted
About This Pattern
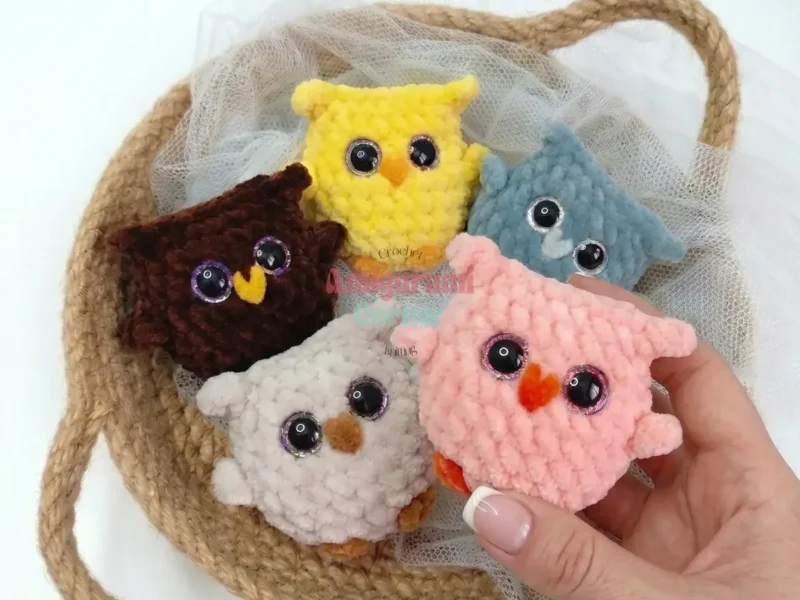
There's something quietly cheerful about a bird this small. It doesn't ask for drama, just a steady spiral and a little orange yarn for the feet. I think of it as the kind of make you start on a Tuesday evening with tea nearby.
Once it's finished, this bird perches wherever a shelf needs a little life. Tuck it beside a stack of books or on a windowsill where the light catches the plush fiber. It reads as soft, round, and a little bit mischievous.
A few notes before you start: this pattern uses US crochet terminology, and the whole bird is worked in a continuous spiral — don't join your rounds unless told to. Standing about 6 cm tall, the finished size is based on a gauge of plush yarn at 120 m / 100 g worked with a 3.5 mm hook, so your own result may run a little larger or smaller depending on your yarn and tension.
- Start the body and head together from a foundation oval rather than a standard magic circle.
- Work the opening rounds to shape the base and widen the body in a continuous spiral.
- Return to your main plush yarn and keep increasing until the body reaches its widest point.
- Work even rounds without increases to build the straight sides of the body and head.
- Pause partway through the final rounds to insert the safety eyes a few stitches apart.
- Decrease through the last rounds to shape the top of the head into a rounded crown.
- Fasten off, close the opening with your yarn tail, then embroider on the beak.
On the desk
- Plush yarn — approximately 120 m / 100 g weight; approx. 11 g used
- Small amount of orange yarn for the feet (puff stitch claws)
- Size 3.5 mm crochet hook
- 12 mm safety eyes (1 pair)
- Scissors
- Yarn needle for finishing
- Embroidery thread or yarn for beak embroidery
- Stitch marker (optional, for tracking rounds)
Stitch shorthand
- ch — chain
- sl st — slip stitch
- sc — single crochet
- hdc — half double crochet
- inc — increase (2 sc in same stitch)
- dec — decrease (invisible decrease — 2 sc worked together)
- mr — magic ring
- PS — puff stitch (2–3 double crochets in one stitch with a single top — used for feet)
- ( ) x N — repeat instructions in brackets N times
Tiny baby bird amigurumi plush crochet pattern
Body and Head (worked as one piece)
- Round 1
Make a foundation oval: ch 7, starting in the 2nd ch from hook work inc, sc 4, work 4 sc in the last ch (corner), then working along the opposite side of the foundation chain: sc 4, inc. (16)
- Round 2
(sc 3, inc) x 4. (20)
- Round 3
Inc, sc 1, switch to orange yarn — PS (puff stitch of 2–3 dc in one stitch) for first foot , sc 4, switch to orange yarn — PS for second foot , sc 1, inc x 2, sc 8, inc. (24)
Note: The puff stitch feet are worked by inserting the hook into the indicated stitch, switching to orange yarn, and working 2–3 dc all into the same stitch with a shared top, then returning to the main yarn. These sit on the underside of the body as little clawed feet.
- Rounds 4–5
Sc 24. (2 rounds, 24 sts each)
- Round 6
Sc 2, wing: ch 3, then working back along the chain: sc 1, hdc 1, hdc 1 into the base of the wing chain , sc 10, wing (repeat as above) , sc 12. (24)
Note: The wings are small decorative tabs crocheted directly into the round. After working back along the chain, continue the main round without adding extra stitches into the base.
- Round 7
(sc 2, dec) x 6. (18)
- Rounds 8–9
Sc 18. (2 rounds, 18 sts each)
- Round 10
Sc 1, dec (side), sc 5, dec (side), sc 8. (16)
Note: The two decreases in Round 10 are positioned on the sides of the head to begin shaping the face area.
Insert 12 mm safety eyes between Rounds 7 and 8, spaced 3 stitches apart from each other, at this point if not already done.
- Round 11
Sc 2, first ear: ch 3, sl st into the base of the ear chain , then working into both loops of the piece, sl st 7, second ear: ch 3, sl st into the base of the ear chain .
Note: The final round is worked as slip stitches into both walls of the piece, pulling the top of the head closed. The two small ear tufts are formed by the ch-3 loops attached at each side.
Fasten off, leaving a tail long enough to weave in and close any remaining gap at the top of the head.
Where it goes
- Set it on a desk or windowsill as a small perch of color that doesn't take up real space.
- Pair it with a nest of yarn scraps or a small basket for a simple shelf display.
- Give it as a pocket-size companion for a child's backpack or coat pocket.
- Group a few in different colors along a bookshelf for a little flock of personality.
Color ideas
- Classic robin Work the body and head in a warm brown plush yarn, keep the puff-stitch feet in orange, and embroider the beak in a matching orange thread.
- Soft sparrow Use a muted gray plush yarn for the full body and head, work the feet in orange as written, and pick a darker gray or black thread for the beak.
Care
Hand wash the finished bird in cool water with a mild detergent to protect the plush yarn's texture.
Reshape the body gently while damp and let it air dry flat, away from direct heat.
Store it somewhere dry and out of direct sun so the plush fiber keeps its softness and color.
Assembly
- Step 1 Close the top: After fastening off Round 11, use the yarn tail and a yarn needle to close any remaining opening at the crown of the head, pulling gently to keep the shape neat and round.
- Step 2 Safety eyes: If not already inserted before Round 11, carefully separate the plush fibers between Rounds 7 and 8 and insert the 12 mm safety eyes approximately 3 stitches apart. Secure the backings firmly from the inside.
- Step 3 Embroider the beak: Using orange embroidery thread or a short length of orange yarn, embroider a small V-shaped or straight-line beak just below the eyes, centered on the face. A simple satin stitch or a single straight stitch works well for this tiny scale.
- Step 4 Weave in all ends: Secure all yarn tails — the main body yarn, the orange foot yarn, and the embroidery thread — by weaving them carefully into the interior of the toy so they are hidden and secure.
- Step 5 Fluff: Gently brush the plush yarn surface with your fingertips or a soft brush to restore any fluffiness that was flattened during crocheting.
Easy to get wrong
Losing the foundation oval shape
Keep your tension even across the increases and the 4-sc corner so the oval doesn't pull lopsided. Count stitches at the end of Rounds 1 and 2 before moving on.
Safety eyes placed unevenly
Insert both eyes before you close the crown, checking spacing from the front as you go. Only fully secure the backings once you're happy with the placement.
Losing track in plush yarn
Plush yarn's fluffy texture can hide your stitches, so count every round carefully and work slowly. A contrasting-color stitch marker at the round start helps prevent miscounting, and the wrong side of the fabric is often easier to read if you lose your place.
Bird looking too flat
This pattern doesn't call for stuffing since the plush yarn itself gives enough shape at this small size, but if your bird looks flat, tuck a very small pinch of polyfill in before closing Round 11 for a rounder result.
Between the songs
- The satisfaction here is in the details, not the size. You start with a foundation oval instead of a magic circle, shaping the whole body and head as one spiral with no seams to sew later. Then the puff-stitch feet pull you in: you swap to orange yarn mid-row, work two or three double crochets into a single stitch for a clawed little foot, then slide right back to your main color without missing a beat. Placing the safety eyes between specific rounds and closing the crown with a yarn needle afterward both ask for a bit of precision. None of it is hard, but all of it rewards patience.
Listener questions
What skill level is required for this baby bird pattern?
This pattern is suitable for confident beginners and intermediate crocheters. You should be comfortable with single crochet, increases, decreases, and working in a continuous spiral. The integrated feet and wings add a small challenge but are clearly explained in the pattern notes.
Can I use a different yarn weight for this pattern?
Yes, you can substitute plush yarn with chenille, velvet, or even standard DK yarn. Keep in mind that changing yarn weight will affect the finished size — a lighter yarn will produce a smaller bird and a heavier yarn a larger one. Adjust your hook size accordingly and work to a tight gauge so the stuffing does not show through.
How long does it take to crochet this tiny bird?
Most crocheters with intermediate experience can complete this bird in approximately 30 to 60 minutes, making it a perfect quick project for an afternoon. The all-in-one construction means there is no assembly of separate limbs, which saves significant time compared to traditional amigurumi patterns.
Can I sell finished toys made from this pattern?
Please check the original designer's terms before selling finished pieces. As a general guideline, many independent crochet designers permit small-scale handmade sales with credit given. When selling any toy, ensure safety eyes are secured firmly, and consider using embroidered eyes instead for items intended for young children.
Original pattern: https://amigurumicorner.com/crochet-plush-baby-bird-amigurumi-6-cm-toy/
About the Author

Marisol QuinteroWho runs Crochet Obsessed, why a stitch count sits at the end of every round, how a pattern gets written here, and the things this site will never do.
More Patterns
- IntermediateNo. 01

Rose Granny Square Tote Crochet Pattern
Rose granny square tote crochet pattern made from 18 dimensional rose squares for a sturdy, romantic everyday bag.
- IntermediateNo. 02
Tropical octopus baby blanket crochet pattern with appliqués
Tropical octopus baby blanket crochet pattern: a cream filet base with coral and turquoise octopus appliqués, leaves, and…
- IntermediateNo. 03
Sunny lemon couple amigurumi crochet pattern
Sunny lemon couple amigurumi crochet pattern with embroidered slices and safety eyes for a cheerful handmade shelf pair.


