- LevelIntermediate
- Time4-6 hours
- Hook3.5 mm
- YarnDK
About This Pattern
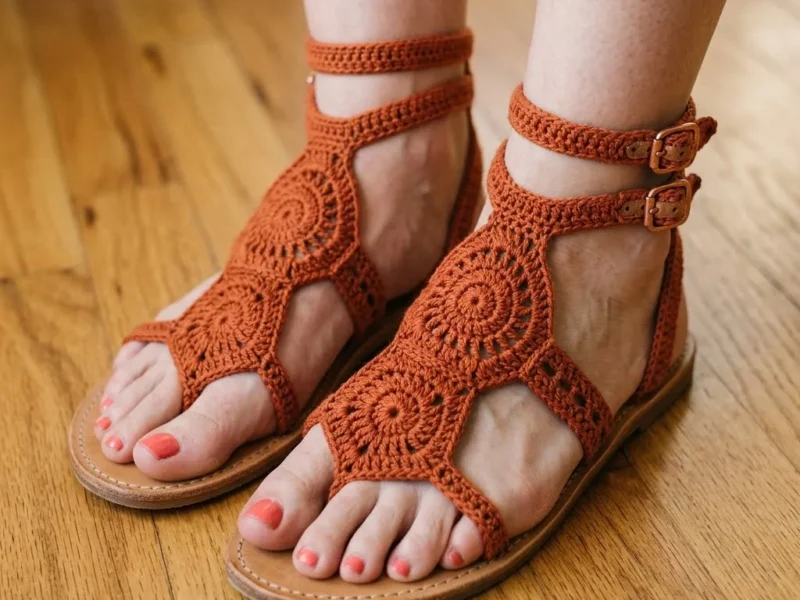
There's something sun-warmed about this one, like clay tile and dry heat. The terracotta cotton reads earthy rather than flashy, the kind of color that looks right against tan skin and bare ankles. I think of it as the crochet answer to a leather sandal you'd find at a market stall, not a costume piece.
Once assembled, these sit by the door like proper shoes, not a craft-fair experiment. They look equally at home tucked under a patio chair or lined up next to sneakers in an entryway. Guests tend to ask where you bought them, which is the whole point.
- Work five separate cotton medallions using the terracotta yarn and your 3.5mm hook, checking each one against the gauge circle before moving on.
- Lay the five medallions out in the toe, side, side, instep, ankle configuration before joining anything permanently.
- Join the toe medallion to both side medallions first, keeping each connection narrow so gaps show between the pieces.
- Join the instep medallion across the two side medallions, then attach the ankle medallion above that.
- Try the joined upper against your foot or the leather sole and adjust join widths before committing further.
- Crochet the ankle straps and work the buttonhole detail so each strap can take a buckle prong.
- Attach a second strap higher up the ankle medallion for a layered gladiator look.
- Position the finished crocheted upper on the leather sole, aligning toe and ankle ends, then punch, glue, and buckle it into place.
On the desk
- for Crochet Sandals
Yarn
- 150 yards of sport weight or DK weight cotton yarn per pair
Color shown
- Terracotta/Rust
Recommended
- Mercerized cotton for durability and slight sheen
Hook
- 3.5mm (E/4) crochet hook
- Adjust based on your gauge
Additional Supplies
- Leather sandal sole bases (available at craft stores or online)
- 4 small buckles (approximately 10mm width)
- Leather hole punch or awl
- Tapestry needle
- Sharp scissors
- Stitch markers
- Fabric glue or leather adhesive (optional for extra security)
- Gauge Information
- Work 5 rounds of the medallion motif. Your finished circle should measure approximately 2.5 inches in diameter.
- Gauge matters here because the medallions need to fit together properly and cover your foot comfortably. If your medallions are too large, go down a hook size. Too small? Go up a hook size.
Stitch shorthand
- ch — chain
- st — stitch
- sts — stitches
- sl st — slip stitch
- sc — single crochet
- dc — double crochet
- hdc — half double crochet
- tr — treble crochet
- ch-sp — chain space
Terracotta crochet gladiator sandals with medallion motifs
Each sandal consists of
1. One toe medallion (sits over the front of your foot)
2. Two side medallions (cover the sides of your foot)
3. One instep medallion (covers the top of your foot)
4. One ankle medallion (wraps around your ankle)
5. Two ankle straps with buckle attachments
The medallions are worked individually, then joined as you go on the final round. The straps are worked directly onto the ankle medallion. Finally, everything attaches to your leather sandal sole.
Circular Medallion Motif Pattern
You’ll make 5 medallions per sandal, 10 total for the pair. I recommend making all medallions first, then joining them.
- Round 1
Create a magic ring. Ch 1 (does not count as a stitch throughout), work 8 sc into the ring. Sl st to first sc to join. Pull magic ring closed. (8 sc)
- Round 2
Ch 3 (counts as first dc here and throughout), dc in same st, 2 dc in each st around. Sl st to top of ch-3 to join. (16 dc)
- Round 3
Ch 3, dc in same st, dc in next st, *2 dc in next st, dc in next st* around. Sl st to top of ch-3 to join. (24 dc)
- Round 4
Ch 4 (counts as dc plus ch-1), skip next st, *dc in next st, ch 1, skip next st* around. Sl st to 3rd ch of beginning ch-4 to join. (12 dc, 12 ch-1 spaces)
- Round 5
Sl st into first ch-1 sp, ch 3, 2 dc in same sp, ch 1, *3 dc in next ch-1 sp, ch 1* around. Sl st to top of ch-3 to join. (12 groups of 3 dc, 12 ch-1 spaces)
- Round 6
Ch 1, sc in same st, sc in next 2 dc, 2 sc in ch-1 sp, *sc in next 3 dc, 2 sc in ch-1 sp* around. Sl st to first sc to join. (60 sc)
This completes one medallion. The finished circle should measure approximately 2.5 to 3 inches across. Make 10 total.
Joining the Medallions Now comes the fun part. You’ll connect your medallions to form the sandal shape.
Joining Method: Hold two medallions with wrong sides together (or right sides together if you prefer a raised seam on the outside). Using sl sts, join through both layers for approximately 8 to 10 stitches. Fasten off and weave in ends.
Layout for Each Sandal
Lay out 5 medallions in this configuration: Medallion 1 (Toe): Bottom center Medallion 2 (Right Side): Upper right, joined to Medallion 1
Medallion 3 (Left Side): Upper left, joined to Medallion 1 Medallion 4 (Instep): Top center, joined to Medallions 2 and 3
Medallion 5 (Ankle): Very top, joined to Medallion 4
Each join should be approximately 8 to 10 stitches wide. This creates gaps between medallions for a gladiator sandal look.
Pro tip: Before permanently joining, lay the medallions on your foot or the leather sole to check placement. Adjust join lengths as needed for your foot shape.
Ankle Strap Pattern You’ll make two straps per sandal, four total.
First Strap (Lower): Join yarn to the edge of the ankle medallion at the right side.
- Row 1
Ch 1, work 6 sc evenly across the medallion edge. Turn. (6 sc)
- Rows 2–35
Ch 1, sc in each st across. Turn. (6 sc)
This creates a strap approximately 10 to 12 inches long. Adjust length based on your ankle measurement. You need the strap to wrap around your ankle with 2 inches of overlap for the buckle.
Buckle End
On the last row, ch 1, sc in first 2 sts, ch 4, skip 2 sts, sc in last 2 sts. This creates a buttonhole for the buckle prong. Fasten off.
Second Strap (Upper):
Work the same as the first strap, attaching it to the ankle medallion approximately half an inch above the first strap attachment point.
Attaching to Leather Soles This step requires some patience, but the result is worth it.
Step 1: Position your crocheted upper on the leather sole base. The toe medallion should sit over the front of the sole, and the ankle piece should align with the back.
Step 2: Using a leather punch or awl, create holes around the edge of the sole approximately every half inch. Space them evenly where the crochet will attach.
Step 3: Thread your tapestry needle with matching yarn. Starting at the toe, whipstitch the crochet upper to the sole through the punched holes and the edge stitches of your medallions.
Step 4: Work around the entire perimeter where crochet meets leather. Keep stitches firm but not so tight that they pucker the crochet.
Step 5: For extra durability, you can apply a thin line of fabric glue or leather adhesive between the crochet and the sole before stitching.
Attaching the Buckles
Step 1: Position each buckle at the loose end of each strap (the end not attached to the medallion).
Step 2: Fold the strap end over the buckle bar approximately 1 inch. Whipstitch this fold securely in place.
Step 3: The other end of the strap (with the buttonhole) wraps around the ankle and the buckle prong goes through the buttonhole to secure.
Step 4: Repeat for all four straps.
Sizing Adjustments
For Smaller Feet Use a smaller hook (3.0mm). Reduce Round 6 to work 1 sc in each ch-1 sp instead of 2 sc. Make shorter ankle straps.
For Larger Feet Use a larger hook (4.0mm). Add a Round 7: Ch 1, sc in each st around. Make longer ankle straps. Consider adding a 6th medallion between the instep and ankle.
Where it goes
- Casual warm-weather footwear to wear with rolled denim, linen dresses, or a sundress.
- A handmade gift for a friend who collects artisan sandals rather than mass-produced shoes.
- A statement piece for a craft fair or small handmade-goods shop table.
- A slow-fashion wardrobe project that pairs well with woven totes or a straw hat.
Color ideas
- Sunset Clay Terracotta/rust for all five medallions and straps, keeping the leather sole in its natural tan for contrast.
Care
Spot clean with a damp cloth. For deeper cleaning, hand wash gently in cool water with mild soap. Do not machine wash.
Stuff the toe area with paper towels to maintain shape. Lay flat to dry away from direct heat or sunlight.
Store flat or stuffed to maintain medallion shape. Avoid hanging, which can stretch the straps.
Easy to get wrong
Skipping the gauge circle check
Work the 5-round medallion and measure it before starting the full set, since a wrong hook size throws off how the pieces fit together and cover the foot.
Joining medallions too solidly
Keep each join to about 8 to 10 stitches as directed instead of seaming the whole edge, or the sandal loses its open, strappy gladiator shape.
Gluing to the sole before checking fit
Lay the joined upper on the leather sole and try it against your foot first, then adjust placement before punching holes or applying adhesive.
Between the songs
- The real satisfaction here is watching flat medallions become a structural upper. Each circle starts as a simple 5-round motif, but the way they interlock at the toe, sides, instep, and ankle is what turns crochet into architecture for your foot. Joining them with 8 to 10 stitch connections instead of solid seams is a clever trick, since it's what gives the whole thing that airy, strappy gladiator look instead of a solid crocheted slipper. Then there's the finishing stage, punching leather, threading buckles, gluing an upper onto a sole, which feels more like shoemaking than yarn craft. It's a project that stretches your skills sideways instead of just making you crochet longer.
Listener questions
Can I use a different cotton yarn than mercerized cotton?
You can substitute any sport or DK weight cotton, but mercerized cotton gives the medallions their slight sheen and extra durability for footwear. A softer, unmercerized cotton will still work, just expect a more matte finish.
Where do I find leather sandal sole bases?
The pattern notes these are available at craft stores or online, so check either source before starting. Having the sole on hand early helps you check medallion sizing against it.
What if my medallions come out a different size than 2.5 inches?
Adjust your hook size up if they're too small or down if they're too large, then re-check against the target diameter. Getting this right matters because the medallions need to fit together and cover the foot properly.
How many buckles do I actually need per pair?
The materials list calls for 4 small buckles around 10mm wide, which covers both ankle straps on both sandals. Keep an extra on hand in case one gets damaged during the leather punching step.
Do I need special tools to attach the crochet to the leather sole?
A leather hole punch or awl handles the piercing, and fabric glue or leather adhesive can add extra security if you want it. Neither tool is unusual, so a basic craft-store version works fine.
Original pattern: https://crochetwithmia.com/terracotta-sunset-crochet-gladiator-sandals-free-pattern/
About the Author

Marisol QuinteroWho runs Crochet Obsessed, why a stitch count sits at the end of every round, how a pattern gets written here, and the things this site will never do.
More Patterns
- IntermediateNo. 01

Slouchy everyday beanie worked flat in half double crochet
Crochet beanie pattern for a slouchy everyday look worked flat with hdc rows, then seamed into a soft,…
- IntermediateNo. 02
Crochet amigurumi doll with dress, shoes, and hat
Crochet amigurumi doll pattern with dress, shoes, and hat details for a soft, huggable keepsake you build one…
- IntermediateNo. 03
Chunky moss stitch crochet sweater with raglan-free shoulders
Chunky crochet sweater pattern using moss stitch, worked flat with a 10mm hook for a soft, fast, cool-weather…


