- LevelIntermediate
- Time4-6 hours
- Hook4.0 mm
- YarnWorsted
About This Pattern
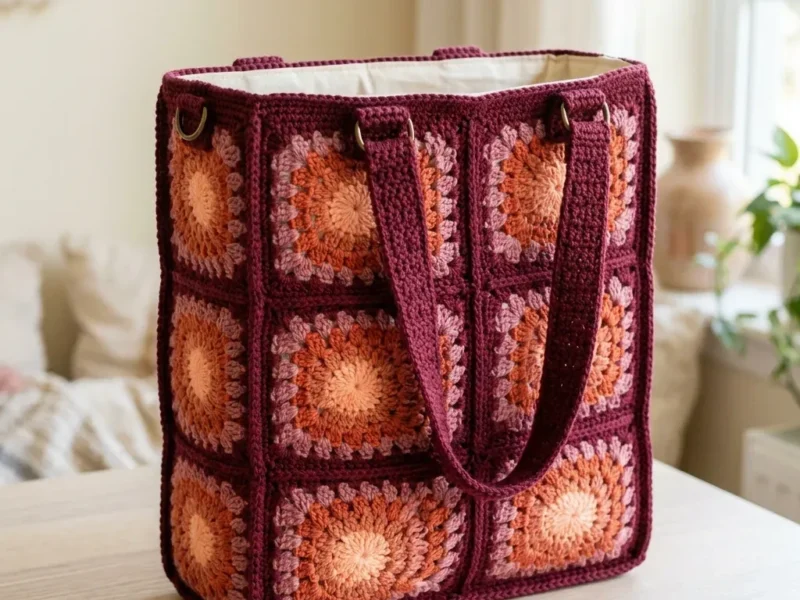
This one feels like a slow burn in the best way, the kind of warm, layered glow you get when a sunset actually holds still for you. Deep burgundy fades into terracotta, then coral, then blush, and every square repeats that same quiet gradient. It is cozy and structured at the same time, which is a rare combination in a bag.
Picture this tote parked by the door with a cotton candle, a stack of paperbacks, or your current crochet project peeking out the top. The ombre grid catches light differently depending on where it sits, so a kitchen chair or a reading nook both suit it. It reads as intentional, not improvised, the second someone sets eyes on it.
This is an intermediate-level pattern, so you will want to already be comfortable with granny squares, joining motifs, and some basic sewing for the lining. The finished tote measures approximately 14 inches wide by 14 inches tall by 4 inches deep, plenty of room for books, projects, groceries, or whatever else you need to haul around.
- Work through the granny squares one at a time, changing color at the start of each new round.
- Fasten off and weave in the color-change tails on each square before moving to the next one.
- Lay all the squares out first so you can see the color pattern before joining anything permanently.
- Join squares with slip stitches worked through the back loops to build the ridged seam lines.
- Assemble the joined squares into the boxy shell shape for the sides, front, and back.
- Work the Top Border rounds in single crochet all the way around the top opening.
- Fold each D-Ring Tab around its ring and stitch it in place at the top corners.
- Make and attach the Handles, then wet block the shell before sewing in the fabric lining.
On the desk
- Choose a smooth, tightly spun cotton or cotton-blend. Fuzzy or stretchy fibers will not hold the boxy shape you want. Here are some excellent options:
- Lion Brand 24/7 Cotton in Wine, Terracotta, Peach, and Blush. This 100 percent mercerized cotton is smooth, sturdy, and holds its shape beautifully.
- Paintbox Yarns Cotton DK (used doubled) in Deep Burgundy, Terracotta, Peach Sorbet, and Blush Pink. Doubling it brings it into worsted weight range and adds stiffness.
- WeCrochet Dishie in Wine, Terracotta, Peach, and Blush. This worsted-weight cotton is soft yet firm enough for structured accessories.
Yarn (Worsted Weight Cotton or Cotton-Blend)
- Color A, Deep Burgundy: approximately 300 yards (274 m)
- Color B, Terracotta or Rust: approximately 150 yards (137 m)
- Color C, Coral or Medium Peach: approximately 150 yards (137 m)
- Color D, Light Peach or Blush: approximately 100 yards (91 m)
Total yarn needed
- approximately 700 yards (640 m)
Hook
- US size G-6 (4.0 mm) or H-8 (5.0 mm) depending on your gauge; the sample uses H-8 (5.0 mm).
Notions
- Yarn needle
- Scissors
- 4 antique brass D-rings, 1 inch (2.5 cm)
- Stitch markers
- 1/2 yard (0.46 m) natural canvas or heavy cotton fabric for lining
- Sewing needle and thread to match lining
- Sewing machine (optional but recommended)
- Pins
Stitch shorthand
- ch (chain) — The foundation stitch. Yarn over, pull through the loop on your hook.
- sl st (slip stitch) — Insert hook, yarn over, pull through both the stitch and the loop on your hook in one motion.
- sc (single crochet) — Insert hook, yarn over, pull up a loop (2 loops on hook), yarn over, pull through both loops.
- dc (double crochet) — Yarn over, insert hook, yarn over, pull up a loop (3 loops on hook), yarn over, pull through 2 loops, yarn over, pull through remaining 2 loops.
- sp (space) — The gap between stitches, usually created by chain stitches.
- ch-sp (chain space) — A specific space created by chain stitches in the previous row or round.
- sk (skip) — Pass over the indicated stitch without working into it.
- st(s) (stitch or stitches) — Individual loops of work.
- RS (right side) — The front of your work, the side that faces out.
- WS (wrong side) — The back of your work, the side that faces in.
- rep (repeat) — Do the indicated instructions again.
- yo (yarn over) — Wrap the yarn over your hook from back to front.
- [ ] (brackets) — Work the instructions inside the number of times indicated.
- ( ) (parentheses) — Indicate the stitch count at the end of the row or round.
Sunset ombre granny square tote crochet pattern
Granny Square (Make 28)
You need 28 identical squares. I know that sounds like a lot, but they work up fast once you get into a rhythm. Put on a podcast or a movie and enjoy the meditative repetition.
Begin with Color D . Make a magic ring, or chain 4 and join with a slip stitch to form a ring.
Granny Cluster: This is the heart of every granny square. A granny cluster is simply 3 double crochet (dc) stitches worked into the same chain space. Yarn over, insert hook into the ch-sp, pull up a loop, yarn over, pull through 2 loops. Repeat twice more in the same space. That group of 3 dc counts as one cluster.
- Round 1
Color D Ch 3 (counts as first dc), work 2 dc into the ring, ch 2, [3 dc into the ring, ch 2] 3 times. Join with sl st to top of beginning ch-3. Fasten off Color D leaving a 6-inch tail. (4 clusters of 3 dc, 4 corner ch-2 spaces) (12 dc, 4 ch-2 sps)
- Round 2
Color C Join Color C with sl st into any corner ch-2 sp. Ch 3 (counts as first dc), work 2 dc into same corner ch-2 sp, ch 2, 3 dc into same corner ch-2 sp, ch 1, [3 dc, ch 2, 3 dc into next corner ch-2 sp, ch 1] 3 times. Join with sl st to top of beginning ch-3. Fasten off Color C. (24 dc, 4 ch-2 sps, 4 ch-1 sps)
- Round 3
Color B Join Color B with sl st into any corner ch-2 sp. Ch 3 (counts as first dc), 2 dc into same corner ch-2 sp, ch 2, 3 dc into same corner ch-2 sp, ch 1, 3 dc into next ch-1 side sp, ch 1, [3 dc, ch 2, 3 dc into next corner ch-2 sp, ch 1, 3 dc into next ch-1 side sp, ch 1] 3 times. Join with sl st to top of beginning ch-3. Fasten off Color B. (36 dc, 4 ch-2 corner sps, 8 ch-1 sps)
- Round 4
Color A Join Color A with sl st into any corner ch-2 sp. Ch 3 (counts as first dc), 2 dc into same corner ch-2 sp, ch 2, 3 dc into same corner ch-2 sp, [ch 1, 3 dc into next ch-1 sp] twice, ch 1, [3 dc, ch 2, 3 dc into next corner ch-2 sp, [ch 1, 3 dc into next ch-1 sp] twice, ch 1] 3 times. Join with sl st to top of beginning ch-3. Fasten off Color A unless continuing to join immediately. (48 dc, 4 ch-2 corner sps, 12 ch-1 sps)Checkpoint: Getting gauge right matters a lot for this project. One completed granny square (through Round 4) should measure 4.5 inches by 4.5 inches (11.5 cm by 11.5 cm) after light blocking with a US H-8 (5.0 mm) hook. If your square is smaller, try a larger hook; if it is larger, go down a hook size. Since you are making 28 squares, even a small difference multiplies into a big problem.
Top Border
With RS facing and Color A, join yarn at any corner of the top opening.
- Round 1
Ch 1 (does not count as a stitch), work 1 sc into each dc stitch and 1 sc into each ch-1 sp and 2 sc into each ch-2 corner sp around the entire top opening. Work 1 sc into each seam join point. Join with sl st to first sc. (104 sc)
- Round 2
Ch 1, sc in each sc around. Join with sl st to first sc. (104 sc)
- Round 3
Ch 1, sc in each sc around. Join with sl st to first sc. Fasten off Color A. (104 sc)
D-Ring Tabs (Make 4)
Using Color A, chain 10.
- Row 1
Sc in 2nd ch from hook and in each ch across. Turn. (9 sc)
- Rows 2–5
Ch 1, sc in each sc across. Turn. (9 sc) Fold the tab in half around one D-ring. Slip stitch or whip stitch the two ends together, enclosing the D-ring. Make 4 tabs total.Sew one tab at each top corner of the bag, centered over the seam where the side panel meets the front or back panel.
Handles (Make 2)
Using Color A, chain 6.
- Row 1
Sc in 2nd ch from hook and in each ch across. Turn. (5 sc) Continue working even in sc (ch 1, turn, sc in each sc across) until the handle measures 24 inches (61 cm) total length.Thread one end through a D-ring, fold back 1 inch, and sew securely. Thread the other end through the corresponding D-ring on the same panel face. Fold and sew. Repeat for the second handle on the opposite panel.
Square Layout
Here is how your 28 squares get distributed: Front panel: 3 squares wide by 3 squares tall (9 squares)
Back panel: 3 squares wide by 3 squares tall (9 squares)
Right side panel: 1 square wide by 3 squares tall (3 squares)
Left side panel: 1 square wide by 3 squares tall (3 squares)
Base panel: 3 squares wide by 1 square tall (3 squares)
Assembling the Bag Shell
Lay your squares out in the correct configuration before you start joining. Make sure all squares are oriented the same way for consistent color flow.
Flat Join: This technique creates those beautiful visible grid lines on your finished bag. Hold two squares with wrong sides together. Insert your hook through the back loop only (blo) of the corresponding stitch on both squares simultaneously. Draw up a loop of Color A and slip stitch through both loops. Continue across the seam. The ridge that forms on the right side becomes part of the design.
Horizontal Joins (side by side): Hold two squares with wrong sides together. Using Color A, work the flat join across the edge, going through back loops of corresponding dc stitches and through the ch-1 spaces. At corner ch-2 spaces, slip stitch through both corner spaces together.
Vertical Joins (rows to each other): Work the flat join horizontally across the full width of two joined rows.
Complete all five panels: front (9 squares), back (9 squares), right side (3 squares), left side (3 squares), and base (3 squares).
Step 1: Hold the base panel and front panel with wrong sides together. Align the bottom edge of the front with one long edge of the base. Work flat join seam across. Fasten off.
Step 2: Repeat on the opposite long edge of the base, joining the back panel.
Step 3: Join the right side panel to the right edge of the front panel, down the full height. At the bottom corner, pivot and join along the short edge of the base. Continue up the right edge of the back panel. Repeat for the left side panel.
Your bag shell is now a 3D open box.
Fabric Lining
Cut your fabric: Front and back: 2 rectangles, each 15 inches wide by 15.5 inches tall Sides and base: 1 rectangle, 5 inches wide by 47.5 inches long
Sew the lining:
With right sides together, pin the long strip to the front rectangle. Sew up the right side, across the bottom, and up the left side using a 1/2 inch seam allowance. Attach the back rectangle to the remaining edges. Clip corners, press seams, turn right side out. Fold the top edge down 1/2 inch and press.
Insert and attach:
Place the lining inside the bag with wrong sides facing. The folded top should sit just below the top border. Slip stitch the lining to the inside of the border all the way around.
Where it goes
- An everyday market or grocery tote, since the boxy 4-inch depth gives packed items room to sit upright.
- A dedicated project bag for a current crochet or knitting work-in-progress, paired with a small zip pouch for hooks and scissors.
- A substantial book bag for the library or a coffee shop, roomy enough for a paperback and a notebook together.
- A everyday carry-all for errands, pairing well with simple cotton or denim outfits thanks to the warm, muted color grid.
Color ideas
- Classic sunset gradient Color D (light peach) at the square center, Color C (coral) for round 2, Color B (terracotta) for round 3, and Color A (deep burgundy) for the outer rounds, Top Border, D-Ring Tabs, and Handles.
- Reversed warm fade Start each square's center in Color A for a deep burgundy core, move outward through Color B then Color C, and finish the outer round plus Top Border, Tabs, and Handles in Color D for a pale, soft frame.
Care
Hand wash in cool water with a mild detergent, since this piece is worked in cotton or a cotton blend rather than a machine-washable synthetic.
Never tumble dry; lay the tote flat or reshape it over a form while it air dries to protect the boxy structure.
Store it stuffed with tissue paper when not in use so the squares hold their block shape over time.
Assembly
- Step 1 Weave in all ends securely, threading tails through at least 5 to 6 stitches in a zigzag pattern.
- Step 2 Blocking: Wet block before inserting the lining. Submerge in cool water, squeeze gently, roll in a towel, then shape into a boxy form. Stuff firmly to hold the shape while drying for 24 to 48 hours.
- Step 3 Care: Hand wash in cool water with mild detergent. Lay flat or reshape over a form to dry. Never tumble dry. Store stuffed with tissue paper to maintain shape.
Easy to get wrong
Losing count on the ch-1 side spaces
Drop a stitch marker into each corner ch-2 space before you start a new round so the corners and the plain ch-1 side spaces never get confused. This matters more as the squares get bigger in rounds 3 and beyond.
Joining through both loops instead of back loop only
Slow down on the join-as-you-go seam and check that your hook is going through the back loop only on both squares at once. Catching all four loops flattens the ridge that is supposed to show on the right side.
Skipping the wet block before lining
Sew the fabric lining in before blocking and the shell will never settle into a true boxy shape. Block and stuff the shell first, let it dry fully, then add the lining.
Between the songs
- The satisfaction here is really about contrast and control. Each granny square moves through four colors in a fixed order, so by the time you finish square one you already understand the whole visual logic of the bag. Joining through the back loop only with slip stitch is the real payoff move: it leaves a visible ridge on the right side that becomes part of the finished look instead of hiding as a seam. Add the Top Border worked in sc, the D-ring tabs folded around actual hardware, and a fabric lining sewn in afterward, and you get a project that teaches corner-to-corner piecing, textured seaming, and basic bag construction all in one build.
Listener questions
Can I use a different fiber than cotton for this tote?
Stick with a smooth, tightly spun cotton or cotton blend rather than anything fuzzy or stretchy, since the pattern depends on that fiber to hold its boxy shape. A fuzzy or stretchy yarn will blur the granny square grid lines and the seam ridges.
Do I need to use all four colors exactly as listed?
No, the four-color gradient is the design feature, but you can swap in your own four shades as long as they move from dark to light. Just keep Color A as your main color for the Top Border, D-Ring Tabs, and Handles since it needs the largest yardage.
Why does the seam show on the front of the bag?
That visible ridge is intentional. Joining through the back loop only with slip stitch creates a raised line on the right side that becomes part of the finished look rather than a seam to hide.
Is the fabric lining required?
It is strongly recommended, since the lining gives the bag its structure and keeps smaller items from slipping through the granny square gaps. The pattern calls for natural canvas or heavy cotton fabric sewn in after blocking.
What hook size should I actually use?
The sample was made with a US H-8 (5.0 mm) hook, though a G-6 (4.0 mm) is listed as an option depending on your gauge. Swatch a square first and compare it against your yardage before committing to 28 squares.
Original pattern: https://bunnypatterns.com/sunset-ombre-granny-square-tote-free-crochet-pattern/
About the Author

Marisol QuinteroWho runs Crochet Obsessed, why a stitch count sits at the end of every round, how a pattern gets written here, and the things this site will never do.
More Patterns
- IntermediateNo. 01

Rose Granny Square Tote Crochet Pattern
Rose granny square tote crochet pattern made from 18 dimensional rose squares for a sturdy, romantic everyday bag.
- IntermediateNo. 02
Tropical octopus baby blanket crochet pattern with appliqués
Tropical octopus baby blanket crochet pattern: a cream filet base with coral and turquoise octopus appliqués, leaves, and…
- IntermediateNo. 03
Sunny lemon couple amigurumi crochet pattern
Sunny lemon couple amigurumi crochet pattern with embroidered slices and safety eyes for a cheerful handmade shelf pair.


