- LevelIntermediate
- Time12-18 hours
- Hook4.00 mm
- YarnDK
About This Pattern
There is a warmth to this one that goes beyond the golden yellow. It has that old-fashioned, heirloom quality without feeling fussy or overworked. I think of it as the kind of piece someone keeps in a cedar chest and pulls out years later with a little gasp.
Your hands will do two very different jobs here. First comes the meditative, repetitive rhythm of granny squares joined as you go, then the steadier march of hdc rows shaping the bodice, armholes, and neckline into something wearable rather than flat.
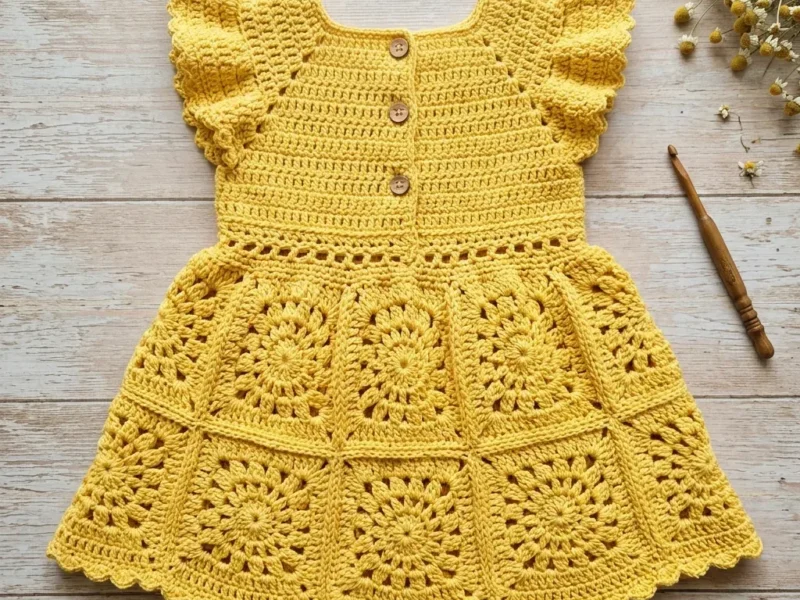
Finished and laid over the back of a chair, this dress reads as a single sunny block of color with texture that catches the light differently from every angle. The flutter ruffles at the armholes and the scalloped hem give it movement even at rest, like it is waiting for someone small to put it on.
- Start by making the granny squares one at a time, joining each new square to the last as you finish its final round.
- Work the back right and back left panels flat in hdc rows, shaping the armhole edges as you go.
- Build the front bodice panel the same way so all three bodice sections share the same stitch count and row rhythm.
- Seam the bodice panels together at the shoulders and sides before adding the finishing touches.
- Add the neckline edging to settle the neck opening and give it a clean, finished line.
- Crochet two armhole flutter ruffles separately and attach them for a bit of movement at the shoulders.
- Work the inter-tier band and both skirt tiers to build the dress downward from the bodice.
- Finish with the hem scallop edging, weave in ends, and sew on the buttons at the back opening.
On the desk
- DK weight (CYCA 3 / Light), 100 percent cotton or cotton-blend
- Approximately 350 to 400 yards or 320 to 365 meters in golden yellow
Specific Yarn Suggestions
- Paintbox Yarns Simply DK (100% cotton, 137 yds per 50 g skein) in Buttercup Yellow. Approximately 3 skeins. This yarn has excellent stitch definition for granny squares and blocks beautifully.
- Paintbox Yarns Cotton DK (100% cotton, 137 yds per 50 g skein) in Mustard Yellow. Approximately 3 skeins. A slightly firmer hand gives the skirt panels great structure.
- Lion Brand 24/7 Cotton (100% cotton, 186 yds per 100 g skein) in Goldenrod. Approximately 2 skeins. Widely available and consistent in twist.
Substitution Note
- Any smooth DK weight cotton or cotton-blend with a gauge matching 18 sc x 22 rows equals 4 inches will work. Avoid fuzzy or textured yarns as they obscure the granny square lace pattern. Mercerized cotton gives the crispest look. I do not recommend substituting with acrylic for a first garment because it will not block well and the drape will differ significantly.
- US size G-6 / 4.00 mm
- 3 wooden shank buttons, approximately 15 mm diameter
- Yarn needle for finishing
- Stitch markers (at least 6)
- Scissors
- Blocking mats and pins
- Rust-proof straight pins
Stitch shorthand
- ch — chain
- sl st — slip stitch
- sc — single crochet (insert hook, yarn over, pull through, yarn over, pull through both loops)
- hdc — half double crochet (yarn over, insert hook, yarn over, pull through, yarn over, pull through all 3 loops)
- dc — double crochet (yarn over, insert hook, yarn over, pull through, yarn over, pull through 2 loops, yarn over, pull through remaining 2 loops)
- tr — treble crochet
- sp — space
- ch-sp — chain space
- sk — skip
- st(s) — stitch(es)
- beg — beginning
- rep — repeat
- pm — place marker
- rem — remaining
- RS — right side
- WS — wrong side
- yo — yarn over
- JAYG — join-as-you-go
- ( ) — work all instructions within parentheses into the same stitch or space
- [ ] x N — repeat bracketed instructions N times
Golden granny square baby dress with flutter sleeves
Granny Square (Worked in Rounds)
This is a standard 4-round granny square with a circular center motif.
Foundation Ring: Ch 6, join with sl st to form a ring.
- Round 1
(RS): Ch 3 (counts as first dc), 2 dc into ring, ch 2, [3 dc into ring, ch 2] 3 times, join with sl st to top of beg ch-3. (4 groups of 3 dc, 4 ch-2 corner spaces)
- Round 2
Sl st into next 2 sts and into ch-2 corner sp, ch 3 (counts as dc), 2 dc in same sp, ch 1, [3 dc in next ch-2 sp, ch 2, 3 dc in same sp, ch 1] 3 times, 3 dc in first ch-2 sp, ch 2, join with sl st to top of beg ch-3. (8 groups of 3 dc, 4 ch-2 corner sps, 4 ch-1 side sps)
- Round 3
Sl st into next 2 sts and into ch-2 corner sp, ch 3 (counts as dc), 2 dc in same sp, ch 1, 3 dc in ch-1 side sp, ch 1, [3 dc in ch-2 corner sp, ch 2, 3 dc in same sp, ch 1, 3 dc in ch-1 side sp, ch 1] 3 times, 3 dc in first ch-2 corner sp, ch 2, join with sl st to top of beg ch-3. (12 groups of 3 dc, 4 ch-2 corner sps, 8 ch-1 side sps)
- Round 4
Finishing Round Sl st into next 2 sts and into ch-2 corner sp, ch 3 (counts as dc), 2 dc in same sp, ch 1, [3 dc in next ch-1 sp, ch 1] twice, [3 dc in ch-2 corner sp, ch 2, 3 dc in same sp, ch 1, [3 dc in next ch-1 sp, ch 1] twice] 3 times, 3 dc in first ch-2 corner sp, ch 2, join with sl st to top of beg ch-3. (16 groups of 3 dc, 4 ch-2 corner sps, 12 ch-1 side sps)Fasten off and weave in ends for standalone squares.
Section 1: Back Right Panel
The back right panel forms the right half of the bodice back when worn. It is worked flat in rows of hdc from the shoulder down to the waistline.
Foundation: Ch 21.
- Round 1
(RS): Hdc in 3rd ch from hook and in each ch across. Turn. (19 hdc)
- Round 2
Ch 2 (does not count as st here or throughout bodice), hdc in each st across. Turn. (19 hdc)
- Round 3
to 8: Rep Row 2. Turn after each row. (19 hdc) Place a stitch marker at each end of Row 1 to mark the shoulder line.
Armhole Shaping begins on Row 9:
- Round 9
(RS): Ch 2, hdc in first 14 sts, leave last 5 sts unworked (these form the armhole edge). Turn. (14 hdc)
- Round 10
Ch 2, hdc2tog over first 2 sts, hdc to end. Turn. (13 hdc)
- Round 11
Ch 2, hdc across to last 2 sts, hdc2tog over last 2 sts. Turn. (12 hdc)
- Round 12
Ch 2, hdc2tog, hdc to end. Turn. (11 hdc)
- Round 13
to 18: Ch 2, hdc across. Turn. (11 hdc) Button Band Row: Do not turn after Row 18. Working along the straight center-back edge from bottom to top, evenly sc 18 sts up the edge, working 1 sc per row end approximately. Fasten off. (18 sc on button band edge)
Section 2: Back Left Panel
Foundation: Ch 21.
- Round 1
(RS): Hdc in 3rd ch from hook and in each ch across. Turn. (19 hdc)
- Round 2
to 8: Ch 2, hdc in each st across. Turn. (19 hdc)
- Round 9
(RS): Ch 2, skip first 5 sts (armhole edge), hdc in rem 14 sts. Turn. (14 hdc)
- Round 10
Ch 2, hdc to last 2 sts, hdc2tog. Turn. (13 hdc)
- Round 11
Ch 2, hdc2tog, hdc to end. Turn. (12 hdc)
- Round 12
Ch 2, hdc to last 2 sts, hdc2tog. Turn. (11 hdc)
- Round 13
to 18: Ch 2, hdc across. Turn. (11 hdc) Buttonhole Band Row: Do not turn after Row 18. Working along the straight center-back edge from bottom to top, sc 5 sts, ch 2, sk 2, sc 4, ch 2, sk 2, sc 4, ch 2, sk 2, sc 1. (18 sts plus 3 buttonhole ch-2 sps on band edge)Fasten off. The three ch-2 spaces form the buttonholes.
Section 3: Front Bodice Panel
Foundation: Ch 43.
- Round 1
(RS): Hdc in 3rd ch from hook and in each ch across. Turn. (41 hdc)
- Round 2
to 8: Ch 2, hdc across. Turn. (41 hdc)
Armhole Shaping:
- Round 9
(RS): Sl st across first 5 sts, ch 2, hdc in next 31 sts, leave last 5 sts unworked. Turn. (31 hdc)
- Round 10
Ch 2, hdc2tog, hdc to last 2 sts, hdc2tog. Turn. (29 hdc)
- Round 11
Ch 2, hdc2tog, hdc to last 2 sts, hdc2tog. Turn. (27 hdc)
- Round 12
Ch 2, hdc2tog, hdc to last 2 sts, hdc2tog. Turn. (25 hdc)
- Round 13
to 18: Ch 2, hdc across. Turn. (25 hdc) Fasten off.
Section 5: Neckline Edging
Join yarn at top right corner of back right button band with sl st.
- Round 1
Sc evenly around the entire neckline as follows: sc 11 across back right neckline edge, sc 3 across right shoulder seam, sc 23 across front neckline, sc 3 across left shoulder seam, sc 11 across back left neckline edge. Join with sl st to first sc. (51 sc)
- Round 2
Ch 1, sc in each st around. Join with sl st. (51 sc) Fasten off and weave in ends.
Section 6: Armhole Flutter Ruffle (Make 2)
Join yarn at the base of the armhole with RS facing, at the underarm point.
- Round 1
Ch 1, work 36 sc evenly around the armhole opening. Join with sl st. (36 sc)
- Round 2
First Ruffle Layer Ch 3 (counts as dc), dc in same st, ch 1, [2 dc in next st, ch 1] around. Join with sl st to top of beg ch-3. (36 groups of 2 dc, 36 ch-1 sps)
- Round 3
Second Ruffle Layer Sl st into first ch-1 sp, ch 3 (counts as dc), 2 dc in same sp, ch 1, [3 dc in next ch-1 sp, ch 1] around. Join with sl st to top of beg ch-3. (36 groups of 3 dc)
- Round 4
Third Ruffle Flare Sl st into next 2 sts and into ch-1 sp, ch 3, 3 dc in same sp, ch 1, [4 dc in next ch-1 sp, ch 1] around. Join with sl st to top of beg ch-3. (36 groups of 4 dc)Fasten off and weave in ends. The ruffle will naturally curl and flare outward.
Inter-Tier Band
Join yarn to the right back edge where the upper and lower tiers meet with RS facing.
- Round 1
Ch 3 (counts as dc), work dc evenly across the join line between tiers. Approximately 24 dc across (3 per square x 8 squares). Turn. (24 dc)
- Round 2
Ch 2, hdc across. Turn. (24 hdc) Fasten off.
Upper Skirt Tier
The upper tier uses 6 squares: 1 for back right, 4 for the front, 1 for back left.
Square U1 (back right): Work Rounds 1 through 4 as standalone square. Fasten off. This is the anchor square.
Square U2: Work Rounds 1 through 3. On Round 4, when reaching the left side of the square, use JAYG to join all 4 side sps along the shared edge to the corresponding side sps of U1’s right edge. At the shared corner, join the corner sp of U2 to the corner sp of U1. Fasten off.
Squares U3, U4, U5: Repeat as U2, each joining to the previous square’s right edge. Fasten off each.
Square U6 (back left): Repeat as U2, joining to U5’s right edge. Do not join U6’s right edge to U1 (this remains the open back). Fasten off.
Attaching Upper Tier to Bodice: Hold the upper skirt strip with top edge aligned to the bottom of the waistband joining strip. Using yarn and a yarn needle, whip stitch the top edge of the upper tier squares to the bottom edge of the waistband row, distributing evenly.
Lower Skirt Tier
The lower tier consists of 8 squares: 6 squares align below the upper squares, plus 1 additional square at each outer back edge.
Square L1 (far right): Work Rounds 1 to 4 as standalone. Fasten off.
Squares L2 through L7: Work Rounds 1 to 3, then join Round 4 to the previous square’s free left edge using JAYG method. Fasten off each.
Square L8 (far left): Work as L2, joining to L7. Fasten off.
Attaching Lower Tier to Upper Tier: Align the top edge of each lower-tier square to the bottom edge of the upper-tier squares. The 6 central lower squares (L2 through L7) align directly below U1 through U6. Square L1 and L8 overhang one square-width at each back edge.
Whip stitch or sl st join the top edges of L1 through L8 to the bottom edges of U1 through U6.
Section 9: Hem Scallop Edging
Join yarn at the bottom right back corner of the lower skirt tier with RS facing.
- Round 1
Foundation Row Ch 1, sc evenly across the entire bottom edge of all 8 lower-tier squares, working approximately 12 sc per square bottom edge. Total: approximately 96 sc. (96 sc)
- Round 2(16)
Shell Edging Round 1: Ch 1, [sc in next st, sk 2 sts, 5 dc in next st (shell made), sk 2 sts] across, ending with sc in last st. (16 shells, 16 sc)
- Round 3(5)
Shell Edging Round 2: Sl st to top of first shell (3rd dc), ch 3 (counts as dc), 4 dc in same st, [sc in sc between shells, 5 dc in 3rd dc of next shell] across, ending sc in last sc, join with sl st to top of beg ch-3. Fasten off.
Where it goes
- A special outfit for a first birthday photo session, paired with simple white socks or soft leather booties.
- A gift for a baby shower that reads as handmade and lasting, worth more than a storebought layette piece.
- A warm-weather layering dress worn over a plain onesie for a lightweight cotton outfit on mild days.
- A keepsake piece parents set aside to hand down, since cotton holds its shape and color through storage.
Color ideas
- Classic single sunflower yellow Work every granny square, both bodice back panels, the front bodice panel, the neckline edging, both flutter ruffles, the inter-tier band, both skirt tiers, and the hem scallop edging all in the same golden yellow for the seamless, single-color look the pattern was designed around.
Care
Hand wash the finished dress in cool water with a mild detergent, since the cotton and cotton-blend fibers named for this pattern hold up well to gentle washing but can lose shape under harsh agitation.
Lay flat to dry on a towel rather than hanging, as a wet cotton granny square skirt and bodice can stretch out of proportion under its own weight.
Store folded rather than on a hanger, and re-block the granny squares lightly with pins if the corners lose their crisp points over time in a drawer.
Assembly
- Step 1 Button Placement: Lay dress flat, RS up, back opening at top. Overlap the button band (back right) over the buttonhole band (back left) by approximately 0.5 inch. Mark button positions through the buttonholes. Sew 3 wooden buttons to the right back button band at marked positions.
- Step 2 Weaving In Ends: Weave in all yarn ends securely, passing through at least 3 to 4 stitches in multiple directions. Cotton yarn does not felt, so secure ends well.
- Step 3 Seaming: If any edges at the bodice sides are not fully closed, use mattress stitch to close any small gaps at the underarm join points. The armhole ruffle covers this area.
Easy to get wrong
Misreading the flat join on Round 4
Slow down at every shared corner and side space, since the chain-1-sl st-chain-1 corner replaces the usual chain-2 and the sl st side join replaces the chain-1 entirely. Count your ch-2 and ch-1 spaces on the neighboring square before you join so you land in the right one.
Losing track of the armhole shaping rows
Keep the stitch markers at the Row 1 shoulder line and the skipped-stitch armhole edge of Section 2 in place until the panel is fully seamed. It is easy to lose the shaping sequence across so many repeated hdc rows if nothing marks where the armhole actually begins.
Rushing the blocking before joining squares
Block each granny square to a consistent size before you start the join-as-you-go process, since uneven squares make the flat corner and side joins pucker or gap. A few extra minutes with blocking mats and pins up front saves re-joining later.
Between the songs
- What makes this project satisfying is how the granny squares and the hdc bodice talk to each other. You get the lacy, open structure of the squares joined invisibly at the corners and sides, then a completely different smooth, dense fabric where the bodice panels shape the shoulders and armholes. Working the join-as-you-go method on Round 4 so the seam nearly disappears is the kind of small technical payoff that makes the whole piece feel more polished than the stitch count suggests. Add the flutter ruffles, the scallop hem, and a tidy buttoned back closure, and you are practicing four or five real garment skills inside one project, each one visible in the finished dress rather than hidden in a swatch.
Listener questions
Can I use a yarn other than the ones listed?
Yes, as long as it is a smooth DK weight cotton or cotton-blend that matches the 18 sc x 22 rows to 4 inches gauge. Avoid fuzzy or textured yarns, since they obscure the lace look of the granny squares.
Why does the pattern avoid acrylic for this project?
Acrylic will not block the same way cotton does, so the granny squares would not hold their crisp, flat shape. The drape would also differ enough from the sample that the finished dress would hang differently.
What is the join-as-you-go method used for here?
It connects each new granny square to a completed one during the final round instead of sewing or slip stitching squares together afterward. This pattern uses a flat version of it, replacing the usual ch-2 corner and ch-1 side chains with slip stitches into the neighboring square so the seam lies nearly invisible.
Is this a good first garment project?
The source intro calls it a good stretch project for a confident beginner who has finished a few accessories, as long as you read the whole pattern first and give yourself extra time. If you already know garment shaping, armhole logic, and granny squares, it sits comfortably in intermediate territory.
Why does the bodice use half double crochet instead of single crochet?
Half double crochet builds a denser, smoother fabric than single crochet while working up faster than double crochet. That density gives the bodice panels enough structure to hold their shape through the armhole and shoulder shaping.
Original pattern: https://crochetwithmia.com/sunflower-yellow-granny-square-baby-dress-free-crochet-pattern/
About the Author

Marisol QuinteroWho runs Crochet Obsessed, why a stitch count sits at the end of every round, how a pattern gets written here, and the things this site will never do.
More Patterns
- IntermediateNo. 01

Rose Granny Square Tote Crochet Pattern
Rose granny square tote crochet pattern made from 18 dimensional rose squares for a sturdy, romantic everyday bag.
- IntermediateNo. 02
Tropical octopus baby blanket crochet pattern with appliqués
Tropical octopus baby blanket crochet pattern: a cream filet base with coral and turquoise octopus appliqués, leaves, and…
- IntermediateNo. 03
Sunny lemon couple amigurumi crochet pattern
Sunny lemon couple amigurumi crochet pattern with embroidered slices and safety eyes for a cheerful handmade shelf pair.


