- LevelIntermediate
- Time4-6 hours
- Hook4.0 mm
- YarnWorsted
About This Pattern
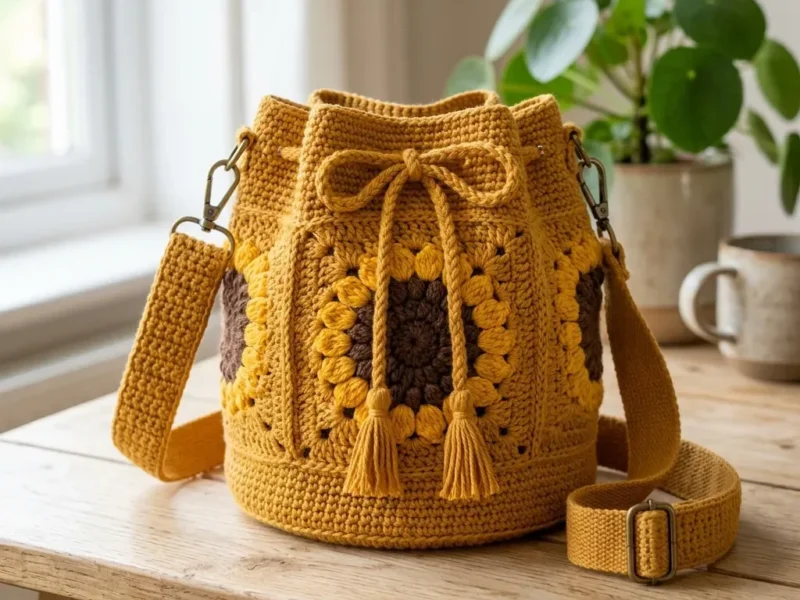
I get a little giddy over this one. There is something about a sunflower built from puff stitch petals that feels like a tiny burst of sunshine you get to carry around. It is cheerful without trying too hard, and that is my favorite kind of cheerful.
Picture this bag sitting on a counter by the door, honey gold and golden yellow catching the light. The drawstring top with its tassels gives it a slightly playful, finished look. It reads as handmade in the best way, not fussy, just warm.
The finished bag measures approximately 8.5 inches / 21.5 cm tall and 7.25 inches / 18.5 cm across the base, with about 23 inches / 58.5 cm around the upper body. The strap adjusts from roughly 36 to 48 inches / 91.5 to 122 cm, making it comfortable for crossbody wear on most body types.
- Work the Base and Bottom Wall in main color, increasing steadily in the round until the base matches the square panel's edge count.
- Join the base to the square panel so the stitch counts line up evenly all the way around.
- Add the Top Band with Eyelets, working plain rounds first, then the eyelet round that sets up the drawstring openings.
- Finish the top band with a final round that fills in the eyelet spaces before moving to assembly.
- Make the D-Ring Tabs and attach the rings, then work the Crossbody Strap and thread it through the slider and clasps.
- Chain and slip stitch the drawstring cord, weave it through the eyelets, and tie it off at the front center.
- Make two tassels and attach one to each cord end, then block the whole bag to settle the squares flat.
On the desk
Yarn
- MC (main color) honey gold: 360 yards / 329 meters
- B (brown) : 55 yards / 50 meters
- C (golden yellow) : 85 yards / 78 meters
- Use a worsted or aran weight cotton or cotton blend yarn, such as Lion Brand 24/7 Cotton, Paintbox Yarns Cotton Aran, or Dishie Worsted. Look for a firm worsted cotton that creates dense fabric, and avoid slippery or very stretchy yarns, especially for the strap.
Hooks
- US G/6 (4.0 mm) hook for the main bag construction
- US H/8 (5.0 mm) hook for the drawstring if you tend to crochet tightly
Notions
- 4 stitch markers
- Tapestry needle
- Scissors
- Tape measure
- Pins or clips for assembly
Hardware
- Two 1 inch / 25 mm D-rings or O-rings
- Two swivel clasps
- One 1 inch / 25 mm strap slider
Optional
- Cotton fabric, thread, and hand-sewing needle if you want to add a lining inside the bag.
Stitch shorthand
- Puff Stitch — This creates those lovely textured petals. Work it like this: yarn over, insert hook in the indicated space, yarn over and pull up a loop. Repeat that sequence 4 times total in the same space (you’ll have 9 loops on your hook). Then yarn over and pull through all loops on hook, chain 1 to close the puff.
- 3-dc Cluster — Yarn over, insert hook in space, yarn over and pull up a loop, yarn over and pull through 2 loops. You now have 2 loops remaining on your hook. Repeat that sequence 2 more times in the same space (you’ll have 4 loops on hook). Yarn over and pull through all loops.
- Invisible Join — Cut your yarn leaving a tail. Pull the tail through the last stitch. Thread your tapestry needle under both loops of the first stitch of the round, then back into the center of the last stitch. This mimics a regular stitch and creates a seamless finish.
- BLO — back loop only
- ch — chain
- ch-sp — chain space
- dc — double crochet (yarn over, insert hook, pull up loop, yarn over and pull through 2 loops twice)
- hdc — half double crochet
- inc — increase (2 stitches in same stitch)
- MC — main color
- rep — repeat
- rnd — round
- RS — right side
- sc — single crochet (insert hook, pull up loop, yarn over and pull through both loops)
- sl st — slip stitch
- sp — space
- st(s) — stitch(es)
- tr — treble crochet
- yo — yarn over
- UK crocheters note — US sc equals UK dc, US dc equals UK tr, US tr equals UK dtr.
Sunflower granny square bucket bag crochet pattern
Main Pattern
Use B (brown) for the center, C (golden yellow) for the petals, and MC (honey gold) for the square frame and border. The chain-3 counts as 1 dc where stated. Block each square before joining. Make 4 squares total.
- Round 1
(B): Make a magic ring. Ch 2, work 16 dc in the ring, sl st to first dc. (16 dc)
- Round 2
(B): Ch 1, [sc in next dc, ch 1] around, sl st to first sc. (16 sc, 16 ch-1 sps)
- Round 3(16)
(C): Sl st into first ch-sp, ch 1, work puff st in each ch-sp around, sl st to first puff. (16 puffs)
- Round 4
(C): Ch 2, work 3-dc cluster in each closing ch-sp around, ch 1 after each cluster, sl st to first cluster. (16 clusters, 16 ch-1 sps)
- Round 5
(MC): Join MC in any ch-sp. Ch 3, 2 dc in same sp, ch 2, 3 dc in same sp; [3 dc in each of next 3 sps, (3 dc, ch 2, 3 dc) in next sp] 3 times; 3 dc in each of last 3 sps, sl st to top of ch-3. (60 dc, 4 corner ch-2 sps)
- Round 6
(MC): Ch 1, sc in each dc; in each corner ch-2 sp work (sc, ch 2, sc), sl st to first sc. (68 sc; 17 sc per side)
- Round 7
(MC): Ch 1, sc in each sc; in each corner ch-2 sp work (sc, ch 2, sc), sl st to first sc. (76 sc; 19 sc per side)
- Round 8
(MC): Repeat Rnd 7. (84 sc; 21 sc per side)
- Round 9
(MC): Repeat Rnd 7. Fasten off with invisible join. (92 sc; 23 sc per side) Checkpoint: Each square measures approximately 5.75 inches / 14.5 cm across after blocking. Each edge has 23 sc between corner spaces.
Base and Bottom Wall
Work in joined rounds with MC. The chain 1 at the start of sc rounds does not count as a stitch. Join each round with a slip stitch to the first sc.
- Round 1
Magic ring, ch 1, 8 sc in ring. (8 sc)
- Round 2
Inc in each st around. (16 sc)
- Round 3
[Sc in next st, inc] 8 times. (24 sc)
- Round 4
[Sc in next 2 sts, inc] 8 times. (32 sc)
- Round 5
[Sc in next 3 sts, inc] 8 times. (40 sc)
- Round 6
[Sc in next 4 sts, inc] 8 times. (48 sc)
- Round 7
[Sc in next 5 sts, inc] 8 times. (56 sc)
- Round 8
[Sc in next 6 sts, inc] 8 times. (64 sc)
- Round 9
[Sc in next 7 sts, inc] 8 times. (72 sc)
- Round 10
[Sc in next 8 sts, inc] 8 times. (80 sc)
- Round 11
[Sc in next 9 sts, inc] 8 times. (88 sc)
- Round 12
Sc in next 21 sts, inc; [sc in next 21 sts, inc] 3 times. (92 sc)
- Round 13
BLO sc in each st around to turn the base upward. (92 sc)
- Rounds 14–16
Sc in each st around. Fasten off after Rnd 16. (92 sc) Checkpoint: Base measures approximately 7.25 inches / 18.5 cm across. The top of the bottom wall has 92 stitches, matching 4 panel edges times 23 stitches.
Top Band with Eyelets
Join MC at any upper corner. Work around the top of the panel tube, placing 23 sc across each square edge.
- Round 1
Ch 1, sc in each edge st around. Do not work into corner ch-2 spaces unless needed to close a tiny gap. (92 sc)
- Round 2
Sc in each st around. (92 sc)
- Round 3
Eyelets Sc in first 2 sts, [ch 2, skip 2 sts, sc in next 6 sts] 10 times, ch 2, skip 2 sts, sc in last 8 sts. (70 sc, 11 ch-2 sps; 92 positions)
- Round 4
Sc in each sc and 2 sc in each ch-2 sp around. (92 sc)
- Rounds 5–7
Sc in each st around. Fasten off after Rnd 7. (92 sc)
D-Ring Tabs (Make 2)
- Row 1
Ch 7, sc in 2nd ch from hook and each ch across. (6 sc)
- Rows 2–12
Ch 1, turn, sc in each st across. (6 sc) Finish: Wrap tab around a D-ring, overlap short ends by 2 rows, and sew firmly to the upper side seam through the top band and panel border.
Crossbody Strap
- Row 1
Ch 8, sc in 2nd ch from hook and each ch across. (7 sc)
- Rows 2–120
Ch 1, turn, sc in each st across until strap measures approximately 42 inches / 106.5 cm, or your desired length. (7 sc)Edge: Sc evenly around the long sides, placing 3 sc in each corner. Fasten off and weave ends.
Hardware assembly: Thread strap through slider and swivel clasps. Sew the folded ends securely with matching yarn or strong thread.Strength tip: For a non-stretch strap, sew a strip of cotton webbing or grosgrain ribbon to the wrong side before attaching hardware.
Where it goes
- An everyday market or errand bag that holds a wallet, keys, and a water bottle without feeling precious.
- A warm-weather crossbody for walks or outdoor markets, paired with simple cotton or linen outfits that let the sunflower motif stand out.
- A gift bag for someone who likes plant or flower motifs, filled with small treats instead of wrapped in paper.
- A dedicated project bag for a small knitting or crochet work-in-progress, since the bucket shape and drawstring top keep things contained.
Color ideas
- Classic sunflower Brown for the Rnd 1 and 2 center, golden yellow for the Rnd 3 and 4 puff stitch petals, honey gold main color for the granny square frame, base, top band, tabs, and strap.
- Golden monochrome Golden yellow for the center rounds and petals, honey gold main color for everything else including the base, top band, D-ring tabs, and crossbody strap, with brown reserved only for the smallest center round.
Care
Hand wash the finished bag in cool water with a mild detergent, since the honey gold, brown, and golden yellow cotton yarns hold their shape best without a washing machine's agitation.
Lay the bag flat to dry on a towel, reshaping the circular base and granny square panel by hand while it is still damp.
Store it stuffed lightly with tissue paper or a cloth bag to help the bucket shape hold, away from direct sunlight so the colors stay true.
Assembly
- Arrange the Squares Arrange the four squares in a ring with the right side facing out and all sunflowers upright. Use MC and either a mattress stitch or a flat slip-stitch join.
- Join Vertical Edges Join vertical edges: Connect 23 edge stitches from one square to 23 edge stitches of the next square. Repeat until all four squares form a tube. Keep corner ch-2 spaces tidy and aligned at top and bottom.
- Attach Tube to Base Attach tube to bottom wall: Pin one lower edge of each square to 23 stitches of the bottom wall. Sew or slip-stitch through 23 edge stitches per square and 92 wall stitches total.
- Reinforce Corners Reinforce corners: Add a few neat whipstitches at the four lower corners where the square corners meet the round base. This prevents gaps.
- Weave in Ends Weave in ends inside the bag as you go.
- Placement Tip Placement tip: The front and back each show one full sunflower panel centered. The side panels curve around the bucket shape. Keep the seams at the side edges so the drawstring bow can sit nicely at the front.
- Step 1 Steam or wet-block the finished bag lightly, shaping the top rim and square panels with your hands.
- Step 2 Consider adding a fabric lining if you’ll carry keys, cosmetics, or small items that might slip through the corner spaces of the granny squares.
- Step 3 Check all hardware joins with a firm tug before use. Reinforce any join that shifts.
Easy to get wrong
Base and panel stitch counts mismatched
Confirm every granny square has exactly 23 stitches per edge and the base totals 92 stitches before joining. Recount the last increase round on the base if the two pieces do not line up.
Eyelets landing unevenly around the top band
Remember Round 3 starts with 2 sc, repeats the eyelet sequence 10 times, then closes with the final eyelet and 8 sc. Place a stitch marker at the starting point so the repeats stay on track.
Granny square cupping or ruffling at the edges
Block the square firmly with pins or clips before joining it to the base. If it still waves after blocking, try a different hook size for the border rounds only.
Between the songs
- What makes this one satisfying is the layering of techniques inside a single panel. You build the sunflower center with puff stitch petals, frame it with a granny square border, then carry that structure into a circular base that has to match the panel's stitch count exactly. The eyelet round asks for careful repeat counting, which feels like a small puzzle once the drawstring finally weaves through clean. Add the D-ring tabs and an adjustable crossbody strap, and you get hardware details that make this feel like a real bag rather than a granny square turned into one. It is the kind of project where every round teaches you something new.
Listener questions
Can I make this bag without the D-rings and swivel clasps?
Yes, you can skip the hardware and sew the strap ends directly to the D-ring tabs instead. The bag will still hold its shape fine, you just lose the adjustable, detachable strap feature.
Why does the pattern recommend a firm worsted cotton?
A dense, non-stretchy cotton like the ones listed in the materials keeps the granny square panel structured instead of sagging under the weight of items inside. Slippery or stretchy yarns are especially risky for the strap, since they can stretch under the bag's weight.
Do I need to add a fabric lining?
It is optional but worth considering if you plan to carry keys, cosmetics, or anything small enough to slip through the corner spaces of the granny squares. The notes mention it as an assembly step for exactly that reason.
What if my drawstring cord comes out uneven lengths?
Chain until the cord measures approximately 66 inches, then slip stitch into the back bump of each chain for a rounded finish. Weave it through all 11 eyelets starting and ending at the front center so both sides end up even before tying the bow.
My strap feels stretchy after a few wears, what went wrong?
This usually comes down to yarn choice or hook size for the Crossbody Strap section. Try a smaller hook next time, or add a fabric or webbing backing for extra support.
Original pattern: https://bunnypatterns.com/sunflower-granny-square-bucket-bag-free-crochet-pattern/
About the Author

Marisol QuinteroWho runs Crochet Obsessed, why a stitch count sits at the end of every round, how a pattern gets written here, and the things this site will never do.
More Patterns
- IntermediateNo. 01

Rose Granny Square Tote Crochet Pattern
Rose granny square tote crochet pattern made from 18 dimensional rose squares for a sturdy, romantic everyday bag.
- IntermediateNo. 02
Tropical octopus baby blanket crochet pattern with appliqués
Tropical octopus baby blanket crochet pattern: a cream filet base with coral and turquoise octopus appliqués, leaves, and…
- IntermediateNo. 03
Sunny lemon couple amigurumi crochet pattern
Sunny lemon couple amigurumi crochet pattern with embroidered slices and safety eyes for a cheerful handmade shelf pair.


