- LevelIntermediate
- Time2-3 Hours
- Hook3.0 mm
- YarnDK (Light Worsted)
About This Pattern
This soft and simple crochet baby bonnet starts life as a tiny circle and grows into the sweetest little cap for your favorite baby. Built from a basic double crochet circle that's shaped through a few increase rounds, it's the kind of pattern that looks far more polished than the effort it actually takes. It's perfect for new crocheters ready to try shaping, or for experienced makers who want a fast, satisfying baby gift they can finish in an afternoon.
The techniques here are refreshingly approachable: chain-3 starting rounds, evenly spaced double crochet increases, and a lovely shell stitch border worked with skipped stitches for texture. You'll also work a deliberate gap in the border rounds to leave the neck opening unworked, which is the clever little trick that turns a flat circle into a wearable bonnet shape. Expect this project to take about 2 to 3 hours, making it an easy weekend or evening project.
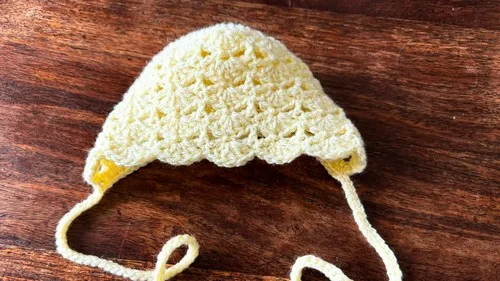
The finished bonnet is soft, lightweight, and airy thanks to the DK weight yarn, with a scalloped shell edge framing baby's face beautifully. It works up in sizes from newborn through 3 years by simply adjusting your hook, so it's a pattern you'll return to again and again. Whether you're stitching it for your own little one or wrapping it up for a baby shower, it's the kind of handmade gift that feels genuinely special.
- Begin with a small ring and work an initial round of double crochets to form the crown of the bonnet.
- Close the center hole snugly by pulling the starting tail before moving into the next round.
- Increase evenly around the circle so the stitch count doubles, giving the bonnet its rounded cap shape.
- Add a single crochet foundation row to set up stitches evenly for the shell pattern.
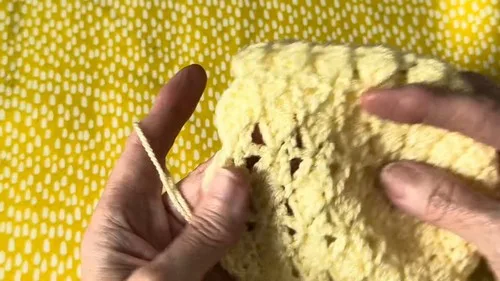
- Work the shell border by skipping stitches, clustering double crochets into one stitch, then anchoring with a single crochet, repeating around.
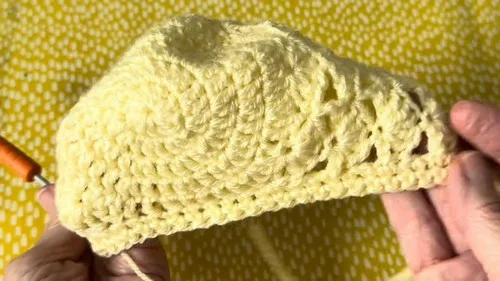
- Leave several stitches unworked at the end of the border row to form the open neck edge.
- Finish with a final single crochet after the last shell, then weave in all yarn tails for a clean finish.
Materials
- Double knit weight 3 yarn
Crochet hook (choose size based on baby’s age)
- 0 to 6 months: 3.0 mm
- 6 to 12 months: 3.5 mm
- 1 to 3 years: 4.0 mm
Tools
- Yarn needle
- Stitch marker (optional but helpful)
Crochet Abbreviations
- sc
- single crochet
- dc
- double crochet
- shell
- shell stitch
Soft and Simple Crochet Baby Bonnet Pattern for All Seasons
Main Pattern
- Round 1
Forming the Circle Start with a slip knot. Chain 3. Work 10 double crochets into the first chain.Slip stitch to the first DC to join.
Pull the tail to close the center hole. - Round 2
First Increase Round Chain 2. Work 2 double crochets into each stitch around. You should have 20 stitches at the end.Slip stitch to the first DC to join.
- Round 3
Second Increase Round Chain 2. Pattern: 2 DC into first stitch, 1 DC into next stitch. Repeat around. You should have 30 stitches.Join with a slip stitch.
- Round 4
Third Increase Round Chain 2. Pattern: 2 DC into first stitch, 1 DC into each of next 2 stitches. Repeat around. You should have 40 stitches.Join with a slip stitch.
- Round 5
Final Increase Round Chain 2. Pattern: 2 DC into first stitch, 1 DC into each of next 3 stitches. Repeat around. You should have 50 stitches.Join with a slip stitch.
Shell Stitch Section (Worked in Rows)
Part 2
- Row 1
Start Shell Pattern Chain 1 and turn. 1 single crochet in the first stitch. Pattern: Skip 2 stitches, work 5 DC in the next stitch (shell), skip 2 stitches, 1 SC in next stitch. Repeat.Leave a gap of 6 stitches unworked at the end for the neck opening.
End with 1 SC after the final shell. - Row 2
Chain Bridge Row Chain 5 and turn. 1 SC into the third DC of the shell below. Chain 2.1 DC into the SC below.
Chain 2.Repeat the pattern of SC into shell, chain 2, DC into SC below.End the row with 1 DC into the first SC of the row below. - Row 3
Stacking Shells Chain 1 and turn. 5 DC into the SC from the row below. 1 SC into the top of the DC from the previous row. Repeat shell and SC placement across. End with 1 SC into the turning chain from Row 2.Repeat Shell Rows Repeat Row 2 and Row 3 three more times.
Adjust number of repeats as needed to ensure bonnet depth fits the baby comfortably.
Border
Chain 1.
Work single crochet stitches along the side, back, and other side of the bonnet.
First Tie After completing one side, chain 45.
Slip stitch into each chain, starting from the second chain from the hook, back toward the bonnet.
Continue working SC across the back of the bonnet to the other side.
Second Tie At the opposite corner, chain 45 again.
Slip stitch back to the bonnet starting from the second chain from the hook.
Finishing Touches Cut the yarn and pull through to fasten off.
Use a yarn needle to weave in all loose ends.
For durability, split the yarn as you weave to secure it better.
More photos
Important Notes
- 💡 Always swatch first — hook size dramatically changes bonnet size here, so a quick gauge check before you start saves frustration later.
- 💡 Use a stitch marker in the first stitch of every round; it's the easiest way to track your join point and avoid losing your place in the shell border.
- 💡 When closing the center hole after your first round of 10 double crochets, pull slowly and evenly so the fabric doesn't pucker or twist.
- 💡 DK weight yarn splits easily, so work with shorter arm lengths of yarn and check your tension every few stitches to keep the fabric smooth.
- 💡 Mark your 6-stitch neck gap with a scrap of contrasting yarn before you start the border round so you don't accidentally work through it.
- 💡 Weave in all tails securely along the inside of the bonnet, especially near the shell border, since loose ends can scratch delicate baby skin.
- 💡 Gauge: Ensure your gauge matches the tutorial for accurate sizing, and adjust your hook size if your stitches are too tight or too loose.
Common Mistakes and Fixes
- Not pulling the tail tight enough after
Before joining with your slip stitch, tug firmly on the starting tail until the center hole closes completely, then weave in the tail securely so it doesn't loosen over time.
- Losing count during the increase round
Place a stitch marker in the first stitch of the round and count in groups of 2 as you go; pause halfway through to verify you're on track before finishing the round.
- Working the shell stitches unevenly
Count out loud as you work each shell — skip 2, work 5 DC into the next stitch, skip 2, 1 SC — and use a marker to flag every fifth shell as a checkpoint.
- Forgetting to leave the 6-stitch gap
Before starting the border round, count out and mark the 6 stitches you'll skip at the end so you don't accidentally work all the way around the circle.
- Using the wrong hook size
Double check the materials list — 3.0mm for 0-6 months, 3.5mm for 6-12 months, 4.0mm for 1-3 years — and always crochet a quick gauge swatch first.
- Skipping the chain-2 turning chains
Always work your chain 2 before starting the next round of double crochets, and treat it as your first stitch marker point when counting stitches.
Variations
- I adore this bonnet because it proves you don't need a complicated pattern to make something that looks handmade-with-love. Starting with 10 double crochets into that first chain-3 ring and watching it double to 20 stitches in just one round is so satisfying — you can practically see the hat taking shape in your hands. My favorite part is definitely the shell border: skipping two stitches, working 5 double crochets into the next one, then popping in a single crochet to anchor it creates this gorgeous scalloped edge that frames baby's face like a little crown. Leaving that 6-stitch gap unworked for the neck opening feels like a clever little secret once you realize how naturally the bonnet wraps around baby's head afterward. It's also endlessly customizable — swap yarn colors, add a bow, or leave it simple and classic. I love that this pattern rewards you quickly; there's no waiting through dozens of rounds to see results. Every time I make one, I'm reminded why simple patterns done well are often the most charming ones in my whole collection.
Frequently Asked Questions
What size baby will this bonnet fit?
This pattern is designed to fit babies from newborn through 3 years old simply by changing your hook size — 3.0mm for 0-6 months, 3.5mm for 6-12 months, and 4.0mm for 1-3 years. The stitch counts stay the same throughout.
Can I use a different yarn weight than DK?
You can substitute a light worsted or sport weight yarn, but you'll want to adjust your hook size accordingly and swatch first to make sure the bonnet still fits properly. Sticking close to DK weight gives the best balance of softness and structure for this design.
Why does the pattern leave a gap unworked in the border?
The 6-stitch gap left unworked at the end of the border round creates the neck opening, allowing the bonnet to wrap comfortably around baby's head and under the chin. Without this gap, the bonnet would form a closed circle instead of a wearable cap shape.
How do I keep my shell stitches even?
Consistency comes from counting carefully — always skip 2 stitches, work exactly 5 double crochets into the next stitch, skip 2 more, then work 1 single crochet before repeating. Using a stitch marker every few shells helps you catch mistakes early rather than at the end of the round.
Is this pattern good for a beginner crocheter?
This pattern is a great next step after mastering basic double crochet and single crochet stitches, since it introduces simple increases and shell stitch shaping. It's not the very first project I'd recommend, but a confident beginner comfortable with basic stitches should find it very manageable.
Original pattern: https://crocheteverything.com/soft-and-simple-crochet-baby-bonnet-pattern-for-all-seasons/
About the Author

Marisol QuinteroWho runs Crochet Obsessed, why a stitch count sits at the end of every round, how a pattern gets written here, and the things this site will never do.
More Patterns
- IntermediateNo. 01

Slouchy everyday beanie worked flat in half double crochet
Crochet beanie pattern for a slouchy everyday look worked flat with hdc rows, then seamed into a soft,…
- IntermediateNo. 02
Crochet amigurumi doll with dress, shoes, and hat
Crochet amigurumi doll pattern with dress, shoes, and hat details for a soft, huggable keepsake you build one…
- IntermediateNo. 03
Chunky moss stitch crochet sweater with raglan-free shoulders
Chunky crochet sweater pattern using moss stitch, worked flat with a 10mm hook for a soft, fast, cool-weather…


