- LevelIntermediate
- Time4-6 hours
- Hook3 mm
- YarnWorsted
About This Pattern
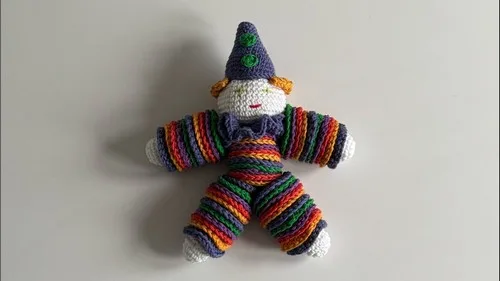
This clown has a cheerful, slightly wonky charm, the kind of project that turns leftover yarn into a character with its own grin. Every scrap color you throw at it just adds to the personality. There is nothing precious about it, which is exactly the point.
Your hands will spend most of their time on small discs and tiny limbs, so this is a counting-and-repeating kind of make. You will string, thread, and pull taut more than once, which keeps your fingers busy in a satisfying way. It rewards patience over speed.
Finished, this clown sits well on a shelf, a bed, or tucked into a reading nook, hat slightly askew. It has enough heft from the stuffing to hold a pose without flopping. Anywhere you want a splash of mismatched color and a bit of handmade whimsy, this clown belongs.
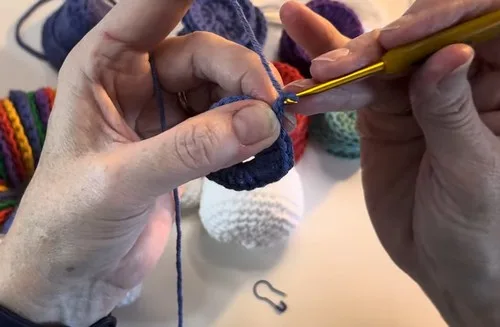
- Crochet a big batch of small flat discs using whatever scrap colors you have on hand.
- Work the hands and feet separately, stuffing each piece before you close it.
- String a set of discs onto yarn strands running through each hand and foot to form the limbs.
- String another batch of discs for the body, threading the arms through the center as you go.
- Attach the legs firmly at the base of the body so the clown can stand or sit.
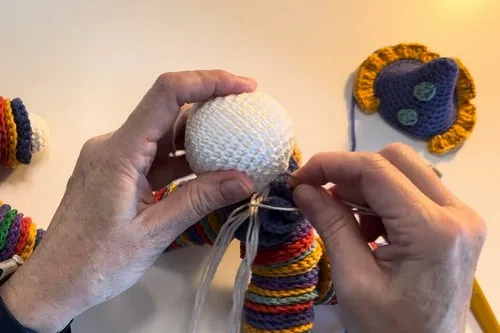
- Crochet the ruffle and the head, then pull all your strands through both to join everything.
- Tie off the strands at the top of the head and trim the ends neatly.
- Sew on the hat, add light stuffing before closing it, then embroider the face and attach the buttons.
On the desk
- Scrap yarn in various colors
- Crochet hook 3 mm
- Safety eyes or embroidery thread for features
- Stuffing
- Yarn needle
- Scissors
Stitch shorthand
- ch — chain
- st — stitch
- sl st — slip stitch
- sc — single crochet
- dc — double crochet
- inc — increase
- dec — decrease
Scrap yarn crochet clown amigurumi pattern
Crochet Discs (Make 52 or More)
- Round 1
Magic Circle ch 2, 11 dc in ring (12 dc). Join with sl st.
- Round 2
Ch 2, 2 dc in each st (24 dc). Join with sl st. Finish with invisible join and leave a long tail.
Hands and Feet (Make 4 Total)
- Round 1
Magic Circle, 5 sc.
- Round 2(10)
2 sc in each st (10).
- Round 3(15)
(1 sc, inc) repeat (15).
- Rounds 4–6(15)
Sc around (15).
- Round 7
(1 sc, dec) repeat. Add stuffing.
- Round 8
Decrease around (5). Close hole, leaving three strands of yarn for assembly.
Head
- Round 1
Magic Circle, 6 sc.
- Round 2(12)
Inc in each st (12).
- Round 3(18)
(1 sc, inc) around (18).
- Round 4(24)
(2 sc, inc) around (24).
- Round 5(30)
(3 sc, inc) around (30).
- Round 6(36)
(4 sc, inc) around (36).
- Rounds 7–12(36)
Sc around (36).
- Round 13(30)
(4 sc, dec) around (30).
- Round 14(24)
(3 sc, dec) around (24).
- Round 15(18)
(2 sc, dec) around (18).
- Round 16
(1 sc, dec) around (12). Stuff firmly.
- Round 17
Dec around (6). Close hole.
Hat
- Round 1
Magic Circle, 6 sc.
- Round 2(9)
(1 sc, inc) around (9).
- Round 3(9)
Sc around (9).
- Round 4(12)
(2 sc, inc) around (12).
- Round 5(12)
Sc around (12).
- Round 6(15)
(3 sc, inc) around (15).
- Round 7(15)
Sc around (15).
- Round 8(18)
(4 sc, inc) around (18).
- Round 9(18)
Sc around (18).
- Round 10(24)
(2 sc, inc) around (24).
- Round 11(24)
Sc around (24).
- Round 12(30)
(3 sc, inc) around (30).
- Round 13(30)
Sc around (30).
- Round 14(36)
(4 sc, inc) around (36).
- Round 15
Sc around (36). Leave tail for sewing.
Ruffle
- Round 1
Magic Circle ch 2, 23 dc in ring (24). Join with sl st.
- Round 2
Ch 2, 3 dc in same st. 4 dc in each st around. Join and fasten off.
Buttons/Dots (Make 2)
- Round 1
Magic Circle 6 sc. Join with sl st. Leave tail for sewing.
Hair (Optional)
Choose placement row on head.
Work 3 dc in each stitch to create curls. Fasten off.
More shots
Where it goes
- A shelf or windowsill accent piece where mismatched scrap colors can show off next to other handmade decor.
- A soft toy for imaginative play, paired with other amigurumi animals in a toy basket.
- A thoughtful handmade gift for a new baby's room, set alongside a crocheted blanket or mobile.
- A craft fair or market item that lets you use up odd yarn leftovers from other projects.
Color ideas
- Rainbow scrap mix Let every disc in the body, arms, and legs use a different scrap color, keep the head and hands/feet in one skin-tone color, and make the hat and ruffle in a single bold contrast color.
- Two-tone harlequin Alternate just two colors disc by disc through the body and limbs, use a third neutral color for the head, and tie the ruffle and hat together in one of the original two colors.
Care
Hand wash gently in cool water if your scrap yarn is a washable fiber blend, since mixed scraps may react differently to heat and agitation.
Lay the clown flat to air dry rather than hanging it, so the stuffed body and limbs keep their shape instead of stretching.
Reshape the hat and ruffle by hand while slightly damp, then store the finished clown upright or flat away from direct sunlight to keep the scrap colors from fading.
Assembly
- Step 1 String 10 discs onto yarn strands of each hand and foot to form arms and legs.
- Step 2 String 12 discs for the body, attaching arms through the center.
- Step 3 Join legs securely at the base.
- Step 4 Thread all strands through the ruffle, then through the head. Pull tight.
- Step 5 Tie strands at top of head and trim excess.
- Step 6 Sew hat onto head, stuffing lightly before closing.
- Step 7 Sew on buttons and embroider eyes and mouth.
Easy to get wrong
Uneven disc sizes
Keep your tension consistent across all the discs since they stack directly on top of each other, and a tighter or looser one will throw off the whole column. Count your stitches each round before moving on.
Strands too loose when stringing discs
Pull the yarn strands snug as you thread each disc onto them so the stack sits firm rather than wobbly. A loose stack will slump instead of standing up.
Overstuffing hands and feet
Add stuffing gradually to the hands and feet so the decrease rounds can still close neatly. Too much stuffing too early makes the final rounds hard to cinch shut.
Between the songs
- What makes this one fun is the disc-stacking technique: you crochet dozens of flat two-round discs, then string them onto yarn strands to build the arms, legs, and body like beads on a cord. It is a completely different construction method from a typical amigurumi tube, and it is oddly meditative once you get into a rhythm. The head still builds the classic way, round by round from a magic circle, so you get both techniques in one project. Pulling everything through the ruffle and head at the end feels like the big reveal, when a pile of parts suddenly becomes a clown. It is a great scrap-buster with a real payoff.
Listener questions
Can I really use any scrap yarn for this clown?
Yes, that is the whole appeal of this pattern, since the discs are built one at a time and each can be a different color or even a different fiber. Just try to keep the weight similar across your scraps so the discs stack evenly.
Why does the body use discs instead of a solid crocheted tube?
The disc-and-string method lets you mix dozens of colors into one limb or body section without constantly changing yarn mid-round. It also gives the finished clown a slightly textured, segmented look that a plain tube would not have.
Do I need safety eyes, or can I embroider the face?
The materials list gives you both options, so it comes down to preference and who the clown is for. Embroidered features are a safer choice for a very young child's toy.
How many discs will I actually need in total?
The pattern calls for making 52 or more discs, with 10 strung for each hand and foot and 12 for the body. Keep a running tally as you crochet so you know when you have enough.
Is the hair step necessary to finish the clown?
No, the hair is marked optional in the pattern, so you can leave the head bare under the hat if you prefer a cleaner look. It is a nice extra touch if you want a little personality peeking out from under the brim.
Original pattern: https://crocheteverything.com/chubby-colorful-crochet-clown-free-amigurumi-pattern-made-with-scrap-yarn/
About the Author

Marisol QuinteroWho runs Crochet Obsessed, why a stitch count sits at the end of every round, how a pattern gets written here, and the things this site will never do.
More Patterns
- IntermediateNo. 01

Rose Granny Square Tote Crochet Pattern
Rose granny square tote crochet pattern made from 18 dimensional rose squares for a sturdy, romantic everyday bag.
- IntermediateNo. 02
Tropical octopus baby blanket crochet pattern with appliqués
Tropical octopus baby blanket crochet pattern: a cream filet base with coral and turquoise octopus appliqués, leaves, and…
- IntermediateNo. 03
Sunny lemon couple amigurumi crochet pattern
Sunny lemon couple amigurumi crochet pattern with embroidered slices and safety eyes for a cheerful handmade shelf pair.


