- LevelIntermediate
- Time4-55 hours depending on piece
- Hook6.0 mm
- YarnWorsted
About This Pattern
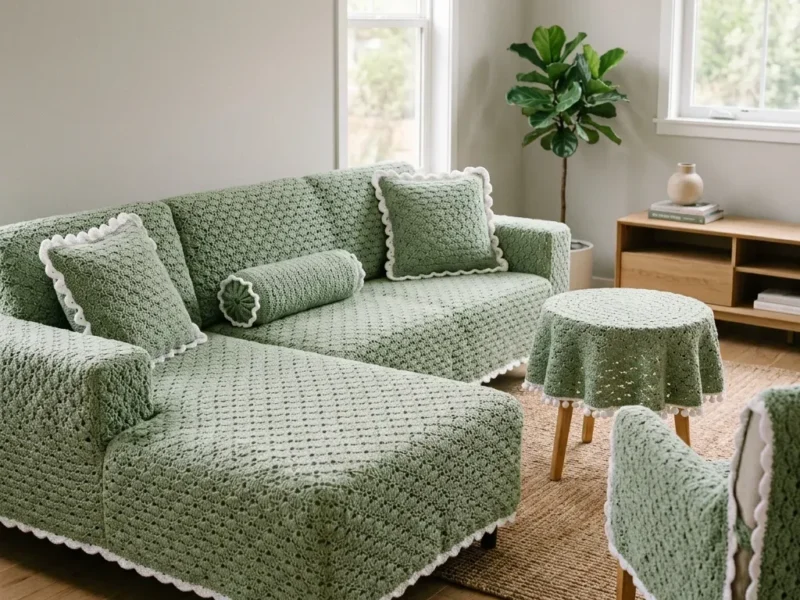
This one's got that soft, sunlit cottage feeling. Sage green against a white scallop edge reads calm and a little old-fashioned, the kind of thing that makes a room feel lived-in rather than decorated. It's not flashy. It just sits there being quietly right.
Your hands will spend most of their time on long, flat rows of shell repeats, which means your real job is holding even tension across a wide panel. There's a satisfying rhythm once the shell sequence clicks into muscle memory. The challenge is patience, not difficulty.
Picture it draped over a sofa or folded on an armchair, with a couple of throw pillows and maybe the bolster nearby. The repeated diamond texture ties every piece together so the room feels styled, not thrown together. It's furniture dressing that actually looks handmade on purpose.
- Start with a foundation chain and establish the shell repeat across your first row before anything else matters.
- Repeat the shell row over and over, trusting the sc-and-5-dc rhythm to keep the stitch count steady.
- Shape the end caps separately, since those rounds build up rather than running flat like the main panels.
- Work through the increasing rounds section where the piece gradually grows wider before you level off.
- Drop into the shell drop rounds near the finish to taper the shaping back down cleanly.
- Join short edges with slip stitches where the pattern calls for a tube rather than a flat seam.
- Add the CC scallop edging last, checking your stitch count lines up before you commit to the repeat.
- Block each panel before pairing it with its matching piece in the set.
On the desk
- Lion Brand Heartland works beautifully for this project. It’s 100% acrylic with excellent stitch definition for shell work, and it’s machine washable. Essential for furniture covers! Choose shade Joshua Tree for the sage green and Natural for the white. You’ll need approximately 25 skeins MC and 2 skeins CC.
- Paintbox Simply DK produces a drapier fabric that lays flat nicely. Choose Grass Green or Pistachio for MC and Paper White for CC. You’ll need approximately 46 balls MC and 3 balls CC.
- Caron Simply Soft is a great budget option with excellent softness. Choose Soft Green for MC and White for CC. You’ll need approximately 20 skeins MC and 2 skeins CC.
- Whatever you choose, look for smooth worsted weight yarn with a matte finish. Avoid fuzzy or heavily plied yarns that obscure stitch definition.
- Yarn (Main Color, MC): Sage green, worsted weight (category 4), approximately 6,200 yards total for the complete set
- Yarn (Contrast Color, CC): White or off-white, worsted weight (category 4), approximately 400 yards total for all edging
Crochet hook
- US size J / 6.0 mm
Additional supplies
- Tapestry needle for seaming and weaving ends
- Stitch markers, at least 10
- Scissors
- Measuring tape
Pillow forms
- two 18-inch square, one 6-by-18-inch bolster
- Rust-proof blocking pins and blocking mats
- Row counter (highly recommended for large panels)
Stitch shorthand
- ch — chain, the foundation stitch that creates a row of linked loops
- sl st — slip stitch, a joining stitch with no height
- sc — single crochet, a short basic stitch
- dc — double crochet, a taller stitch made by yarning over before inserting your hook
- sk — skip, pass over the indicated stitch without working into it
- sp — space
- st(s) — stitch or stitches
- beg — beginning
- rep — repeat
- RS — right side, the public-facing side of your work
- WS — wrong side
- MC — main color (sage green)
- CC — contrast color (white)
- t-ch — turning chain
- yo — yarn over
- pm — place marker
- rem — remaining
- approx — approximately
Sage green shell stitch sofa set for the whole living room
Foundation
With MC, ch 302.
Step by step: With MC, ch 62.
- Round 1
(RS): Sc in second ch from hook, [sk 2 ch, 5 dc in next ch, sk 2 ch, sc in next ch] 50 times. Ch 1, turn. (301 sts)through 36: Rep shell pattern row. (61 sts per row) After row 36, do not fasten off. Sl st the short edges together to form a tube.
- Round 2
(WS): Sc in first sc, [sk 2 dc, 5 dc in next dc (center dc of shell), sk 2 dc, sc in next sc] 50 times. Ch 1, turn. (301 sts)
- Round 2
establishes the pattern: each new shell is worked into the center (3rd) dc of the previous shell, and each sc is worked into the previous sc.Rows 3 through 68: Rep Row 2. Ch 1, turn after each row. (301 sts per row) After Row 68, do not fasten off. Proceed to scallop edging described in the Finishing section.
CHECKPOINT: After Row 68, the panel should measure approximately 86 inches wide and 34 inches tall. Count the shells across the top edge. You should have 50 shells and 51 sc stitches for a total of 301 stitches.
Main Pattern
- Round 1
(RS): Sc in second ch from hook, [sk 2 ch, 5 dc in next ch, sk 2 ch, sc in next ch] 35 times. Ch 1, turn. (211 sts)
- Round 2
and all subsequent rows: Sc in first sc, [sk 2 dc, 5 dc in center dc of next shell, sk 2 dc, sc in next sc] 35 times. Ch 1, turn. (211 sts)Rows 3 through 68: Rep Row 2. (211 sts) CHECKPOINT: Chaise panel should measure approximately 60 inches wide and 34 inches tall with 35 shells across.
Front Panel
With MC, ch 62.
- Round 1
(RS): Sc in second ch from hook, [sk 2 ch, 5 dc in next ch, sk 2 ch, sc in next ch] 10 times. Ch 1, turn. (61 sts)
- Round 2
and all subsequent rows: Sc in first sc, [sk 2 dc, 5 dc in center dc of shell, sk 2 dc, sc in sc] 10 times. Ch 1, turn. (61 sts)Work rows 2 through 36 in pattern. (61 sts)
Fasten off.
End Cap (make 2)
Work in rounds with MC.
- Round 1
Magic ring, ch 1, 6 sc into ring, sl st to first sc to join. (6 sc)
- Round 2
Ch 1, 2 sc in each st around, sl st to join. (12 sc)
- Round 3
Ch 1, [sc in next st, 2 sc in next st] 6 times, sl st to join. (18 sc)
- Round 4
Ch 1, [sc in next 2 sts, 2 sc in next st] 6 times, sl st to join. (24 sc)
- Round 5
Ch 1, [sc in next 3 sts, 2 sc in next st] 6 times, sl st to join. (30 sc)
- Round 6
Ch 1, [sc in next 4 sts, 2 sc in next st] 6 times, sl st to join. (36 sc)
- Round 7
Ch 1, [sc in next 5 sts, 2 sc in next st] 6 times, sl st to join. (42 sc)
- Round 8
Ch 1, [sc in next 6 sts, 2 sc in next st] 6 times, sl st to join. (48 sc)
- Round 9
Ch 1, [sc in next 7 sts, 2 sc in next st] 6 times, sl st to join. (54 sc)
- Round 10
Ch 1, [sc in next 8 sts, 2 sc in next st] 6 times, sl st to join. (60 sc)
- Round 11
Ch 1, [sc in next 9 sts, 2 sc in next st] 6 times, sl st to join. (66 sc)
- Round 12
Ch 1, [sc in next 10 sts, 2 sc in next st] 6 times, sl st to join. (72 sc) Fasten off with a 12-inch tail for seaming. Sew each end cap to the open ends of the body tube using mattress stitch. Leave one cap partially unstitched for inserting the bolster form, then close fully after insertion.
Main Pattern
- Round 1
With MC, magic ring, ch 1, 8 sc into ring, sl st to join. (8 sc)
- Round 2
Ch 1, 2 sc in each st around, sl st to join. (16 sc)
- Round 3
Ch 1, [sc in next st, 2 sc in next st] 8 times, sl st to join. (24 sc)
- Round 4
Ch 1, [sc in next 2 sts, 2 sc in next st] 8 times, sl st to join. (32 sc)
- Round 5
Ch 1, [sc in next 3 sts, 2 sc in next st] 8 times, sl st to join. (40 sc)
- Round 6
Ch 1, [sc in next 4 sts, 2 sc in next st] 8 times, sl st to join. (48 sc)
Main Pattern
- Round 1
(RS): Sc in second ch from hook, [sk 2 ch, 5 dc in next ch, sk 2 ch, sc in next ch] 31 times. Ch 1, turn. (187 sts)
- Round 2
and all subsequent rows: Sc in first sc, [sk 2 dc, 5 dc in center dc of shell, sk 2 dc, sc in sc] 31 times. Ch 1, turn. (187 sts)
- Round 3
through 68: Rep Row 2. (187 sts) Proceed to scallop and picot edging in CC. CHECKPOINT: Armchair cover should measure approximately 54 inches wide and 34 inches tall with 31 shells across each row.
Continue increasing rounds
- Round 7
[Sc in next 5 sts, 2 sc in next st] 8 times. (56 sc)
- Round 8
[Sc in next 6 sts, 2 sc in next st] 8 times. (64 sc)
- Round 9
[Sc in next 7 sts, 2 sc in next st] 8 times. (72 sc)
- Round 10
[Sc in next 8 sts, 2 sc in next st] 8 times. (80 sc)
- Round 11
[Sc in next 9 sts, 2 sc in next st] 8 times. (88 sc)
- Round 12
[Sc in next 10 sts, 2 sc in next st] 8 times. (96 sc)
- Round 13
[Sc in next 11 sts, 2 sc in next st] 8 times. (104 sc)
- Round 14
[Sc in next 12 sts, 2 sc in next st] 8 times. (112 sc)
- Round 15
[Sc in next 13 sts, 2 sc in next st] 8 times. (120 sc)
- Round 16
[Sc in next 14 sts, 2 sc in next st] 8 times. (128 sc)
- Round 17
[Sc in next 15 sts, 2 sc in next st] 8 times. (136 sc)
- Round 18
[Sc in next 16 sts, 2 sc in next st] 8 times. (144 sc)
- Round 19
[Sc in next 17 sts, 2 sc in next st] 8 times. (152 sc)
- Round 20
[Sc in next 18 sts, 2 sc in next st] 8 times. (160 sc)
- Round 21
[Sc in next 19 sts, 2 sc in next st] 8 times. (168 sc)
- Round 22
[Sc in next 20 sts, 2 sc in next st] 8 times. (176 sc)
- Round 23
[Sc in next 21 sts, 2 sc in next st] 8 times. (184 sc)
- Round 24
[Sc in next 22 sts, 2 sc in next st] 8 times. (192 sc)
- Round 25
[Sc in next 23 sts, 2 sc in next st] 8 times. (200 sc)
- Round 26
[Sc in next 24 sts, 2 sc in next st] 8 times. (208 sc)
- Round 27
[Sc in next 25 sts, 2 sc in next st] 8 times. (216 sc)
Shell Drop Rounds
- Round 28
Ch 1, sc in first st, [sk 2 sts, 5 dc in next st, sk 2 sts, sc in next st] 36 times, sl st to join. (216 sts: 36 shells)
- Round 29
Ch 1, sc in first sc, [sk 2 dc, 5 dc in center dc of next shell, sk 2 dc, sc in next sc] 36 times, sl st to join. (216 sts)
- Round 30
through 35: Rep Round 29 six more times. (216 sts) Proceed to scallop and picot edging in CC.
CHECKPOINT: The table cover should lie flat with approximately 20 inches diameter at the flat portion and approximately 3 inches of hanging drop around the perimeter.
Back Panel
Work identical to front panel. Fasten off.
Where it goes
- Drape the full sofa cover over an existing couch to refresh a tired piece of furniture without reupholstering it.
- Set the round table cover under a lamp or a bowl of fruit as a textured centerpiece.
- Toss the throw pillow covers onto a bed or reading chair alongside the bolster pillow for a coordinated corner.
- Use the armchair cover on a desk chair or accent chair to tie a home office or sitting nook into the same palette.
Color ideas
- Classic sage and cream Work every panel in MC sage green and save the white CC strictly for the scallop edging on each piece.
- Soft reversal Make the bolster and round table cover in white as MC with sage CC trim, while the sofa and armchair covers stay sage MC with white edging for contrast across the set.
Care
Hand wash or use a gentle machine cycle depending on which yarn you chose, since acrylic options like Heartland and Simply Soft are machine washable while a DK blend may prefer hand washing.
Lay panels flat to dry and re-block with rust-proof pins on blocking mats if the shells lose their shape after washing.
Store folded rather than hung so the shell texture doesn't stretch out of shape, and keep pieces away from direct sun to protect the sage color.
Assembly
- Step 1 Scallop Edging: Before beginning the edging, count the stitches along the top and bottom edges of each flat panel. The stitch count must be a multiple of 6 plus 1 for the scallop repeat to work evenly. With CC, join to any corner st with sl st. Set-up: Ch 1, sc in same corner st, ch 2, sc in same corner st (this creates a double-sc corner marker). Along each edge: [Sk 2 sts, 5 dc in next st, sk 2 sts, sc in next st] across to next corner. At corner, work (sc, ch 2, sc) into corner st. Continue around all four sides. Sl st to first sc to join.
- Step 2 Picot Enhancement Round (Optional): With CC still attached, sl st to any sc between shells. [Sc in same sc, ch 1, sc in first dc of next shell, ch 1, sc in second dc, ch 3, sl st in first of these 3 ch (picot made), sc in third dc (center), ch 1, sc in fourth dc, ch 1, sc in fifth dc, sc in sc between shells] rep around. Fasten off CC.
- Step 3 Decorative Rosette (for bolster end caps): With MC, ch 4, sl st to form a ring. Round 1: Ch 1, 10 sc into ring, sl st to join. (10 sc) Round 2: [Ch 4, sk 1 sc, sl st in next sc] 5 times. (5 loops) Round 3: Into each ch-4 loop work (sc, hdc, 3 dc, hdc, sc). (5 petals) Fasten off with a long tail. Sew to center of each bolster end cap.
- Step 4 Weaving Ends and Blocking: Thread all yarn tails onto your tapestry needle and weave them in securely. For best results, wet block all pieces on blocking mats, pinning to measurements. Allow to dry completely before placing on furniture.
Easy to get wrong
Edging stitch count doesn't divide evenly
Count the stitches along the top and bottom edge before starting the scallop edging, since the repeat only works on a multiple of 6 plus 1.
Shell centers drifting off-center
Always work the 5-dc cluster into the actual center dc of the previous shell, not just the nearest stitch, so the diamond grid stays aligned row after row.
Between the songs
- What gets me about this one is how the same shell repeat scales from a small round table cover all the way up to a full sofa panel without ever changing character. You're working sc and 5-dc shell clusters over and over, but the fabric that results looks far more delicate than the worsted yarn making it. The scallop-and-picot CC edging is the real payoff moment, turning a plain rectangle into something with a defined, finished border. Making the whole set means you get to watch one simple stitch combination prove itself in a dozen different shapes and sizes.
Listener questions
Can I make just the throw pillow before committing to the sofa cover?
Yes, and I'd actually recommend it. The throw pillow takes far less time and lets you see the finished shell fabric before you invest the hours a sofa panel needs.
Do I need the exact yarn amounts listed for the full set?
Only if you're making every piece. Buy yarn per-project using the individual gauge swatches from your chosen piece rather than the full 6,200 yard total if you're starting smaller.
Why does the pattern call for a tube on the end caps?
The end cap rounds are worked to be joined into a tube shape with slip stitches rather than seamed flat, which gives the bolster ends their rounded, fitted finish.
What happens if my panel doesn't match the checkpoint measurement?
Check your hook size and tension first, since the checkpoint is there precisely so you catch sizing drift early. Adjusting hook size slightly up or down is usually enough to bring a panel back in line.
Is the scallop edging optional?
It's not required structurally, but it's what gives every piece in the set its finished, cottage-core look. Skipping it means a plain shell panel with no defined border.
Original pattern: https://bunnypatterns.com/sage-green-shell-stitch-sofa-set-free-crochet-pattern/
About the Author

Marisol QuinteroWho runs Crochet Obsessed, why a stitch count sits at the end of every round, how a pattern gets written here, and the things this site will never do.
More Patterns
- IntermediateNo. 01

Rose Granny Square Tote Crochet Pattern
Rose granny square tote crochet pattern made from 18 dimensional rose squares for a sturdy, romantic everyday bag.
- IntermediateNo. 02
Tropical octopus baby blanket crochet pattern with appliqués
Tropical octopus baby blanket crochet pattern: a cream filet base with coral and turquoise octopus appliqués, leaves, and…
- IntermediateNo. 03
Sunny lemon couple amigurumi crochet pattern
Sunny lemon couple amigurumi crochet pattern with embroidered slices and safety eyes for a cheerful handmade shelf pair.


