- LevelIntermediate
- Time4-6 hours
- Hook4.5 mm
- YarnWorsted
About This Pattern
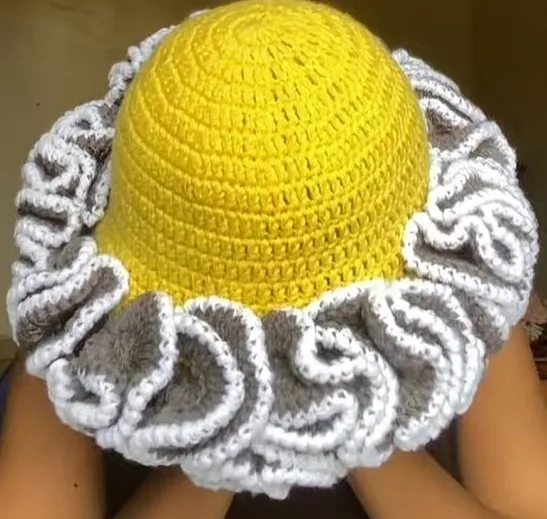
This hat has a bit of a party trick built in. The crown goes together quiet and plain, round after round of double crochet in thin, doubled-up yarn. Then the ruffle shows up at the brim like someone turned the volume up for the chorus.
Your hands do two different jobs here, and that's the fun of it. The small hook and thin yarn ask for patience and even tension around the crown. The big hook and thick three-ply yarn ask for speed and a loose wrist as the ruffle rows bloom outward.
Set this hat on a shelf or a hook by the door and it reads as a little sculpture, not just outerwear. The plain dome and the frilled edge sit together like two different outfits sharing one hat. It catches the eye before anyone even tries it on.
- Build the hat crown first, starting from a magic ring and increasing steadily round by round.
- Keep working the crown rounds in thin, doubled yarn until the body reaches its final width.
- Work the first ruffle row by tripling into every stitch around the hat's edge.
- Slip stitch to close each ruffle row, chain up, and turn before starting the next one.
- Repeat the tripling pattern for the remaining ruffle rows so the frill builds in layers.
- Attach the contrast color yarn and work the final edge round with the smaller hook.
On the desk
- 4.5 mm crochet hook (for ruffles)
- 3.5 mm crochet hook (for hat body and edges)
- Thin yarn (two strands held together) for hat body
- Thick three-ply yarn for ruffles
Optional
- contrast color yarn for ruffle edge
Stitch shorthand
- ch — chain
- st — stitch
- sl st — slip stitch
- sc — single crochet
- dc — double crochet
- mr — magic ring
- rsc — reverse single crochet
Ruffled crown crochet hat with two yarn weights
Hat Body Construction
- Round 1(12)
Create a magic ring, chain 3 (counts as first double crochet), work 11 double crochet into the ring (12 stitches total), slip stitch into top of chain 3
- Round 2(24)
Chain 3, work 2 double crochet in each stitch (24 stitches)
- Round 3(36)
Chain 3, alternate 1 double crochet and 2 double crochet in next (36 stitches)
- Round 4(48)
Chain 3, 1 double crochet in next 2 stitches, 2 in third (48 stitches)
- Round 5(60)
Chain 3, 1 double crochet in next 3 stitches, 2 in fourth (60 stitches)
- Round 6(72)
Chain 3, 1 double crochet in next 4 stitches, 2 in fifth (72 stitches)
- Round 7
Optional Chain 3, 1 double crochet in next 5 stitches, 2 in sixth
- Rounds 8–15
Begin body: Chain 3, 1 double crochet in every stitch aroundContinue until hat measures 6.5–7 inches (about 15 rounds)
- Optional Edge
Optional Chain 1, work 1 single crochet in each stitch around. Slip stitch to join, chain 1, cut yarn.
Ruffles Construction
Attach thicker yarn with 4.5 mm hook, chain 1 to secure.
- Ruffle Row 1
Chain 3, work 2 double crochet in same stitch, work 3 double crochet into every stitch around
- Ruffle Row 2
Slip stitch to top of chain 3, chain 3, turn. Work 2 double crochet in same stitch, continue 3 double crochet in each stitch
- Ruffle Row 3
Repeat same as previous row. Slip stitch to finish, chain 1, cut yarn.
Ruffle Edges
Switch to 3.5 mm hook and thinner yarn.
- Edge Round
Attach yarn, chain 1, work reverse single crochet around the ruffle edge, slip stitch to join, chain 1, cut yarn, and weave in ends
More shots
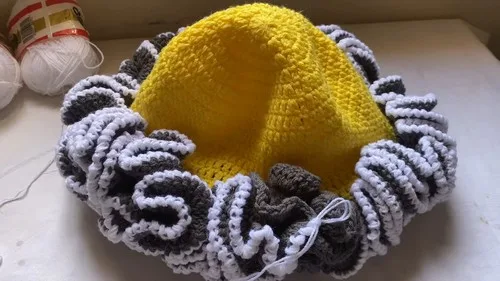
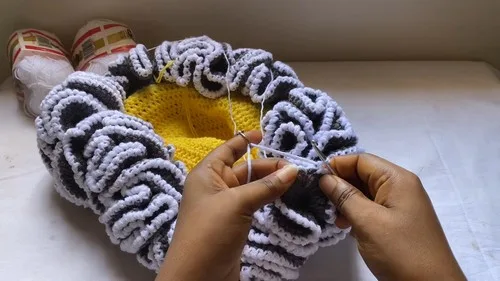
Where it goes
- A cold-weather walk where you want a hat that does more than just keep you warm, paired with a plain wool coat so the ruffle gets the attention.
- A gift for someone who already owns too many plain beanies and wants texture instead, paired with simple mittens in one of the hat's own colors.
- A photo-ready piece for a crochet portfolio or craft fair table, displayed next to other textured accessories to show off technique.
- An everyday hat for running errands, paired with a solid-color scarf so the ruffle brim stays the statement piece.
Color ideas
- Tonal crown, matching ruffle, bright trim Keep the crown and the ruffle rows in two closely related shades of the same color family, then let the contrast color edge round be the one bright pop that outlines the whole brim.
Care
Hand wash in cool water with a gentle detergent, since the thin and thick yarns may behave differently if machine washed together.
Lay the hat flat on a towel to dry, shaping the ruffle rows outward with your fingers so the frill dries open rather than flattened.
Store it flat or stuffed loosely with tissue paper rather than folded, so the ruffle keeps its curl instead of creasing.
Assembly
- Step 1 Weave in all loose ends neatly to complete your hat
Easy to get wrong
Losing the chain 3 turning point
Mark the top of each chain 3 with a stitch marker before you slip stitch into it, since it's easy to miscount in a bulky ruffle row. This keeps your ruffle rows aligned instead of drifting sideways.
Mixing up the two hook sizes
Set the 4.5 mm hook aside with the thick yarn and the 3.5 mm hook aside with the thin yarn before you start the ruffle section. Swapping them even once will throw off your tension for the whole row.
Skipping the chain 1 before cutting yarn
Always chain 1 before you cut the yarn at the end of the ruffle section, as the pattern specifies, so the last stitch has somewhere to anchor. Leaving it off can let the final ruffle row unravel while you weave in ends.
Listener questions
What happens if I skip the slip stitch between ruffle rows?
The slip stitch and chain 3 turn are what keep each ruffle row distinct instead of spiraling into the next. Skipping it will blur the rows together and make the frill look uneven.
Do I need a contrast color, or can the edge match the ruffle?
The pattern calls for a contrast color on the ruffle edge specifically to define that last round. You can match it to the crown instead if you prefer a quieter, more unified look.
How many rows make up the ruffle itself?
The ruffle section is built from three rows worked back to back, each tripling into every stitch around. Together they create the layered, frilled brim that sits over the plain crown.
Original pattern: https://crocheteverything.com/gorgeous-crochet-ruffle-hat-pattern-with-just-yarn-and-hooks/
About the Author

Marisol QuinteroWho runs Crochet Obsessed, why a stitch count sits at the end of every round, how a pattern gets written here, and the things this site will never do.
More Patterns
- IntermediateNo. 01

Rose Granny Square Tote Crochet Pattern
Rose granny square tote crochet pattern made from 18 dimensional rose squares for a sturdy, romantic everyday bag.
- IntermediateNo. 02
Tropical octopus baby blanket crochet pattern with appliqués
Tropical octopus baby blanket crochet pattern: a cream filet base with coral and turquoise octopus appliqués, leaves, and…
- IntermediateNo. 03
Sunny lemon couple amigurumi crochet pattern
Sunny lemon couple amigurumi crochet pattern with embroidered slices and safety eyes for a cheerful handmade shelf pair.


