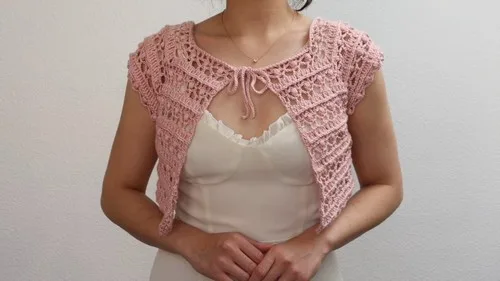
- LevelIntermediate
- Time4-6 hours
- Hook3.5 mm
- YarnWorsted
About This Pattern
This one has that easy, lived-in feeling, like a top you'd grab without thinking twice. It builds from the neck down in one connected piece, so there's no seaming marathon waiting at the end. I love patterns that let the shape reveal itself row by row.
Picture this draped over a chair back, ready to grab on your way out the door. It reads as effortless but it's clearly handmade, the kind of piece that gets a 'where did you get that' every single time. It belongs in a closet, not a drawer, because you'll want it in reach.
- Work a straight first row of double crochet across the foundation chain, placing a corner stitch at each of the four marked points.
- Turn and begin the front post double crochet row, skipping a stitch and working into the next to build the ribbed texture.
- Keep working corner chain spaces at each raglan point so the shoulder and front panel angles stay in line.
- Introduce puff stitches into the pattern, framing them with corner single crochet so the texture panel sits evenly.
- Move into a shell-style section, working double crochet into chain spaces and around the puff stitches with chain-3 spaces between.
- Finish with the treble crochet border, placing three trebles into each chain-3 space and three trebles plus a chain-2 at every corner.
- Check that all four corners still line up before weaving in ends, since the raglan shape depends on those points staying symmetrical.
- Leave a long tail at least as long as your wingspan, chain it out to make a strap, then loop it through the top's edge and tie it off at each shoulder.
On the desk
- Weight 3 acrylic yarn
- 3.5 mm crochet hook
Stitch shorthand
- puff — puff stitch
Top-down raglan top crochet pattern for women
Measurements, Raglan Shape & Body
Measure the back of your neck: Determine the number of chains needed (multiple of six). For example, chain 36 (7 inches).
Calculate front panel stitches: Divide the back neck chain by two (e.g., 36 / 2 = 18 stitches for each front panel).
Determine shoulder stitches: For a back of 36, shoulder stitches = 24 (each).
Add one stitch to each section: Back: 36 + 1 = 37. Shoulders: 24 + 1 = 25 (each). Front panels: 18 + 1 = 19 (each).
Add corner stitches: Add one stitch for each corner (4 corners).
37 + 25 + 25 + 19 + 19 + 4 = 129 total stitches.
Create the foundation chain: Chain the total number of stitches calculated (e.g., 129).
- Foundation Row
Chain 3 (counts as first double crochet). Double crochet 19, place corner stitch, double crochet 25 for shoulder, repeat corner stitch, double crochet 37 for back, repeat corner stitch, double crochet 25 for other shoulder, repeat corner stitch, double crochet 19 to finish row.
- Row 1
Turn, chain 3, chain 1, skip a stitch, front post double crochet in the next. Continue this pattern, placing double crochet in corner chain space.
- Row 2
Turn, chain 3, skip first chain space, single crochet in the next. Repeat, placing puff stitches and corner single crochet.
- Row 3
Turn, chain 3, double crochet in chain space, chain 3. Double crochet around puff stitches, repeat pattern.
- Row 4
Chain 4, place treble crochet in each stitch, place three trebles in chain three spaces, and at the corner, place three trebles, chain two, three trebles.Repeat Rows 1-4: Continue repeating these rows until the body parts are long enough to touch around your body.
Creating the Body and Armholes Continue the pattern: Once the length is sufficient, skip the arm portions when you reach a corner.Skip the arm portion: Skip the arm panel and continue the pattern on the next corner.Work around the body: Continue working in rounds, repeating the pattern until the top reaches your desired length.
Creating the Straps
Leave a long tail: Create a slip knot, leaving a tail as long as your wingspan.
Chain with the tail: Loop the tail over the hook and pull the working yarn through.
Continue chaining: Repeat until you run out of tail yarn.
Secure the end: Chain one at the end, cut off the excess yarn.
Attach the strap: Loop the strap through the edge of the top and tie a ribbon.
More shots
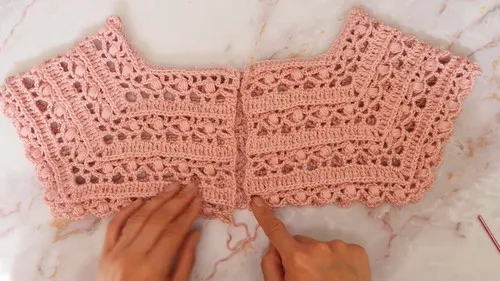
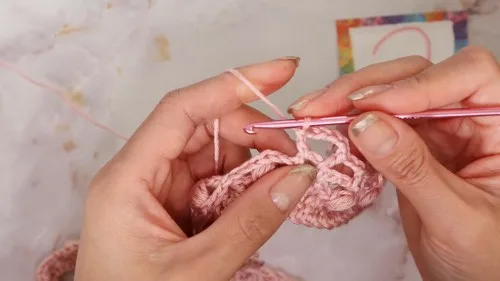
Where it goes
- Layer it over a tank top or fitted dress for an easy daytime look that pairs well with jeans or leggings.
- Wear it on its own in warmer months, paired with simple shorts or a midi skirt for a breezy silhouette.
- Give it as a handmade gift for a friend who likes textured, wearable pieces over purely decorative ones.
- Keep one folded on a shelf as a travel layer, since the acrylic fiber is easy to pack and shake out.
Color ideas
- Soft tonal blend Work the raglan rows and front post double crochet section in a dusty rose, then shift to a warm cream for the puff stitch rows and treble crochet border.
Care
Hand wash in cool water or use a gentle machine cycle in a mesh bag, since acrylic yarn holds its shape best without aggressive agitation.
Lay the top flat to dry rather than hanging it, so the raglan shoulders and corner shaping don't stretch out of place.
Fold it for storage instead of hanging, which keeps the treble crochet border from pulling and the overall shape intact between wears.
Easy to get wrong
Losing track of corner stitches
Mark each of the four corner points with a stitch marker before you start the first row, since the whole raglan shape depends on hitting them consistently every round.
Uneven front post double crochet
Make sure you're skipping the stitch and working into the next one every single time, not every other time, or the ribbed texture will drift out of line.
Puff stitches pulling tight
Keep your tension relaxed when closing each puff stitch so it stays rounded and doesn't flatten the corner single crochet next to it.
Between the songs
- What makes this one worth the hours is the layering of techniques inside a single garment. You start with straight double crochet rows for the raglan shaping, where those four corner increases quietly build the sleeve and neck angles without any confusing math mid-row. Then you shift gears into front post double crochet for a ribbed texture, puff stitches for softness and dimension, and finally a treble crochet shell border that frames the whole piece. Each section asks something different of you, so the top never drags. By the time you reach that final border round, you've practiced four distinct skills in one project, and the raglan lines actually fit the way they're supposed to.
Listener questions
Why does the pattern use so many different stitch types?
Each section serves a purpose: the double crochet rows build the raglan shape, the front post double crochet adds texture, the puff stitches bring dimension, and the treble crochet border finishes the edge cleanly. It's a deliberate progression rather than a random mix.
What happens if my corner counts don't match row to row?
If a corner count drifts, it usually traces back to a missed corner stitch a row or two earlier, so backtrack and check your marked points first. Catching it early is much easier than unraveling several rows later.
Is this a good project for someone newer to garment crochet?
It's best for someone comfortable with basic stitches who's ready to try corner shaping and a couple of textured stitches. The instructions are clear, but there's enough going on that a first garment project might feel smoother with simpler shaping.
Can I adjust the length or fit as I go?
Yes, the source notes mention customizing length and fit as part of making this your own. Just keep the corner shaping and panel proportions consistent so the raglan lines still sit correctly on the body.
Original pattern: https://crocheteverything.com/crochet-raglan-top-pattern-for-stylish-women-to-roam-around/
About the Author

Marisol QuinteroWho runs Crochet Obsessed, why a stitch count sits at the end of every round, how a pattern gets written here, and the things this site will never do.
More Patterns
- IntermediateNo. 01

Rose Granny Square Tote Crochet Pattern
Rose granny square tote crochet pattern made from 18 dimensional rose squares for a sturdy, romantic everyday bag.
- IntermediateNo. 02
Tropical octopus baby blanket crochet pattern with appliqués
Tropical octopus baby blanket crochet pattern: a cream filet base with coral and turquoise octopus appliqués, leaves, and…
- IntermediateNo. 03
Sunny lemon couple amigurumi crochet pattern
Sunny lemon couple amigurumi crochet pattern with embroidered slices and safety eyes for a cheerful handmade shelf pair.


