- LevelIntermediate
- Time4-6 hours
- Hook4 mm
- YarnWorsted
About This Pattern
There's something calm about a bag that starts as a tiny circle and just keeps opening up. I love how this one begins in silence, with a magic circle in your palm, then slowly turns into something with texture and shoulders. It feels less like following instructions and more like watching dough rise.
Once it's finished, this bag doesn't hide in a closet. The puff stitch band catches light and shadow in a way flat stitches never do, so it reads as handmade the moment someone glances at it. Set on a chair by the door with the handles looped over, it looks ready to be grabbed on the way out.
- Start with a magic circle and build a flat, round base with steady double crochet increases.
- Keep expanding the base across a couple more rounds, spacing single and double stitches to keep it flat.
- Shift into the puff stitch rounds, working three yarn overs per puff with chain gaps between them.
- Repeat the puff and chain pattern for a second round, working into the gaps you already made.
- Continue through the remaining rounds to finish shaping the body and set up the top opening.
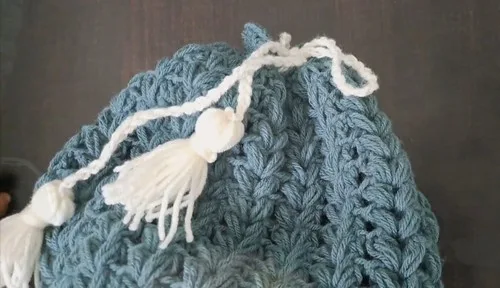
- Chain a length to weave through the top openings, turning it into a working drawstring closure.
- Chain your handles to your preferred length and attach them securely to the top edges of the bag.
- Weave in any loose ends with a yarn needle so the inside looks as tidy as the outside.
On the desk
- Worsted weight yarn (color of your choice)
- Crochet hook suitable for your yarn (typically 4mm–5.5mm)
- Scissors
- Yarn needle for weaving ends
Stitch shorthand
- DC — double crochet
- SC — single crochet
- HDC — half double crochet
- TR — treble crochet
- ch — chain
- sl st — slip stitch
Puff stitch circle bag with easy handles
Main Pattern
- Round 1(16)
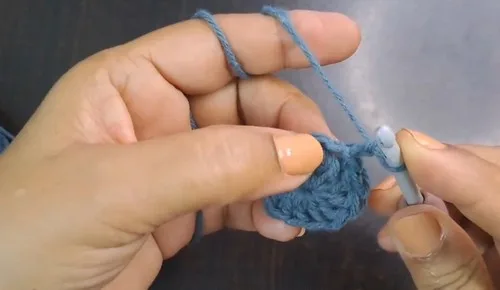
Magic Circle Foundation Start with a magic circle; Work 16 double crochets (DC) into the circle; Join with a slip stitch to the first DC.
- Round 2
Increasing the Circle In the same stitch as the join, work 2 DC; Next stitch: 2 DC, then 1 DC in the following stitch; Repeat this sequence all the way around; Join with a slip stitch to close the round.
- Round 3
Expanding the Base Begin with 2 DC in the same stitch; Next two stitches: 1 DC in each; Repeat pattern: 2 DC, 1 DC, 1 DC across the round; Join with a slip stitch.
- Round 4
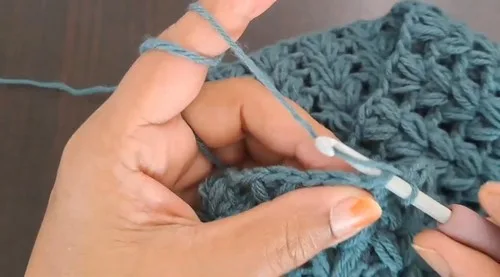
Puff Stitch Round Create a puff stitch by yarning over and pulling through three times in the same stitch; Pull through all loops on the hook; Chain 2; Skip two stitches, then make another puff stitch; Repeat this puff-chain pattern around; Join with a slip stitch between puff stitches.
- Round 5
Second Puff Stitch Round Slip stitch into the gap between puff stitches; In each gap, make a new puff stitch; Chain 2 after each puff stitch; Repeat around and join.
- Round 6
Single Crochet Round Single crochet into each gap between puff stitches; Also, single crochet directly into each puff stitch; Continue around and join.
- Round 7
Base for Bag Body In the next stitch, work 1 DC, then chain 1; Skip the next stitch and repeat the pattern: 1 DC, chain 1; Continue this around and join.
- Round 8
Bag Design Round In each gap: work 1 SC, 1 HDC, 1 DC, 1 TR; In the next gap: work 1 TR, 1 DC, 1 HDC, 1 SC; Alternate this pattern around to form the design; Continue repeating this round until the bag reaches desired height.
More shots
Where it goes
- Carry it as a market bag for a loaf of bread, a bunch of herbs, and a couple of tomatoes.
- Use it as a beach or pool tote, paired with a striped towel and a paperback.
- Let it double as a project bag for a smaller crochet or knitting work in progress.
- Style it as an everyday shoulder bag over a simple cotton dress or jeans and a tee.
Color ideas
- Tonal Neutral Work the base rounds and puff stitch rounds all in the same oatmeal or stone shade, then use a slightly darker version of that color for the handles so they read as a quiet accent.
Care
Hand wash the bag in cool water with a gentle soap, since worsted weight yarn can felt or shrink if it's agitated too roughly.
Lay it flat on a towel to dry and reshape the base and puff stitch rounds by hand while damp, rather than hanging it up wet.
Store it stuffed lightly with tissue paper or a soft cloth so the round base and puff texture keep their shape between uses.
Assembly
- Step 1 Drawstring: Chain a length long enough to go around the top of the bag; weave the chain through the top openings to create a drawstring closure.
- Step 2 Handles: Create desired-length chains for handles; attach the handles securely to the top edges of the bag using slip stitches or sewing with a yarn needle; ensure both handles are even and firmly secured.
Easy to get wrong
Losing count on the base increases
Place a stitch marker at the start of each base round before you begin the 2 DC, 1 DC repeat, since a single missed increase throws the whole circle out of flat.
Puff stitches coming out uneven
Pull each of the three yarn overs to the same loose height before finishing the puff, and keep tension consistent so all the puffs sit at the same size around the round.
Handles that pull loose from the top edge
Whether you attach with slip stitches or sew them on with a yarn needle, go around each attachment point twice so the connection can take real weight.
Between the songs
- The real satisfaction here is contrast. You get the meditative, almost automatic rhythm of the increasing base rounds, then you hit the puff stitch rounds and everything slows down, three yarn overs pulled through together, a chain gap, repeat. That texture shift is the whole personality of this bag. Building the base flat and round from a magic circle also teaches you to read your increases by feel, not just by counting, which pays off in plenty of other projects. And because the drawstring and handles are worked separately, you get to finish the fussy textured part first, then coast through the simpler chains at the end. It's a project that rewards you early and lets you cruise to the finish.
Listener questions
Why does my base look ruffled instead of flat?
A ruffled base usually means too many increases have snuck in across the rounds. Check that you're following the 2 DC, 1 DC spacing exactly as each round calls for it.
How do I keep the puff stitch rounds from looking messy?
Messy puffs almost always come from uneven tension on the three yarn overs before you pull through. Slow down on that pull-through step and keep your loops relaxed but consistent.
Do the handles need to match the body of the bag in color?
Not at all, this is a great spot for a contrast color if you want the handles to stand out. Just make sure whatever yarn you choose is sturdy enough to hold up under regular carrying.
Can I make the drawstring longer if I want to wear the bag differently?
Yes, the drawstring chain length is entirely up to how you plan to close and carry the bag. Chain it longer if you want extra length to tie a bow or loop it twice.
Original pattern: https://crocheteverything.com/gorgeous-crochet-bag-with-puff-stitch-stylish-handles-pattern/
About the Author

Marisol QuinteroWho runs Crochet Obsessed, why a stitch count sits at the end of every round, how a pattern gets written here, and the things this site will never do.
More Patterns
- IntermediateNo. 01

Slouchy everyday beanie worked flat in half double crochet
Crochet beanie pattern for a slouchy everyday look worked flat with hdc rows, then seamed into a soft,…
- IntermediateNo. 02
Crochet amigurumi doll with dress, shoes, and hat
Crochet amigurumi doll pattern with dress, shoes, and hat details for a soft, huggable keepsake you build one…
- IntermediateNo. 03
Chunky moss stitch crochet sweater with raglan-free shoulders
Chunky crochet sweater pattern using moss stitch, worked flat with a 10mm hook for a soft, fast, cool-weather…


