- LevelIntermediate
- Time4-6 hours
- Hook3 mm
- YarnWorsted
About This Pattern
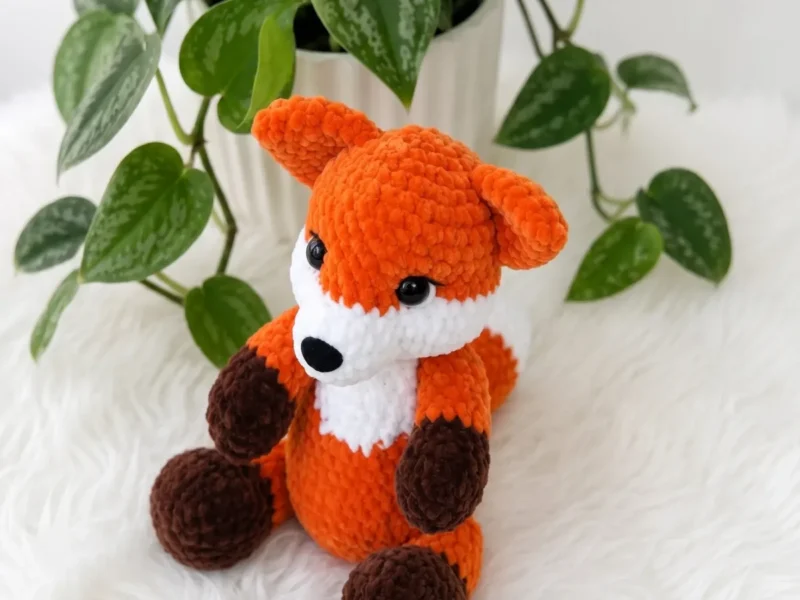
There's something calm about this little fox before you even pick up the hook. The orange chenille has that soft, brushed look that makes a finished piece feel like it was made to be held. I think of this one as a quiet-evening project, the kind you work on with the radio low and no rush to finish the round.
Set on a shelf or tucked into a reading nook, this fox reads as soft and a little wise, not cartoonish. The brown legs and orange body give it real presence next to books or a lamp. It's a piece that looks handmade in the best sense, with a texture people reach out to touch before they even ask who made it.
This pattern is written in US crochet terms and worked entirely in continuous spiral rounds — no joining slip stitches, just a stitch marker to track where each round begins. Gauge isn't critical here; what matters most is tight, consistent tension so the fiberfill won't peek through your stitches. Stitch counts appear in parentheses at the end of every round, and the safety eyes and nose go in during the exact round specified, before the head closes up too far to fit them.
- Start with the head, working orange chenille in continuous spiral rounds from a magic ring up through several increase rounds, adding a white-and-orange color band around Round 12 before decreasing and stuffing it closed.
- Crochet the muzzle separately in white, working four rounds up to 18 stitches, then fasten off and set it aside for embroidery.
- Make a pair of ears in orange, shaping them through several rounds of increases and plain rounds, then fold each flat and single crochet the opening closed.
- Crochet the body in orange, mirroring the head's shaping with rounds of increases followed by rounds of decreases to taper it.
- Embroider the mouth onto the muzzle with black thread before it ever touches the head.
- Stuff each piece with polyfill as you close it, then sew the muzzle centered below the safety eyes.
- Whipstitch the ears on at an outward angle, then sew the head to the body using its long yarn tail, followed by the arms, legs, and tail.
On the desk
Yarn
- Plush/chenille yarn in orange (1 skein), white (small amount), and brown (small amount) — approximately CYCA #4 Worsted weight
Yarn
- Embroidery thread or fine yarn in black for muzzle detail
Hook
- US D-3 / 3mm crochet hook
Safety eyes
- 12–16mm (1 pair)
- Safety nose: 1 piece
Stuffing
- Polyfill fiberfill
Stitch markers
- 1–2 to track spiral rounds
- Yarn needle / tapestry needle
- Scissors
Stitch shorthand
- dec — Invisible Decrease (insert hook in front loop of next st, then front loop of following st, yarn over, pull through both loops, yarn over, pull through remaining 2 loops)
- FO — Fasten Off
- inc — Increase (2 sc in the same stitch)
- MR — Magic Ring
- Rnd — Round
- sc — Single Crochet
- SM — Stitch Marker
- st(s) — Stitch(es)
Snuggly plush fox amigurumi crochet pattern
Head
Orange yarn. Worked in continuous spiral rounds.
- Round 1
6 sc in MR. (6)
- Round 2
inc in each st around. (12)
- Round 3
(1 sc, 1 inc) × 6. (18)
- Round 4
(2 sc, 1 inc) × 6. (24)
- Round 5
(3 sc, 1 inc) × 6. (30)
- Round 6
(4 sc, 1 inc) × 6. (36)
- Rounds 7–10
sc in each st around. (36)
- Round 11
3 inc, 10 sc, 3 inc, 20 sc. (42) Insert safety eyes and safety nose in this round.
- Round 12
Change to white: (1 sc, 1 inc) × 3; change to orange: 10 sc; change to white: (1 sc, 1 inc) × 3; change to orange: 20 sc. (48)
- Rounds 13–14
Change to white yarn: sc in each st around. (48)
- Round 15
(6 sc, 1 dec) × 6. (42)
- Round 16
(5 sc, 1 dec) × 6. (36)
- Round 17
(4 sc, 1 dec) × 6. (30) Begin stuffing firmly.
- Round 18
(3 sc, 1 dec) × 6. (24)
- Round 19
(2 sc, 1 dec) × 6. (18)
- Round 20
(1 sc, 1 dec) × 6. (12) FO, leave a long tail for seaming.
Muzzle
White yarn. Worked in continuous spiral rounds.
- Round 1
6 sc in MR. (6)
- Round 2
inc in each st around. (12)
- Round 3
(1 sc, 1 inc) × 6. (18)
- Round 4
sc in each st around. (18) FO, leave a long tail. Embroider mouth detail with embroidery thread before attaching.
Ears
Orange yarn. Make 2. Worked in continuous spiral rounds.
- Round 1
4 sc in MR. (4)
- Round 2
inc in each st around. (8)
- Round 3
(1 sc, 1 inc) × 4. (12)
- Round 4
sc in each st around. (12)
- Round 5
(2 sc, 1 inc) × 4. (16)
- Round 6
(3 sc, 1 inc) × 4. (20) Fold flat so the two sides align, then sc through both layers across the opening to close. FO, leave a long tail for attaching.
Legs
Brown yarn. Make 2. Worked in continuous spiral rounds.
- Round 1
6 sc in MR. (6)
- Round 2
inc in each st around. (12)
- Round 3
(1 sc, 1 inc) × 6. (18)
- Round 4
(2 sc, 1 inc) × 6. (24)
- Rounds 5–6
sc in each st around. (24)
- Round 7
6 dec, 12 sc. (18)
- Round 8
3 dec, 12 sc. (15) Begin stuffing.
- Round 9
sc in each st around. (15)
- Round 10
10 sc, change to orange yarn: 5 sc. (15)
- Rounds 11–15
sc in each st around. (15)
- Round 16
Dec to close opening. FO, leave a long tail for attaching.
Arms
Brown yarn. Make 2. Worked in continuous spiral rounds.
- Round 1
6 sc in MR. (6)
- Round 2
inc in each st around. (12)
- Round 3
(3 sc, 1 inc) × 3. (15)
- Rounds 4–5
sc in each st around. (15)
- Round 6
3 dec, 9 sc. (12) Change to orange yarn.
- Rounds 7–13
sc in each st around. (12)
- Round 14
6 dec. (6) FO, leave a long tail for attaching.
Body
Orange yarn. Worked in continuous spiral rounds.
- Round 1
6 sc in MR. (6)
- Round 2
inc in each st around. (12)
- Round 3
(1 sc, 1 inc) × 6. (18)
- Round 4
(2 sc, 1 inc) × 6. (24)
- Round 5
(3 sc, 1 inc) × 6. (30)
- Round 6
(4 sc, 1 inc) × 6. (36)
- Round 7
(5 sc, 1 inc) × 6. (42)
- Rounds 8–9
sc in each st around. (42)
- Round 10
(5 sc, 1 dec) × 6. (36)
- Rounds 11–13
sc in each st around. (36)
- Round 14
(4 sc, 1 dec) × 6. (30)
- Rounds 15–17
sc in each st around. (30)
- Round 18
(3 sc, 1 dec) × 6. (24)
- Rounds 19–21
sc in each st around. (24) FO, leave a long tail for seaming.
Tail
Begin with white yarn. Worked in continuous spiral rounds.
- Round 1
4 sc in MR. (4)
- Round 2
inc in each st around. (8)
- Round 3
(1 sc, 1 inc) × 4. (12)
- Round 4
(2 sc, 1 inc) × 4. (16)
- Round 5
(3 sc, 1 inc) × 4. (20)
- Round 6
(4 sc, 1 inc) × 4. (24) Change to orange yarn.
- Rounds 7–11
sc in each st around. (24)
- Round 12
(4 sc, 1 dec) × 4. (20)
- Round 13
(3 sc, 1 dec) × 4. (16)
- Round 14
sc in each st around. (16)
- Round 15
(2 sc, 1 dec) × 4. (12) FO, leave a long tail for attaching.
Where it goes
- A shelf companion for a nursery or kid's bedroom, sitting well next to storybooks and a soft reading lamp.
- A thoughtful handmade gift for a baby shower or a child's first birthday, paired with a knit blanket in a matching orange or cream.
- A desk or windowsill mascot for a crochet-loving adult who collects amigurumi animals.
- A photo prop for craft fairs or an Etsy-style product shoot, styled with autumn-toned fabric or wood props.
Care
Hand wash the finished fox in cool water with a gentle detergent, since chenille yarn can shed and mat under high agitation.
Press out excess water in a towel and lay the piece flat to air dry, reshaping the ears and muzzle by hand while damp.
Store it stuffed and upright on a shelf rather than pressed flat in a bin, which keeps the chenille pile from crushing over time.
Assembly
- Step 1 Embroider the mouth onto the muzzle using black embroidery thread before attaching it to the head.
- Step 2 Sew the muzzle centrally onto the lower front of the head, centered below the safety eyes.
- Step 3 Attach the ears to the top of the head, evenly spaced, using the yarn tails and a whipstitch. Angle them slightly outward for a natural look.
- Step 4 Sew the head to the top of the body, aligning the front faces of both pieces. Use the long yarn tail from the head and sew around the entire base.
- Step 5 Attach the legs to the lower sides of the body, positioning them so the fox sits steadily upright.
- Step 6 Sew the arms to the upper sides of the body, just below where the head meets the body.
- Step 7 Attach the tail to the back of the body at the base, angling it slightly upward.
- Step 8 Weave in all remaining yarn ends securely.
Easy to get wrong
Losing track of spiral rounds
Plush yarn hides your stitches more than smooth cotton does, so drop a stitch marker into the first stitch of every round without fail. Move it up each time you complete a round instead of trying to count texture by eye.
Stitching too loosely for chenille
Chenille yarn is fluffy but stretchy, and loose tension lets stuffing peek through gaps. Go down a hook size if your stitches look open, and aim for fabric that feels dense before you start stuffing.
Sewing the muzzle before embroidering it
Once the muzzle is whipstitched to the head, black embroidery thread is much harder to place evenly. Stitch the mouth onto the flat muzzle piece first, then attach it centered under the safety eyes.
Skipping the invisible decrease
The standard decrease leaves a visible bar across the stitch. Work the invisible decrease through the front loops only of two consecutive stitches instead — it blends cleanly into the fabric, which matters most during the head's closing rounds.
Stuffing the head too late
The head's opening narrows fast once you start decreasing. Add fiberfill starting at Round 17 and keep adding small amounts through Round 19 so the finished head is firm and round instead of flat.
Fumbling the color changes
Round 12's white-and-orange sections look intimidating but aren't. Carry the non-working yarn loosely across the wrong side for the orange stitches between the white sections, then drop and pick it up cleanly — the plush texture hides any minor carry lines.
Attaching parts with a single strand
A single strand of yarn can shift or loosen over time, especially on a toy handled by small hands. Sew parts on with a doubled yarn tail, running the needle through the body and out the opposite side two or three times before knotting.
Between the songs
- The satisfaction here is in the layering: chenille yarn for the plush orange body, a contrasting white and brown muzzle piece built separately, and black embroidery thread stitched on for the mouth before assembly. You're working entirely in continuous spiral rounds, so there's no seam to hide and no joining slip stitch to fuss over, just steady increases tracked with a stitch marker. Attaching safety eyes and a safety nose gives the face structure fast, which is rewarding after rounds of plain single crochet. Whipstitching the ears on at an angle, rather than flat, is the kind of small detail that makes the finished fox look alert and intentional rather than generic.
Listener questions
Can I use regular worsted weight yarn instead of chenille?
Yes, a standard worsted weight yarn will work with the same US D-3 / 3mm hook and stitch counts. You'll lose some of the plush texture, but the shaping and proportions stay the same.
Do I need a safety nose, or can I embroider it instead?
The pattern calls for a safety nose alongside the embroidered mouth, and I'd stick with that for a secure, child-safe finish. If you skip the safety hardware, embroider the nose with the same black thread used for the mouth.
Why does my muzzle look lumpy after stuffing?
Overstuffing a small piece like the muzzle can distort its shape before you even sew it on. Add fiberfill in small pinches and check the shape against the head as you go.
How do I keep the ears from flopping forward?
Whipstitch them on with a slight outward angle rather than straight up, as the assembly steps describe. A firmer stuffing in the base of each ear also helps them hold their shape.
Is this a good pattern for a first amigurumi project?
It's better suited to someone who has made at least one or two amigurumi pieces already, since it involves several separate parts and color changes. If you're brand new, practice tight single crochet in continuous rounds first.
Original pattern: https://amigurumicorner.com/little-fox-amigurumi-free-crochet-pattern/
About the Author

Marisol QuinteroWho runs Crochet Obsessed, why a stitch count sits at the end of every round, how a pattern gets written here, and the things this site will never do.
More Patterns
- IntermediateNo. 01

Slouchy everyday beanie worked flat in half double crochet
Crochet beanie pattern for a slouchy everyday look worked flat with hdc rows, then seamed into a soft,…
- IntermediateNo. 02
Crochet amigurumi doll with dress, shoes, and hat
Crochet amigurumi doll pattern with dress, shoes, and hat details for a soft, huggable keepsake you build one…
- IntermediateNo. 03
Chunky moss stitch crochet sweater with raglan-free shoulders
Chunky crochet sweater pattern using moss stitch, worked flat with a 10mm hook for a soft, fast, cool-weather…


