- LevelIntermediate
- Time4-6 hours
- Hook3.5 mm
- YarnLight / DK
About This Pattern
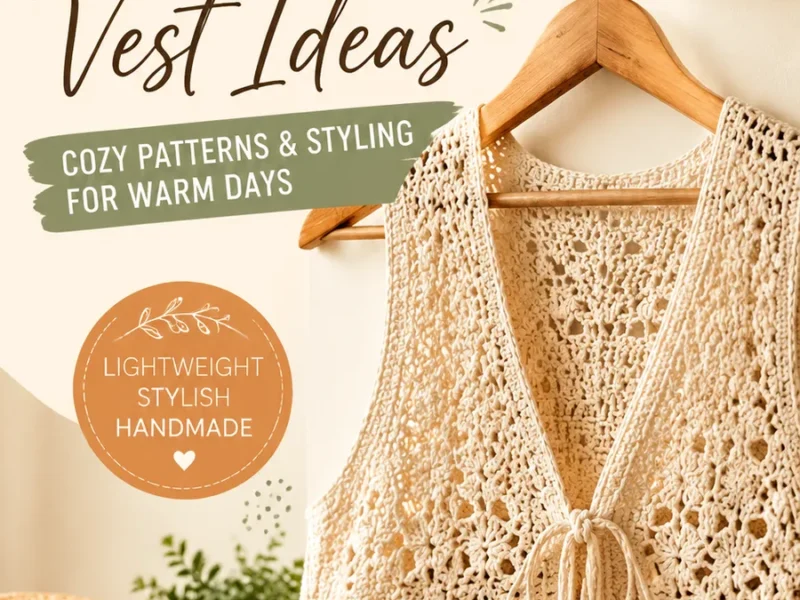
This vest has that easy, breezy radio-on-a-porch kind of mood. It is not trying to be fancy or fussy, just open and relaxed, like something you would reach for on the first warm morning of the week. The cream color keeps it quiet so the stitch texture gets to do the talking.
Your hands get a nice mix of steady and playful here. Rows of solid double crochet settle you into a rhythm, then the lace shell sections ask you to pay attention again, placing two groups of double crochet into one space to open things up. It is the kind of project where your hands never get bored but never feel rushed either.
Laid over a chair back or folded on a shelf, this vest reads as soft and a little lived-in, the good kind of lived-in. Worn over a tank top or a slip dress, the tie front gives it a little shape without any real fuss. It is the piece you grab when you want to look finished without trying hard.
Skill level: confident beginner to intermediate. Finished size: approximately Small/Medium, 36 inch bust (91 cm), adjustable. Gauge: 20 dc x 10 rows = 4 x 4 inches (10 x 10 cm), worked in US crochet terms.
Always create a gauge swatch before beginning the full vest, especially when using cotton yarn, since garments made with crochet often change shape after washing and blocking and fiber weight can affect the final fit.
The vest is made from one back panel and two front panels, each worked flat from the bottom upward. The turning chain does not count as a stitch unless stated, and you should always turn your work at the end of each row.
- Start the back panel with a long foundation chain worked in rows from the bottom up.
- Build a few rows of solid double crochet to establish the base fabric before any lace begins.
- Introduce the lace shell pattern across the row, skipping stitches and working fans into the gaps.
- Repeat the back panel's textured and lace rows to complete its shaping.
- Chain and work the two front panels the same way, keeping them mirrored for the open neckline.
- Join the shoulder seams, then sew the side seams from the bottom up, leaving about 8 inches (20 cm) open for armholes, and add crochet ties at the front neckline.
- Wet block the finished piece flat so the lace shells open fully and the panels sit smooth.
On the desk
- Lightweight cotton yarn, approximately 850 yards (777 meters)
- 3.5 mm crochet hook (US E-4)
- Yarn needle
- Scissors
- Stitch markers
- Tape measure
Stitch shorthand
- ch — chain
- sc — single crochet
- dc — double crochet
- sl st — slip stitch
- st — stitch
- sk — skip
- sp — space
- rep — repeat
Open Lace Tie-Front Crochet Vest Top for Summer
Back Panel
Chain 91.
- Row 1
Dc in the fourth chain from hook and in each chain across. Turn. (88 dc)
- Row 2
Ch 3, dc in each stitch across. Turn. (88 dc)
- Row 3
Ch 1, sc in each stitch across. Turn. (88 sc)
- Row 4
Ch 3, dc in next 3 sts, sk 2 sts, work lace shell, sk 2 sts, dc in next 4 sts. Repeat across. End with dc in last 4 sts. Turn.
- Row 5
Ch 3, dc across, working 2 dc into each ch-1 space. Turn. (88 dc)
- Rows 6–28
Repeat Rows 3-5 until panel measures approximately 15 inches (38 cm).Fasten off and weave in ends.
Front Panels (Make 2)
Chain 46.
- Row 1
Dc in fourth chain from hook and across. Turn. (43 dc)
- Row 2
Ch 3, dc across. Turn. (43 dc)
- Row 3
Ch 1, sc across. Turn. (43 sc)
- Row 4
Work lace shell pattern across as established.
- Row 5
Dc across, filling chain spaces with 2 dc each.Repeat Rows 3-5 until the panel measures approximately 15 inches (38 cm).
For neckline shaping, decrease 1 stitch at the inner edge every other row for 6 rows.Fasten off. Make a second panel opposite to the first.
Special Stitch
Lace shell: Work (2 dc, ch 1, 2 dc) into the same stitch or chain space. This creates an open fan shape used throughout the decorative sections.
Where it goes
- Thrown over a plain tank top or camisole for an easy outdoor market or patio outing.
- Layered over a slip dress to dress it up a little without adding real warmth.
- Worn open over a lightweight button-up for a breezy office-casual look on warmer days.
- Paired with high-waisted shorts or a linen skirt for a relaxed, textural warm-weather outfit.
Color ideas
- All-Natural Cream Work the back panel and both front panels entirely in the same cream cotton so the lace shells and solid rows are the only contrast, letting texture carry the design.
- Striped Lace Accent Change yarn color at the start of each lace shell row for a striped effect running through the open lace sections.
Care
Hand wash the finished vest in cool water with a gentle detergent, since the lightweight cotton yarn holds its shape best without rough agitation.
Lay the piece flat to dry rather than hanging it, so the lace shell sections do not stretch out of shape under their own weight.
Store it folded rather than on a hanger, and give it a quick wet block again before wearing if the lace rows look flattened after storage.
Assembly
- Step 1 Place the front panels beside the back panel with right sides facing outward.
- Step 2 Join shoulders using slip stitches or mattress-style whip stitching.
- Step 3 Sew side seams from the bottom edge upward, leaving approximately 8 inches (20 cm) open for armholes.
- Step 4 Join yarn at the neckline edge and work one round of single crochet around the front opening.
- Step 5 Create two ties by chaining 45 stitches from each front opening edge, then slip stitch back along the chain.
- Step 6 Add tassels if desired by attaching small yarn fringe pieces.
- Step 7 Gently wet block the finished vest by laying it flat and shaping the panels to the correct measurements. Allow it to dry completely before wearing. This helps open the lace stitches and creates a smoother garment shape.
Easy to get wrong
Uneven sizing
Check gauge before making the panels because small differences can affect garment width.
Loose seams
Use a strong joining method and avoid pulling the yarn too tightly.
Neckline shape issues
Count decreases carefully and keep both front panels mirrored.
Stiff fabric
Try a larger hook size if your fabric feels too firm.
Construction Note
Crochet garments rely heavily on consistent tension. Measuring your work as you progress is one of the easiest ways to prevent surprises during assembly.
Between the songs
- What I love about this one is how the construction keeps it honest: one back panel, two front panels, no mysterious shaping to puzzle over. You get real technique variety in a small space, moving from solid double crochet rows into single crochet stabilizer rows, then opening into the lace shell, that fan of two double crochets, a chain, two more double crochets, worked right into the same space. Watching that fan appear after rows of plain stitching is satisfying every single time. The tie-front detail on the mirrored front panels gives you a little finishing reward too, something that makes the piece look considered rather than just stitched together.
Listener questions
What yarn weight works best for this vest?
A lightweight cotton yarn is what the pattern calls for, since it drapes well and keeps the stitch definition crisp in the lace shell sections. A cotton blend works too if you want a touch more softness and stretch.
Can I make this vest longer or wider?
Yes, the three-panel construction makes this easier than a one-piece garment, since you can add rows to the back and front panels before starting the lace sections. Just keep the lace shell repeats even across the row so the fans line up.
Do I need to block this piece?
I would not skip it. Wet blocking is what opens the lace shells fully and gives the panels their smooth, finished shape, so lay it flat and let it dry completely before wearing.
Is this a good pattern if I have never worked lace shells before?
Yes, the shell stitch itself is simple, just two double crochets, a chain, and two more double crochets into the same space. The solid rows before each lace section give you a steady rhythm before you need to focus on placement.
How do the front panels create the tie-front look?
The two front panels are worked as mirrored pieces, which naturally shapes the open neckline and leaves the tie detail at the center front. Keeping both panels identical in row count and lace placement is what makes the mirroring read cleanly.
How do I adjust the size of this vest?
Measure around the fullest part of the bust and add about 2 to 4 inches (5 to 10 cm) of positive ease for a relaxed fit. For a wider vest, increase the starting chain in multiples of 8 stitches, and for a longer vest, add extra pattern rows before assembly. To make it cropped, work fewer body rows, and for larger sizes, widen both front and back panels before shaping the neckline.
Do I need to make a gauge swatch first?
Yes. Crochet garments can change shape after washing and blocking, so swatching first, especially with cotton yarn, helps confirm the fit before committing to the full vest. The gauge for this pattern is 20 dc x 10 rows = 4 x 4 inches (10 x 10 cm).
Original pattern: https://duniarecipe.com/easy-crochet-vest-top-pattern-ideas-for-stylish-summer-outfits/
About the Author

Marisol QuinteroWho runs Crochet Obsessed, why a stitch count sits at the end of every round, how a pattern gets written here, and the things this site will never do.
More Patterns
- IntermediateNo. 01

Rose Granny Square Tote Crochet Pattern
Rose granny square tote crochet pattern made from 18 dimensional rose squares for a sturdy, romantic everyday bag.
- IntermediateNo. 02
Tropical octopus baby blanket crochet pattern with appliqués
Tropical octopus baby blanket crochet pattern: a cream filet base with coral and turquoise octopus appliqués, leaves, and…
- IntermediateNo. 03
Sunny lemon couple amigurumi crochet pattern
Sunny lemon couple amigurumi crochet pattern with embroidered slices and safety eyes for a cheerful handmade shelf pair.


