- LevelIntermediate
- Time4-6 hours
- Hook4.0 mm
- YarnBulky
About This Pattern
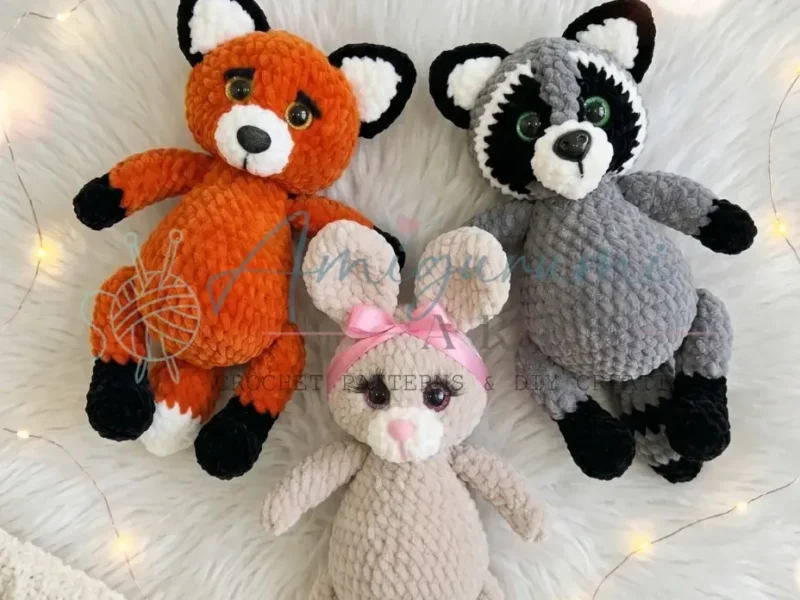
This one has that cozy, after-school-special warmth to it, the kind of toy you picture tucked under somebody's arm on the drive home. It is soft-edged and round, built from plush yarn so even the color-blocked bits feel gentle instead of sharp. Whichever face you give it, fox, raccoon or bunny, the mood lands the same: friendly, a little sleepy, easy to love on sight.
Finished and stuffed, this is a toy that holds its own on a shelf or a bed without looking stiff. The rounded body and the three different tail options give it enough personality that it does not read as a generic plushie. It is the kind of piece that ends up living on a windowsill or a kid's bed, getting picked up and put down a hundred times a week.
- Start the ears as flat rows in black yarn, working two panels per ear before joining them together.
- Work the lower legs the same way, swapping to white yarn instead of black if you are making the bunny.
- Choose and crochet your tail: the fox, raccoon and bunny versions each have their own distinct round count and shaping.
- Crochet the body in continuous spiral rounds, keeping a stitch marker at the start of each round so you do not lose your place.
- Pick your head, fox or bunny share one head shape while the raccoon gets its own, and work it in the round as well.
- Stuff the head firmly and the body to a stable, non-collapsing firmness, then close everything up and weave in your ends.
- Whipstitch the head to the body with the muzzle facing forward, then attach the arms at the marked rounds, angled slightly forward.
On the desk
Yarn
- Bulky plush yarn (such as Himalaya Dolphin Baby or YarnArt Dolce) in your main color, plus black and white; additional colors as needed per character
Hook
- US G-6 / 4.0 mm
Safety eyes
- 16 mm, 2 per toy
Stuffing
- Polyester fiberfill
Stitch markers
- At least 2
- Yarn needle / tapestry needle
- Scissors
- Sewing thread and hand-sewing needle (for muzzle shaping and part attachment)
Stitch shorthand
- BLO — Back Loop Only
- ch — Chain
- dc — Double Crochet
- dec — Invisible Decrease (insert hook in front loop of next 2 sts, pull up a loop, yarn over, pull through all 3 loops)
- hdc — Half Double Crochet
- inc — Increase (2 sc in same stitch)
- MR — Magic Ring
- Rnd — Round
- Row — Row
- sc — Single Crochet
- sl st — Slip Stitch
- SM — Stitch Marker
- st / sts — Stitch / Stitches
One body, three faces: amigurumi fox, raccoon or bunny
Ears — Fox or Raccoon (make 2; each ear = 2 panels)
Work flat rows. Make 2 panels per ear, then join them.
Step by step: Begin with black yarn.
Step by step: Ch 2, work 6 sc in second ch from hook. (6).
Step by step: Ch 2, work 6 sc in second ch from hook. (6).
- Round 1
Ch 2, work 3 sc in first ch from hook, ch 1, turn. (3)
- Round 2
1 sc, inc, 1 sc, ch 1, turn. (4)
- Round 3
Inc, 2 sc, inc, ch 1, turn. (6)
- Round 4
6 sc. (6)Step by step: 24 sc each round. (24) (3 rounds total).
Make a second panel the same way. Place both panels together and join with sc edging — do not join the base edge: Joining Row: 4 sc along one side, 3 sc in the top point, 4 sc along the other side. (11)
Upper Arms (make 2)
Begin with black yarn (use main color for the bunny version).
- Round 1
4 sc in MR. (4)
- Round 2
Inc in each st around. (8)
- Round 3
(1 sc, dec) repeat 4 times. (4) Switch to main color yarn.
- Round 4
(1 sc, inc) repeat 4 times. (8)
- Round 5
8 sc. (8)
- Round 6
8 sc. (8)
- Round 7
2 sl st, 2 sc, 2 hdc, 2 sc. (8)
- Round 8
2 sl st, 2 sc, 2 hdc, 2 sc. (8)
- Round 9
3 sc, 2 hdc, 2 sc. (8) (Note: this round begins 1 st shifted from the previous.)
- Round 10
8 sc. (8)
- Round 11
8 sc. (8)Step by step: (5 sc, dec) repeat 3 times. (18) Switch to black yarn.
- Round 12
1 dec, 2 sc, 1 dec, 2 sc. (6)
- Round 13
Fold flat and join — work 3 sc through both layers to close. Do not stuff. this …
Lower Legs (make 2)
Begin with black yarn (use white yarn for the bunny version).
- Round 1
4 sc in MR. (4)
- Round 2
Inc, 1 sc, 3 sc in next st, 2 sc. (9)
- Rounds 3–5
9 sc each round. (9)
- Round 6
1 sc, 2 dec, 4 sc. (7)
- Round 7
7 sc, 1 slip stitch offset (shift stitch marker to align for flat section).
- Round 8
4 sc, ch 1, turn. (Working flat now.)
- Round 9
1 sc, dec, 1 sc. (3) (Flat row.) Return to working in the round:
- Round 10
1 dec, 2 sc, 2 dec. (Working around the foot.)
- Round 11
6 sc. (6) Switch to main color yarn.
- Round 12
(1 sc, inc) repeat 3 times. (9)
- Round 13
9 sc. (9)
- Round 14
9 sc. (9)Sl st to finish. Fasten off, leaving a long yarn tail for sewing. Lightly stuff and sew onto the body so the color transition is hidden.
- Round 15
(2 sc, inc) repeat 3 times. (12)
- Round 16
12 sc. (12)Step by step: 18 sc each round. (18) (2 rounds total); Fold flat and join — work 9 sc through both layers to close.
- Round 17
6 dec. (6) Insert joint button/disc between Rounds 12 and 13 before closing if using jointed construction.
For sewn-in (non-jointed) legs, continue from Round 14 instead of Round 17:
- Round 18
Sewn method 1 dec, 4 sc, 1 dec, 4 sc. (10)
- Round 19
1 dec, 3 sc, 1 dec, 3 sc. (8)
- Round 20
Fold flat and join — work 4 sc through both layers to close.
Fox Tail
Begin with black yarn.
- Round 1
6 sc in MR. (6)
- Round 2
Inc in each st around. (12)
- Round 3
(1 sc, inc) repeat 6 times. (18)
- Round 4
18 sc. (18)
- Round 5
(5 sc, inc) repeat 3 times. (21)
- Round 6
21 sc. (21) Switch to main color yarn.
- Round 7
(6 sc, inc) repeat 3 times. (24)
- Round 8
24 sc. (24)
- Round 9
24 sc. (24)
- Round 10
(6 sc, dec) repeat 3 times. (21)
- Round 11
21 sc. (21)
- Round 12
(5 sc, dec) repeat 3 times. (18)
- Round 13
18 sc. (18)
- Round 14
18 sc. (18)
- Round 15
(4 sc, dec) repeat 3 times. (15)
- Round 16
15 sc. (15)
- Round 17
(3 sc, dec) repeat 3 times. (12)
- Round 18
12 sc. (12)
- Round 19
Fold flat and join — work 6 sc through both layers to close. Stuff firmly before closing.
Body
- Round 1
6 sc in MR. (6)
- Round 2
Inc in each st around. (12)
- Round 3
(1 sc, inc) repeat 6 times. (18)
- Round 4
(2 sc, inc) repeat 6 times. (24)
- Round 5
(3 sc, inc) repeat 6 times. (30)
- Round 6
(4 sc, inc) repeat 6 times. (36)
- Round 7
(5 sc, inc) repeat 6 times. (42)Rnd 8: Insert jointed legs between Rounds 6 and 7 at this point if using joint discs.
- Round 9
Work 6 sc while incorporating tail base, then 36 sc around. (42) The tail and legs are crocheted into this round together.
- Round 10
42 sc. (42)
- Round 11
(5 sc, dec) repeat 6 times. (36)
- Round 12
36 sc. (36)
- Round 13
(4 sc, dec) repeat 6 times. (30)
- Round 14
30 sc. (30)
- Round 15
(3 sc, dec) repeat 6 times. (24)
- Round 16
24 sc. (24)
- Round 17
(2 sc, dec) repeat 6 times. (18)
- Round 18
18 sc. (18)
- Round 19
18 sc. (18)Rnd 20: Attach upper arms as you work this final round — crochet them in as you go.
Head — Fox or Bunny
Begin with white yarn for the muzzle.
- Round 1
Ch 4. Starting in second ch from hook: inc, 1 sc, 3 sc in last ch; working back along opposite side: 2 sc. (8)
- Round 2
(1 sc, inc) repeat 4 times. (12)
- Round 3
12 sc, 1 stitch offset (move marker forward 1 st). Switch to main color yarn.
- Round 4
6 inc, 6 sc, 1 stitch offset. (18)
- Round 5
2 sc, 2 inc, 3 sc, 2 inc, 9 sc. (22)
- Round 6
(1 sc, inc) repeat 8 times, 6 sc. (30)
- Round 7
3 inc, 17 sc, 3 inc, 7 sc. (36)
- Round 8
(1 sc, inc) repeat 3 times, 17 sc, (1 sc, inc) repeat 3 times, 7 sc. (42)
- Rounds 9–12(42)
42 sc each round. (42) (4 rounds total)
- Round 13
(5 sc, dec) repeat 6 times. (36)
- Round 14
(4 sc, dec) repeat 6 times. (30)
- Round 15
(3 sc, dec) repeat 6 times. (24)
- Round 16
(2 sc, dec) repeat 6 times. (18)
- Round 17
(1 sc, dec) repeat 6 times. (12)
- Round 18
6 dec. (6) Fasten off and close. Insert 16 mm safety eyes between Rounds 7 and 8, placed in Round 7 between the two sets of increases.
Head — Raccoon
Begin with white yarn for the muzzle.
- Round 1
Ch 4. Starting in second ch from hook: inc, 1 sc, 3 sc in last ch; working back: 2 sc. (8)
- Round 2
(1 sc, inc) repeat 4 times. (12)
- Round 3
12 sc, 1 stitch offset. (Begin colorwork — Black = B, Gray = G, White = W)
- Round 4
B: 2 inc, inc with 1st st in B and 2nd in G, inc with 1st st in G and 2nd in B, B: 2 inc, 1 sc; G: 5 sc; B: 1 stitch offset. (18)
- Round 5
B: 2 sc, 2 inc; G: 2 sc; B: 1 sc, 2 inc, 3 sc; G: 5 sc; B: 1 sc. (22)
- Round 6
B: (1 sc, inc) 3 times; G: 1 sc, inc, 1 sc; B: (inc, 1 sc) 3 times, inc split B/G; G: 6 sc. (30)
- Round 7
B: 3 inc, 6 sc; G: 4 sc; B: 7 sc, 2 inc, inc split B/G; G: 7 sc. (36)
- Round 8
G: 1 sc; W: (inc, 1 sc) 3 times, 6 sc; G: 6 sc; W: 7 sc, (1 sc, inc) 2 times, 1 sc; G: inc, 7 sc. (42)
- Round 9
42 sc — work BLO only where white stitches appear. (42)
- Rounds 10–12(42)
42 sc each round. (42) (3 rounds total)
- Round 13
(5 sc, dec) repeat 6 times. (36)
- Round 14
(4 sc, dec) repeat 6 times. (30)
- Round 15
(3 sc, dec) repeat 6 times. (24)
- Round 16
(2 sc, dec) repeat 6 times. (18)
- Round 17
(1 sc, dec) repeat 6 times. (12)
- Round 18
6 dec. (6) Fasten off and close. Insert 16 mm safety eyes between Rounds 7 and 8, placed in Round 7 between the two sets of increases.
Where it goes
- A bedside companion for a child's room, paired with a soft knit blanket in a matching main color.
- A soft focal point on a nursery shelf, grouped with a couple of smaller single-color amigurumi for scale contrast.
- A handmade gift for a baby shower or birthday, especially nice when you pick the bunny head for a softer look.
- A photo-prop plushie for craft fair displays, where the three-in-one design lets you show fox, raccoon and bunny side by side.
Color ideas
- Classic fox Main color in a warm rust or orange for the body, head, upper arms and lower legs, with black yarn for the ear panels, the start of the arms and legs, and the fox tail detailing, plus white for muzzle and face accents.
- Soft bunny Main color carried through the body and the bunny head, white yarn swapped in for the lower legs and the bunny tail instead of black, keeping the whole toy pale and gentle.
Care
Spot clean with a damp cloth and mild soap first, since bulky plush yarns like these hold water and take a long time to dry all the way through at the core.
If you do need a full wash, let it air dry flat on a towel, turning it occasionally, and keep it away from direct heat so the fiberfill does not clump.
Reshape the ears and limbs gently with your fingers while still slightly damp, and store the finished toy somewhere dry and out of direct sun to keep the colors from fading.
Assembly
- Step 1 Stuff the Head firmly and close. Weave in end.
- Step 2 Stuff the Body to your desired firmness. The base of the body should feel stable — add more fiberfill if it collapses.
- Step 3 Sew the Head to the top of the Body using the yarn tail and whipstitch. Align the muzzle to face forward. Take several passes around for a secure join.
- Step 4 Attach the Upper Arms to the sides of the body at Round 19–20, using the yarn tail and whipstitch. Angle them slightly forward.
- Step 5 If using sewn-in legs, stuff the Lower Legs lightly through the ankle area only — the foot should be firmer. Sew the open flat edge to the base of the body.
- Step 6 Sew the Ears to the top of the head — for the fox/raccoon, position them upright with the base slightly inward. For the bunny, place them toward the sides of the head with a slight outward angle.
- Step 7 Attach the Tail to the back of the body at the base, centered. Use the yarn tail to sew securely with several whipstitches.
- Step 8 Using sewing thread and a hand needle, make 2–3 small stitches through the muzzle area to define the face shape (cinching slightly if desired).
- Step 9 Weave in all remaining yarn ends.
Easy to get wrong
Losing track of the spiral round start
Place a stitch marker at the first stitch of every round on the body, head, arms, legs and tail, and move it up each time. Without it, the continuous spiral is easy to lose a few rounds in.
Mismatched ear panels
Crochet both panels for each ear before joining, and lay them side by side to check the row counts match before you sew them together. A lopsided ear is one of the easiest things to spot once the head is stuffed.
Listener questions
Can I make the fox, raccoon and bunny from the same body?
Yes, that is the whole idea behind this pattern. You crochet one shared body, one set of upper arms and one set of lower legs, then choose the head, ears and tail that match the character you want.
Do the ears really need to be worked flat?
the fox and raccoon, yes, the ears are worked in flat rows as two panels each and then joined, which gives them a flatter, more pointed shape than a spiral round would. This is different from the rest of the toy, which is all continuous spiral rounds.
What happens if my body base feels wobbly after stuffing?
Add more fiberfill until the base feels stable rather than soft or collapsing, since a firm base is what lets the toy sit upright. Check it again after you attach the legs, since sewing can shift the stuffing slightly.
Why does the pattern ask for safety eyes and also sewing thread?
The 16 mm pieces give you the eyes, while the sewing thread and hand-sewing needle are there for shaping the muzzle and for attaching smaller parts securely. The yarn needle handles the bigger whipstitch joins like the head to the body and the arms to the sides.
Original pattern: https://amigurumiarts.com/crochet-fox-raccoon-bunny-amigurumi-pattern/
About the Author

Marisol QuinteroWho runs Crochet Obsessed, why a stitch count sits at the end of every round, how a pattern gets written here, and the things this site will never do.
More Patterns
- IntermediateNo. 01

Rose Granny Square Tote Crochet Pattern
Rose granny square tote crochet pattern made from 18 dimensional rose squares for a sturdy, romantic everyday bag.
- IntermediateNo. 02
Tropical octopus baby blanket crochet pattern with appliqués
Tropical octopus baby blanket crochet pattern: a cream filet base with coral and turquoise octopus appliqués, leaves, and…
- IntermediateNo. 03
Sunny lemon couple amigurumi crochet pattern
Sunny lemon couple amigurumi crochet pattern with embroidered slices and safety eyes for a cheerful handmade shelf pair.


