- LevelIntermediate
- Time25-35 hours
- Hook6.0 mm
- YarnWorsted
About This Pattern
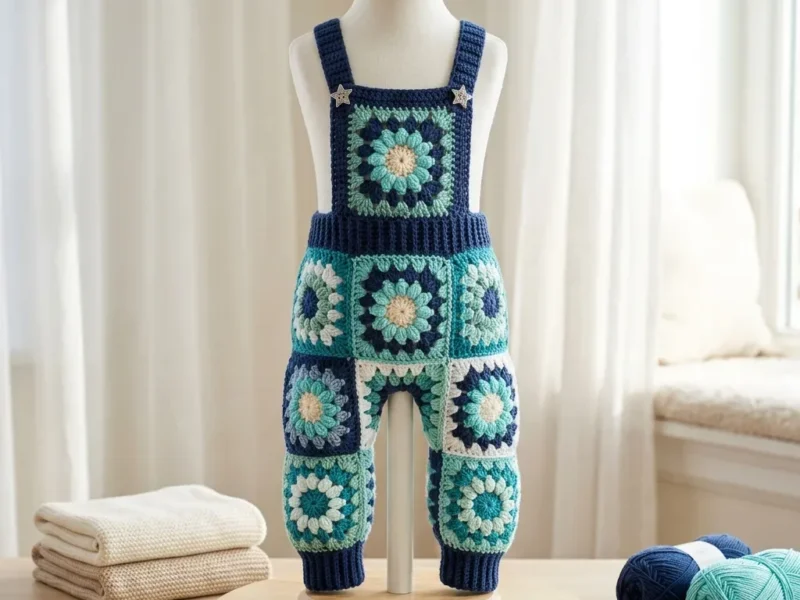
This one feels like a bright morning at the shore, the kind where navy and teal and that soft periwinkle all sit together without fighting. The sunflower-style petals give each square a little dimension, so the bib catches light instead of lying flat. It is playful but tailored, which is a hard combination to land in baby wear.
Finished, this sits folded over a changing table or draped on a nursery chair, structured enough to hold its own shape without a baby in it. The star buttons catch the eye first, then people notice the layered petals on the bib. It reads as handmade couture, not a quick weekend gift.
- Work the sunflower-style granny squares in your assigned colors, building each one through its petal and outline rounds.
- Join squares as you go rather than seaming afterward, connecting them square by square into flat leg and bib sections.
- Assemble the trouser legs from their joined squares, then seam the legs together at the crotch to form the body.
- Add the bib front panel with its single large center square and attach the matching back panel.
- Repeat the ribbing technique for the ankle cuffs on the bottom edge of each leg tube.
- Make the two straps separately, then attach them to connect the bib front to the back panel.
- Sew on the star-shaped buttons, weave in every end, and block the whole garment flat to its finished shape.
On the desk
- You’ll need worsted weight yarn (CYCA 4) with smooth plied construction for the best stitch definition in your granny squares.
Suggested yarns
- Lion Brand Pound of Love (100% acrylic, 1020 yards per 16 oz skein) offers excellent stitch definition, is machine washable, has a wide color range, and is budget friendly for gift giving.
- Paintbox Yarns Simply DK (used at worsted tension with a slightly larger hook) provides very smooth texture and outstanding color consistency for colorwork squares. It’s 100% acrylic and machine washable.
- Cascade 220 Superwash (100% superwash merino, 220 yards per 100g skein) gives superior drape and softness against baby skin. It’s machine washable but more expensive. Worth it for a luxurious result.
Substitution note
- Choose any smooth worsted weight or heavy DK that achieves the listed gauge. Avoid fuzzy or bouclé yarns as they obscure the granny square pattern detail. Always swatch and wash your swatch before beginning, especially with natural fibers that may bloom after washing.
- Color A (Navy): 350 yards / 320 meters (waistband, cuffs, straps, square outlines, bib back)
- Color B (Teal): 200 yards / 183 meters (square petals and borders)
- Color C (Mint): 200 yards / 183 meters (square petals and borders)
- Color D (Cream/Off-white): 100 yards / 91 meters (square centers and petal accent rounds)
- Color E (Periwinkle/Soft blue-grey): 75 yards / 69 meters (square accent petals)
- US size J / 6.0 mm for granny squares and main body construction
- US size I / 5.5 mm for ribbing at waistband and cuffs (produces tighter rib)
- Yarn needle / tapestry needle
- Stitch markers (at least 6)
- Scissors
- 2 star-shaped buttons, approximately 3/4 inch / 2 cm diameter
- Sewing needle and matching thread for button attachment
- Rust-proof pins or blocking pins
- Blocking mats
Stitch shorthand
- ch — chain (wrap yarn over hook and pull through loop)
- sl st — slip stitch (insert hook, yarn over, pull through stitch and loop on hook in one motion)
- sc — single crochet (insert hook, yarn over, pull up loop, yarn over, pull through both loops)
- hdc — half double crochet (yarn over, insert hook, pull up loop, yarn over, pull through all 3 loops)
- dc — double crochet (yarn over, insert hook, pull up loop, yarn over, pull through 2 loops twice)
- tr — treble crochet (yarn over twice, insert hook, pull up loop, [yarn over, pull through 2 loops] 3 times)
- st/sts — stitch/stitches
- sp — space
- ch-sp — chain space
- rep — repeat
- pm — place marker
- rm — remove marker
- RS — right side
- WS — wrong side
- JAYG — join as you go
- BLO — back loop only (work into only the back loop of the stitch, leaving front loop unworked)
- sk — skip
- beg — beginning
- cont — continue
- approx — approximately
- tog — together
- inc — increase (work 2 stitches in same stitch)
- dec — decrease
Ocean blue granny square overalls for baby
Main Pattern
- Round 1
Ch 3 (counts as first dc), work 11 dc into ring, sl st to top of beginning ch-3 to join. Pull ring tail tight. (12 dc)
- Round 2(12)
Join Color B (or assigned petal color) with sl st to any dc. Work one Petal Stitch (sl st, ch 3, 4 dc, ch 3, sl st) in each of the 12 dc around. Do not join between petals, simply work each petal in the next dc. After completing the 12th petal, sl st to base of first petal. Fasten off Color B. (12 petals)
- Round 3
Join Color B (or same petal color as Round 2, per square type) with sl st to the back of any dc from Round 1, working behind the petals. Ch 3 (counts as first dc). Working behind all petals: dc in each dc from Round 1 around. Sl st to top of ch-3. (12 dc)
Note: To work Round 3, insert hook from the back side, behind the petal loops, directly into each Round 1 dc. This pushes petals forward and creates the layered sunflower effect.
- Round 4
Working behind petals as in Round 3, or working into the Round 3 dc stitches: Join Color B or C (per square type) with sl st to any dc.Ch 3 (counts as dc), dc in next dc. Corner: ch 2. Dc in next dc, dc in next dc. Side: ch 1. Dc in next dc, dc in next dc. Corner: ch 2. Dc in next dc, dc in next dc. Side: ch 1. Dc in next dc, dc in next dc. Corner: ch 2. Dc in next dc, dc in next dc. Side: ch 1. Dc in next dc, dc in next dc. Corner: ch 2. Sl st to top of beginning ch-3 to join. Fasten off.
Each side has 4 dc (including the ch-3 start) and 4 corners each with ch-2. (16 dc + 4 ch-2 corner spaces + 4 ch-1 side spaces)
- Round 5
Final border round, worked in Color A, Navy Join Color A with sl st to any corner ch-2 space.Ch 3 (counts as first dc), dc in same corner sp, ch 2, 2 dc in same corner sp (corner made). Ch 1. 2 dc in next ch-1 side sp. Ch 1. 2 dc in next corner ch-2 sp, ch 2, 2 dc in same corner sp. Ch 1. 2 dc in next ch-1 side sp. Ch 1. Repeat from to two more times. Sl st to top of beginning ch-3 to join.
Each side now has: 2 dc (corner), ch-1, 2 dc (side group), ch-1, 2 dc (corner). That is 6 dc per side. (24 dc total + 4 ch-2 corner spaces + 8 ch-1 spaces)
For standalone squares (not being joined on this round): Fasten off Color A. Weave in ends. Block square to 4 x 4 inches.
CHECKPOINT: Each finished blocked square should measure exactly 4 inches x 4 inches / 10 cm x 10 cm. If your squares are off, adjust hook size and remake before continuing.
Ankle Cuffs
Work directly onto the bottom edge of each leg tube. The bottom edge is the bottom of the four ankle squares.
Join Color A with sl st to bottom edge at side seam.
- Round 1
Join Color A, sc evenly around bottom opening. At each square side you should pick up approximately 8 sc (6 dc + 2 ch-sp = 8 sts). With 4 squares meeting at the bottom, the circumference of the cuff opening is 4 square edges x 8 sc = 32 sc. Sl st to join. (32 sc)
- Round 2(32)
through 6 (Ribbing): Ch 1, turn. Working in BLO, sc in each st around. Sl st to join. Turn. Rep this round 5 times (6 rounds total of BLO sc ribbing). (32 sc each round)Fasten off Color A. Weave in ends.
Repeat for second leg.
Waistband
The waistband is worked in the round directly on the top opening of the joined leg tubes.
Join Color A with sl st to top opening at side seam of left leg.
- Round 1
Ch 1, sc evenly around top opening, picking up 1 sc per dc and 1 sc per chain space as before. At crotch join, work 2 sc evenly into the join to avoid puckering. Total: 64 sc. Sl st to join. (64 sc)
- Round 2(64)
through 8 (Ribbing): Ch 1, turn. In BLO, sc in each st around. Sl st to join. Turn. Repeat for 8 rounds total. (64 sc each round)Fasten off. The waistband should measure approximately 1.75 inches / 4.5 cm tall.
Bib Front Panel
The bib front is the prepared bib square (the 17th square worked separately) plus a solid navy crochet panel that connects it to the waistband straps.
Step 1: Position the bib square centered at the front of the overalls at the top of the waistband.
With Color A and yarn needle, whipstitch the bottom edge of the bib square to the top edge of the front waistband, centered. The bib square is 4 inches / 10 cm wide, centered on the 8-inch / 20 cm wide front.
Step 2: Work a connecting panel above the bib square.
Join Color A to top-right corner of bib square.
- Round 1
(RS): Ch 1, sc across the top edge of the bib square. Pick up 8 sc along the top border of the square. Turn. (8 sc)
- Round 2
through 4: Ch 1, sc in each sc across. Turn. (8 sc each row) This small solid navy panel reinforces the top of the bib before the straps split.Fasten off. This bib extension should measure approximately 1 inch / 2.5 cm tall.
Back Panel
The back panel is a solid navy hdc rectangle worked directly onto the back of the waistband, rising to match the bib front height plus strap attachment area.
Join Color A to the top back edge of the waistband at the back right corner.
- Round 1
(RS): Ch 2 (does not count as st), hdc across the full back top edge. You should have 32 hdc across the back. Turn. (32 hdc)
- Round 2
through 10: Ch 2, hdc in each hdc across. Turn. (32 hdc each row) The back panel should measure approximately 4 inches / 10 cm wide per leg and span the full back width of 8 inches / 20 cm, rising approximately 2.5 inches / 6.5 cm.Fasten off.
CHECKPOINT: At this point, viewed from the front, you should have the bib square prominent at center front, with a small solid navy panel above it. From the back, a full-width solid navy panel rises from the waistband.
Straps (Make 2)
Each strap is worked in sc ribbing (BLO) for firmness and stretch. Straps attach at the back panel top corners and cross to the bib front, fastening with star buttons.
Foundation chain: With Color A and I hook, ch 7.
- Round 1
Sc in 2nd ch from hook, sc in each ch across. Turn. (6 sc)
- Round 2
through 56: Ch 1, sc in BLO of each sc across. Turn. (6 sc each row) Row count determines length. 56 rows at gauge = approximately 12.5 inches / 32 cm. This allows the strap to travel from the back top, over the shoulder, and attach at the bib front with a button, fitting a 12-24 month toddler.Fasten off, leaving a 12-inch tail for seaming.
Strap attachment: Sew one short end of each strap to the top corners of the back panel using the yarn needle and tail. Use the mattress stitch for security. Weave tail ends completely.
At the front end of each strap, fold the top end flat and use sewing needle and thread to attach one star button through both layers of strap and through the bib front panel at the upper corners of the bib square. The button both decorates and secures the strap.
For a fully removable button closure: Work one buttonhole in the strap. On Row 55 of strap, ch 2, sk 2 sc, sc in last 4 sc (4 sc + ch-2 sp). On Row 56, sc in each sc and 2 sc in ch-2 sp to close. (6 sc) Then sew button to bib front corner.
Where it goes
- A photoshoot or portrait outfit for a toddler, paired with a plain cream or navy long-sleeve bodysuit underneath.
- A wearable keepsake gift for a new parent who wants something sturdier than a blanket.
- An everyday play outfit for a toddler in the 12 to 24 month range, layered over a turtleneck for cooler days.
- A nursery decor piece, hung or folded on a shelf alongside other handmade textiles before it is worn.
Color ideas
- Classic ocean wash Color A navy covers the waistband, cuffs, straps, square outlines, and bib back, Color B teal and Color C mint take the petals and borders on alternating squares, Color D cream centers every square, and Color E periwinkle shows up only as accent petals.
- Petal-forward contrast Keep Color A navy on the ribbed waistband and cuffs for structure, then let Color E periwinkle and Color C mint dominate the petal rounds on the bib front panel so the chest reads lighter than the legs, with Color D cream still anchoring every center.
Care
If you used an acrylic yarn like the ones listed, machine wash on a gentle cycle and lay flat to dry, since acrylic holds its shape well but can stretch if hung wet.
If you chose the superwash merino option, hand wash in cool water or use a wool cycle, then press out water in a towel rather than wringing.
Store folded rather than hung, since the weight of the joined squares and ribbing can pull a hanging garment out of shape over time.
Assembly
- Step 1 Weave in all remaining ends thoroughly, at least 6 inches into the fabric in different directions.
- Step 2 Block the completed overalls by soaking in cool water for 20 minutes, pressing out excess water in a towel without wringing, then pinning flat to blocking mats to the finished dimensions. Allow to dry completely, 24 to 48 hours.
- Step 3 Final measurements after blocking:
- Step 4 Chest circumference: 20 inches / 51 cm
- Step 5 Overall length shoulder to ankle: 22 inches / 56 cm
- Step 6 Waistband depth: 1.75 inches / 4.5 cm
- Step 7 Bib height: approximately 5 inches / 13 cm (square 4 inches plus extension 1 inch)
- Step 8 Ankle cuff depth: 1.5 inches / 4 cm
- Step 9 Inseam: approximately 9 inches / 23 cm
Easy to get wrong
Petals worked in the wrong direction
Remember that round 3 is worked from the back, behind the petals, directly into the round 1 stitches. If you accidentally work into the petal stitches instead, the layered sunflower look will not form, so unpick back to round 2 and check you are inserting the hook behind the loops.
Losing the ribbing stitch count
Because the BLO ribbing is worked in turned rows joined into a round, it is easy to pick up an extra stitch at the turn. Place a marker at the join point for every ribbing round and count before you fasten off.
Mismatched squares at the join-as-you-go stage
Squares joined with the wrong edge facing out will twist the leg tubes once seamed. Lay all squares for one leg flat in their final layout before joining so you can see any color or orientation errors right away.
Between the songs
- What makes this one worth the hours is the sunflower-style petal motif, where you work behind the previous round's stitches to push petals forward into real texture. You are not just making a flat square, you are learning to read a stitch from the back side and trust that it will look right from the front. Then there is the join-as-you-go assembly, which turns a pile of individual motifs into trouser legs and a bib without a separate seaming session. The ribbed waistband, straps, and ankle cuffs add a completely different rhythm, worked in back loops only for that classic knit-look stretch. By the end you have practiced colorwork, dimensional stitching, garment shaping, and finishing, all in one project.
Listener questions
Can I use a different yarn than the ones listed in the materials?
Yes, as long as it is a smooth worsted weight or heavy DK that hits the listed gauge. Avoid fuzzy or bouclé yarns, since they will obscure the petal detail that makes the sunflower squares work.
Do I need to swatch before starting?
I would, especially since gauge is critical for this garment to fit as intended. Swatch and wash your swatch first, particularly if you are working with a natural fiber like the superwash merino option, since it may bloom after washing.
Why does the pattern use two different hook sizes?
The larger J hook keeps the granny squares and main body open and well defined, while the smaller I hook tightens up the ribbing at the waistband and cuffs. That size difference is what gives the ribbed sections their snug, stretchy feel.
What is the hardest part of this pattern for an intermediate crocheter?
Most people find the join-as-you-go assembly and strap construction the trickiest part, since you are tracking stitch counts across multiple joined pieces at once. The granny squares themselves are approachable even for confident beginners.
How long should I expect this project to actually take?
Plan on roughly 25 to 35 hours total across square construction, joining, assembly, ribbing, and finishing. That does not include the additional blocking and drying time once the overalls are complete.
Original pattern: https://crochr.com/ocean-blue-granny-square-baby-overalls-free-crochet-pattern/
About the Author

Marisol QuinteroWho runs Crochet Obsessed, why a stitch count sits at the end of every round, how a pattern gets written here, and the things this site will never do.
More Patterns
- IntermediateNo. 01

Rose Granny Square Tote Crochet Pattern
Rose granny square tote crochet pattern made from 18 dimensional rose squares for a sturdy, romantic everyday bag.
- IntermediateNo. 02
Tropical octopus baby blanket crochet pattern with appliqués
Tropical octopus baby blanket crochet pattern: a cream filet base with coral and turquoise octopus appliqués, leaves, and…
- IntermediateNo. 03
Sunny lemon couple amigurumi crochet pattern
Sunny lemon couple amigurumi crochet pattern with embroidered slices and safety eyes for a cheerful handmade shelf pair.


