- LevelIntermediate
- Time6-9 hours
- Hook2.25 mm
- YarnFingering
About This Pattern
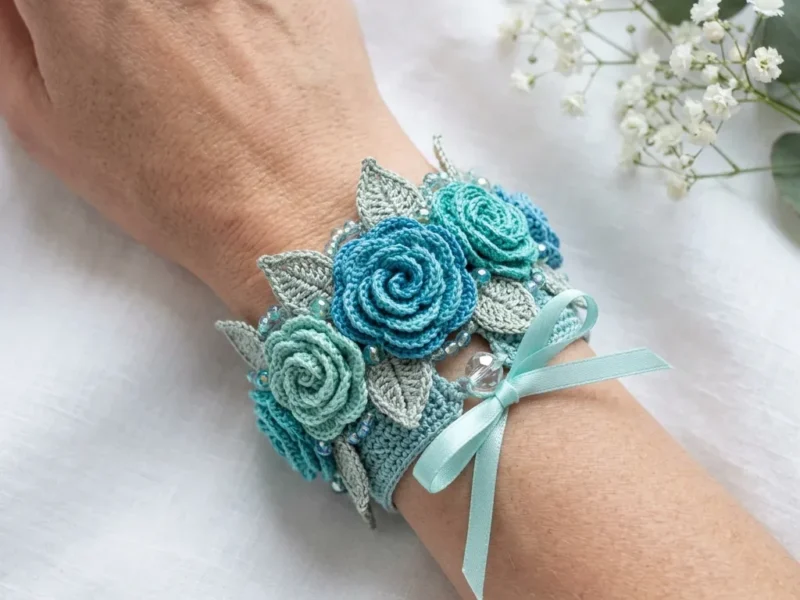
This one sits somewhere between jewelry making and sculpture. The band itself is quiet and structured, but the top explodes into rolled roses and textured leaves in blue, teal, and sage. It is the kind of piece that makes people ask where you bought it, and I like answering that question with a hook and a spool of cotton.
Your hands will do two very different jobs here. The band asks for steady, even double crochet rows, while the roses and leaves want patience as you work small stitches into tight chain spaces and then roll flat strips into dimensional spirals. Threading seed beads onto yarn before certain rows adds a third kind of focus, slower and more deliberate.
Finished, it reads less like a cuff and more like a small bouquet pinned to your wrist. Laid on a dresser or jewelry tray, the steel blue band disappears under the cluster of roses and leaves, with the satin ribbon trailing out in a soft bow. It is substantial enough to anchor a plain sleeve or an open neckline.
- Work the steel blue base band flat in double crochet rows to build the main cuff structure.
- Add the sage gray-green bottom border along one long edge of the band for a finished edge.
- Thread seed beads onto yarn, then work the bead edging and upper accent row along the top edge.
- Crochet the ribbon channels into the band so satin ribbon can thread through later.
- Make the large, medium, and small roses as flat strips, then roll each one into a spiral and stitch the base.
- Crochet the large and medium leaves flat and add surface texture before setting them aside.
- Sew the roses and leaves onto the band in your chosen arrangement, securing each motif firmly.
- Thread the ribbon through the channels, steam or mist the piece lightly, then pin flat to set the shape.
On the desk
Yarn (all fingering weight cotton)
- Color A, Medium blue (main rose): approximately 15 yards (14 meters)
- Color B, Teal (medium roses): approximately 20 yards (18 meters)
- Color C, Sage mint (small roses): approximately 18 yards (16 meters)
- Color D, Sage gray-green (leaves and band accent): approximately 25 yards (23 meters)
- Color E, Steel blue (main band body): approximately 30 yards (27 meters)
- Cotton is strongly recommended for stiffness and stitch definition. The finished piece needs to hold its sculptural shape, so avoid fuzzy, stretchy, or acrylic yarns.
Hook
- US B-1 / 2.25 mm steel or aluminum crochet hook. This is smaller than standard for fingering weight yarn, which creates the dense, firm fabric needed for the floral shapes.
Notions
- Approximately 80 to 100 size 11/0 seed beads in silver-lined aqua blue
- Approximately 20 to 30 small clear glass beads, 3 to 4 mm
- Sewing needle with eye large enough for ribbon
- Yarn needle for assembly
- Sharp hand-sewing needle and matching thread for securing beads
- Fabric stiffener or starch spray (optional but recommended)
- Scissors
- At least 4 stitch markers
Stitch shorthand
- ch — chain: Yarn over, pull through loop on hook
- sl st — slip stitch: Insert hook, yarn over, pull through stitch and loop on hook in one motion
- sc — single crochet: Insert hook, yarn over, pull up a loop (2 loops on hook), yarn over, pull through both loops
- hdc — half double crochet: Yarn over, insert hook, yarn over, pull up a loop (3 loops on hook), yarn over, pull through all 3 loops
- dc — double crochet: Yarn over, insert hook, yarn over, pull up a loop (3 loops on hook), yarn over, pull through 2 loops, yarn over, pull through remaining 2 loops
- tr — treble crochet: Yarn over twice, insert hook, yarn over, pull up a loop (4 loops on hook), [yarn over, pull through 2 loops] 3 times
- sp — space
- st(s) — stitch(es)
- RS — right side
- WS — wrong side
- rep — repeat
- sk — skip
- blo — back loop only
- flo — front loop only
- pm — place marker
- rem — remaining
- tog — together
- yo — yarn over
- rnd — round
Ocean blue floral crochet cuff bracelet pattern
Section 1: Base Band
The band is worked flat, lengthwise, in double crochet rows.
Foundation: Using Color E and US B-1 / 2.25 mm hook, ch 73.
Step by step: Foundation: Using Color D, ch 7.
Sc in 2nd ch from hook, sc in next ch, hdc in next ch, dc in next ch, hdc in next ch, 3 sc in last ch. Working back along opposite side of foundation chain, hdc in next ch, dc in next ch, hdc in next ch, sc in next ch, sl st in last ch. (13 sts around plus 1 sl st)
- Round 1
(RS): Dc in 4th ch from hook (ch-3 counts as first dc), dc in each ch across. Turn. (71 dc)
- Round 2
(WS): Ch 3, dc in each st across, working into the top of the turning ch at the end. Turn. (71 dc)Step by step: Work surface vein as before. Finished length: approximately 0.75 inch (2 cm).
At this point you should have 5 roses and 12 leaves. Lay them out on the band before sewing to plan your arrangement.
- Round 3
(RS): Ch 3, dc in each st across. Turn. (71 dc)
- Round 4
(WS): Ch 1, sc in first st, sc in each st across. Do not turn at end of row. Fasten off Color E. Turn. (71 sc)After Row 4, your band should measure approximately 6.5 inches (16.5 cm) wide and 0.75 inch (1.9 cm) tall.
Section 5: Large Rose (Color A, Make 1)
This is your central, largest rose.
Foundation: Using Color A, ch 41.
- Round 1
Sc in 2nd ch from hook, sc in next ch, hdc in next ch, hdc in next ch, [dc in next 2 ch, tr in next 2 ch, dc in next 2 ch, hdc in next 2 ch, sc in next 2 ch] 3 times, hdc in next ch, dc in next ch, tr in next 2 ch, dc in next ch, hdc in next ch, sc in last ch. (40 sts)
- Round 2
Ch 1, turn. Working back along the opposite side of the foundation chain, sc in each ch across. Fasten off, leaving a 10-inch (25 cm) tail for sewing. (40 sc)Assembly: Hold the strip with RS facing. Starting at the end with the tallest stitches (the tr end), tightly roll the strip into a spiral, stitching through the base every few wraps with the yarn tail and a tapestry needle to secure. When fully rolled, the base of the rose is flat and the spiral shows on the RS. Stitch securely across the base several times. Fasten off and weave in ends on the base.
Finished diameter: approximately 1.25 inches (3.2 cm).
Section 6: Medium Rose (Color B, Make 2)
Foundation: Using Color B, ch 31.
- Round 1
Sc in 2nd ch from hook, sc in next ch, hdc in next 2 ch, [dc in next 2 ch, tr in next 2 ch, dc in next 2 ch, hdc in next 2 ch, sc in next 2 ch] 2 times, hdc in next ch, dc in next ch, tr in next ch, sc in last ch. (30 sts)
- Round 2
Ch 1, turn. Sc in each ch across the opposite side of foundation chain. Fasten off with 10-inch (25 cm) tail. (30 sc)
Assemble as for large rose. Finished diameter: approximately 1 inch (2.5 cm).
Section 7: Small Rose (Color C, Make 2)
Foundation: Using Color C, ch 21.
- Round 1
Sc in 2nd ch from hook, sc in next ch, hdc in next 2 ch, dc in next 2 ch, tr in next 2 ch, dc in next 2 ch, hdc in next 2 ch, sc in next 2 ch, hdc in next ch, dc in next ch, tr in last ch. (20 sts)
- Round 2
Ch 1, turn. Sc in each ch across opposite side of foundation chain. Fasten off with 10-inch (25 cm) tail. (20 sc)
Assemble as before. Finished diameter: approximately 0.75 inch (2 cm).
Total roses: 1 large Color A, 2 medium Color B, 2 small Color C. Five roses total.
Section 8: Large Leaf (Color D, Make 4)
Foundation: Using Color D, ch 12.
- Round 1
Sc in 2nd ch from hook, sc in next ch, hdc in next 2 ch, dc in next 2 ch, hdc in next 2 ch, sc in next ch, 3 sc in last ch (this is the leaf tip). Now working back along the opposite side of the foundation chain, sc in next ch, hdc in next 2 ch, dc in next 2 ch, hdc in next 2 ch, sc in next ch, sl st in last ch (base of leaf). Do not fasten off. (22 sts around plus 1 sl st)
- Round 2
Ch 1. Working in blo only, sl st in each st around to tip, 3 sl st in center tip st, sl st back to base. Fasten off with 6-inch (15 cm) tail.Work surface leaf vein from base to tip as described in Special Stitches. Finished length: approximately 1.25 inches (3.2 cm).
Section 9: Medium Leaf (Color D, Make 4)
Foundation: Using Color D, ch 9.
- Round 1
Sc in 2nd ch from hook, sc in next ch, hdc in next 2 ch, dc in next ch, hdc in next ch, sc in next ch, 3 sc in last ch. Working back along opposite side of foundation chain, sc in next ch, hdc in next ch, dc in next ch, hdc in next 2 ch, sc in next ch, sl st in last ch. (17 sts around plus 1 sl st)
- Round 2
Ch 1. Working in blo, sl st around to tip, 3 sl st in center tip st, sl st back to base. Fasten off with 6-inch (15 cm) tail.Work surface vein as before. Finished length: approximately 1 inch (2.5 cm).
Section 2: Bottom Border
With RS facing, join Color D to the bottom left corner of the band (the foundation chain edge).
Border Row 1: Ch 1, work 71 sc evenly across the foundation chain edge. Turn. (71 sc)
Border Row 2 (RS): Ch 1, sc in blo of each st across. Turn. (71 sc)
Border Row 3 (WS): Ch 1, sc in each st across. Fasten off Color D. (71 sc)
Section 3: Bead Edging and Upper Accent Row
Pre-thread approximately 68 seed beads onto a length of Color D yarn (prepare at least 2 yards).
With RS facing, join beaded Color D yarn to the top right corner of the band (the Row 4 edge).
Bead Row 1 (WS facing, so beads show on RS): Ch 1, [bsc in next st] across entire top edge of band. Turn. (71 bsc, 71 beads placed)
If you run out of pre-threaded beads before the row ends, it is acceptable to place a bead in every other stitch instead, giving 36 beads total.
Bead Row 2: Ch 1, sc in each st across. Do not turn. Fasten off Color D.
Your band now has a beaded upper edge. The total band height is approximately 1.25 inches (3.2 cm).
Section 4: Ribbon Channels
Create two small openings at the front center of the band for threading the ribbon. You can either use a yarn needle and Color E to stitch small loops at the left and right of center, approximately 0.5 inch (1.3 cm) apart, or use a sharp tapestry needle to pierce two small holes in the dc rows at center front, reinforcing the edges with a whip stitch.
The ribbon will pass through from RS to WS through the left hole, across the WS of the band, and back through to the RS through the right hole.
Section 11: Upper Leaf Border
This creates the standing leaf edging along the very top of the band that gives the bracelet its crown-like silhouette.
With RS facing and Color D, join yarn to the top right edge of the band.
Leaf Border Row 1: Ch 1. Working across the top beaded edge of the band, [sc in next 4 sts, ch 10, sc in 2nd ch from hook, sc in next ch, hdc in next 2 ch, dc in next 2 ch, hdc in next ch, sc in next ch, sl st back into the base st of the ch-10 on the band edge] repeat across, ending with sc in remaining sts to fill the edge. Fasten off Color D.
Each ch-10 spike creates an upward-pointing standing leaf. Space them approximately every 4 stitches, which gives you 12 to 14 standing leaves across the top. Work a surface slip stitch vein up the center of each standing leaf, then add seed beads along the base of the leaf border with a hand-sewing needle and thread.
Where it goes
- A statement cuff for a solid-color blouse or a simple sheath dress, letting the roses do the talking.
- A gift for someone who collects handmade jewelry rather than mass-produced accessories.
- A photography or craft-fair display piece, since the dimensional roses photograph well against plain backgrounds.
- An everyday wrist accent paired with denim, where the teal and sage tones soften a casual outfit.
Color ideas
- Original ocean palette Steel blue for the band body, medium blue for the large rose, teal for the medium roses, sage mint for the small roses, and sage gray-green for the leaves and band accent.
- Monochrome blue tonal Keep the band in steel blue and swap the sage mint small roses and sage gray-green leaves for a deeper teal, so every rose and leaf sits within one blue-green family instead of contrasting with it.
Care
Hand wash gently in cool water with mild soap only if the piece needs it, since cotton holds its shape best with minimal washing.
Reshape the roses and leaves while damp, pin the piece flat, and let it air dry completely before wearing again.
Store it flat or loosely coiled in a drawer rather than hanging, so the dimensional roses do not flatten under their own weight.
Assembly
- Step 1 After assembly, hold the bracelet over steam or lightly mist with water. Pin flat and allow to dry completely. If using commercial fabric stiffener, apply a light coat to the roses and leaves only so the band remains flexible enough to tie.
- Step 2 Weave in all remaining yarn ends securely on the WS, working ends in at least two directions. Trim ribbon ends at a 45-degree angle or seal with a lighter flame carefully.
- Step 3 For care, hand wash gently in cool water with mild soap if needed. Do not machine wash or dry. Lay flat to dry, reshaping as needed. Store flat or loosely rolled to maintain the three-dimensional shape.
Easy to get wrong
Rolling the rose strip from the wrong end
Always start rolling at the tall treble crochet end so the spiral shows the tallest stitches on the right side. Starting from the short end buries the detail inside the roll.
Beads strung in the wrong order
Thread all seed beads onto the yarn before you begin the bead edging row, and count them against the pattern before working the row. Running out mid-row means unraveling back to add more.
Between the songs
- The real pleasure here is in the rose spirals. You crochet a flat strip with a built-in height gradient, from short stitches to tall treble crochet, then roll it so the tallest edge becomes the bloom and the short edge becomes the hidden base. Watching a strip go from flat and strange to recognizably floral is genuinely satisfying. The textured leaves add a second skill, surface detail on a flat motif, and the bead edging and ribbon channels at assembly turn separate pieces into one cohesive band. It is a project that teaches rolling, stitching into chain spaces, and bead placement all in one sitting, and each finished rose feels like a small win.
Listener questions
Can I use a different yarn weight than fingering?
I would not recommend it here, since the dense fabric from the small B-1 hook and fingering cotton is what gives the roses their sculptural hold. A heavier yarn would make the band bulky and keep the spirals from rolling tightly.
Why does the pattern call for cotton instead of acrylic?
Cotton has the stiffness and stitch definition this piece needs to hold its three-dimensional shape. Acrylic or fuzzy yarns tend to be stretchy or soft, which makes the rolled roses sag over time.
Do I need to block the roses and leaves separately before assembly?
You can, but the pattern's steaming and pinning step after full assembly works well since it sets everything at once. If you prefer more control over individual rose shape, a light steam before sewing them on is fine too.
What if my wrist is smaller or larger than the stated range?
The ribbon ties give you some flexibility within the 6 to 7.5 inch range by tying tighter or looser. For wrists outside that range, adjust the length of your ribbon rather than the band itself.
How securely do the beads need to be attached?
Very securely, since both the strung seed beads and the sewn-on glass beads will see regular contact against skin and clothing. Use the sharp hand-sewing needle and matching thread as directed, and double back through each bead attachment point.
Original pattern: https://crochr.com/ocean-blue-floral-crochet-bracelet-free-crochet-pattern/
About the Author

Marisol QuinteroWho runs Crochet Obsessed, why a stitch count sits at the end of every round, how a pattern gets written here, and the things this site will never do.
More Patterns
- IntermediateNo. 01

Rose Granny Square Tote Crochet Pattern
Rose granny square tote crochet pattern made from 18 dimensional rose squares for a sturdy, romantic everyday bag.
- IntermediateNo. 02
Tropical octopus baby blanket crochet pattern with appliqués
Tropical octopus baby blanket crochet pattern: a cream filet base with coral and turquoise octopus appliqués, leaves, and…
- IntermediateNo. 03
Sunny lemon couple amigurumi crochet pattern
Sunny lemon couple amigurumi crochet pattern with embroidered slices and safety eyes for a cheerful handmade shelf pair.


