- LevelIntermediate
- Time4-6 hours
- Hook5.0 mm
- YarnWorsted
About This Pattern
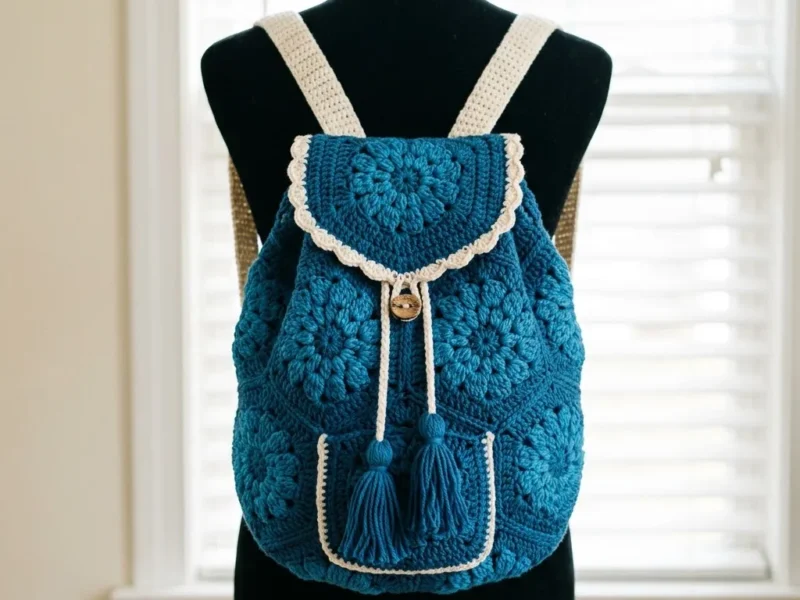
This one feels like a day at the shore translated into stitches. Teal blue and cream sit together the way sea and sand do, no fuss, just a clean pairing that reads coastal without trying too hard. I think of it as the bag you reach for when you want something sturdy and a little bit cheerful.
Your hands get a nice mix here. There's the meditative rhythm of granny squares joining into a tube, then the more technical work of shaping an oval base with careful increases, then a scallop edge that asks for a bit of patience at the finish. It keeps your attention without ever feeling like a slog.
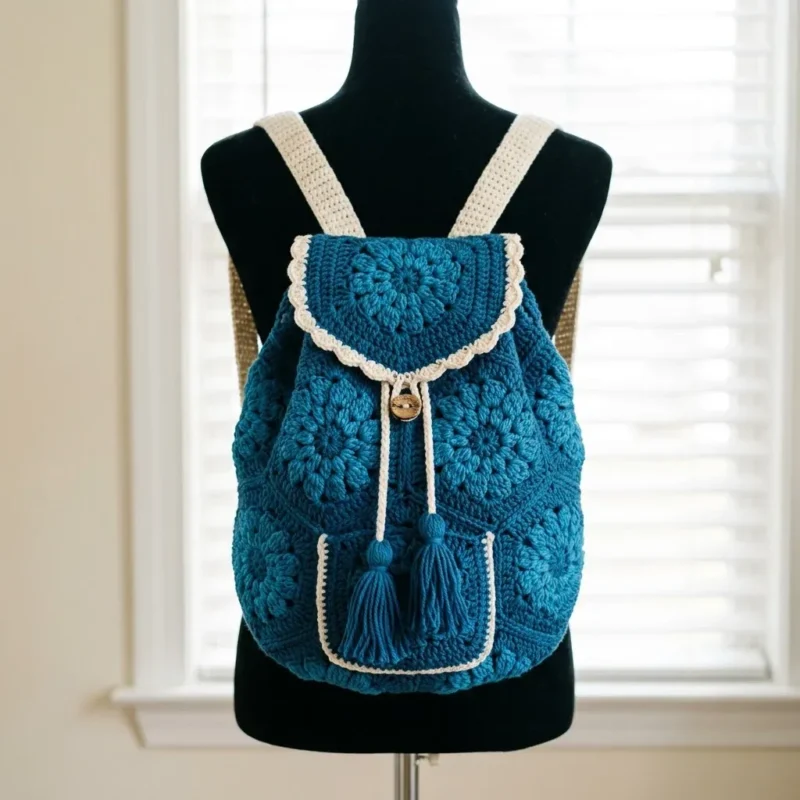
Picture it hanging on a hook by the front door, cream button catching the light, drawstring pulled snug at the top. It's the kind of bag that looks handmade in the best way, the sort of piece that makes someone ask where you got it and you get to say you made it yourself.
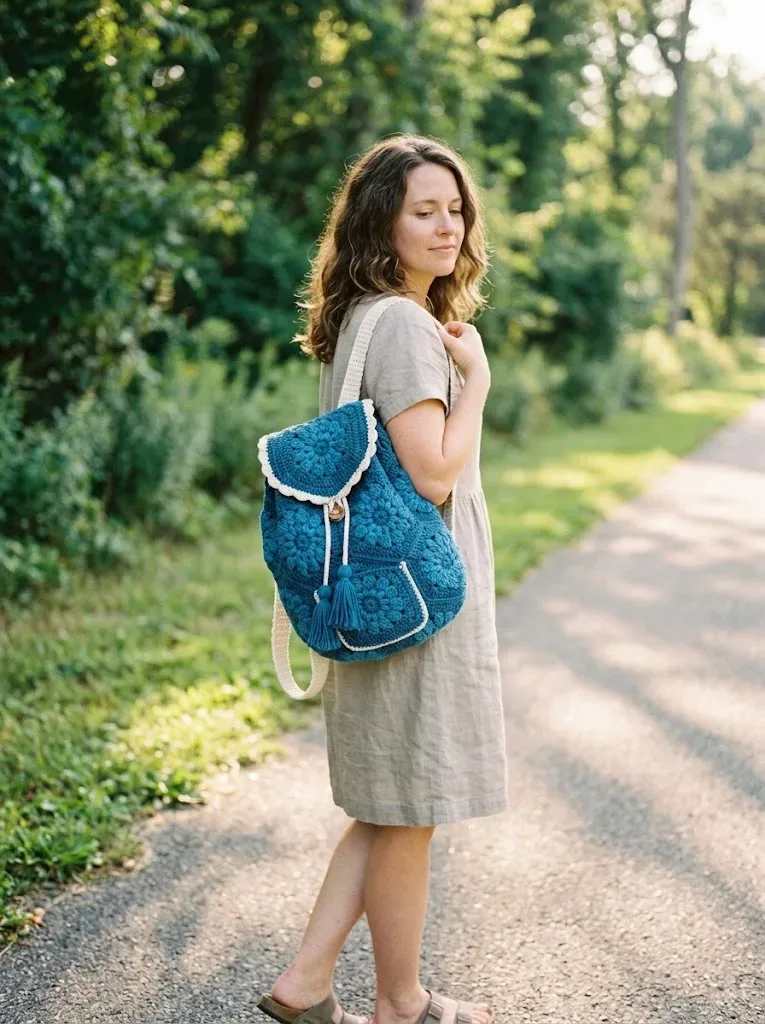
The finished backpack measures approximately 12 inches tall, 10 inches wide, and 4 inches deep, roomy enough for everyday essentials while remaining lightweight and comfortable to wear.
This is an intermediate-level pattern. You should be comfortable with basic crochet stitches, working in the round, and seaming pieces together; if you've made granny squares before, you're ready for this project.
One completed granny square should measure approximately 4 inches by 4 inches after blocking. Always check your gauge before starting; if your squares are too large, try going down one hook size, if they're too small, go up one hook size.
- Crochet 18 puff stitch granny squares in the main color, building each one up with corner clusters and a puff stitch center.
- Join 12 of the squares into a 3x4 panel, then seam the short ends together to form the tube that becomes the backpack body.
- Crochet the oval base in the main color, increasing evenly around both curved ends until it fits snugly inside the bottom of the tube, then whip stitch it in place.
- Work the half-circle flap in rows, increasing out to shape it, then add the scalloped edging in the contrast color around the curved edge.
- Crochet two long straps in the contrast color and a front pocket using the granny square pattern topped with a single crochet round.
- Make two tassels from the main color yarn and attach them to the top corners of the pocket.
- Assemble the backpack: attach the flap, pocket, straps, and button, then thread the drawstring through the top opening with the wooden bead.
On the desk
- Main Color (MC): Approximately 400 grams of worsted weight cotton yarn in teal blue
- Contrast Color (CC): Approximately 100 grams of worsted weight cotton yarn in cream or off-white
- 5.0mm (US H/8) crochet hook
- Yarn needle for weaving ends and seaming
- Stitch markers
- One wooden button, approximately 1 inch diameter
- One wooden bead for drawstring
- Scissors
Stitch shorthand
- ch — chain
- st — stitch
- sl st — slip stitch
- sc — single crochet
- dc — double crochet
- hdc — half double crochet
- puff st — puff stitch
- 3-dc cluster — three double crochet cluster
- sk — skip
- sp — space
Ocean blue coastal granny square backpack crochet pattern
Hook
5.0mm (US H/8) crochet hook
Notions
Yarn needle for weaving ends and seaming Stitch markers One wooden button, approximately 1 inch diameter One wooden bead for drawstring
Scissors
Puff Stitch Granny Square
You'll need 18 identical squares for the main body of the backpack. Work all squares in the main color (teal).
- Round 1
Using MC create a magic ring. Ch 3 (counts as first dc throughout), work 2 dc into ring, ch 2, (3-dc cluster into ring, ch 2) 3 times. Sl st to top of beginning ch-3 to join. (4 clusters, 4 ch-2 spaces)
- Round 2
Sl st into next 2 dc to reach corner ch-2 space. Ch 3, 2 dc in same corner sp, ch 1, work puff st in same corner sp, ch 1, 3 dc in same corner sp. *Ch 1, (3 dc, ch 1, puff st, ch 1, 3 dc) in next corner sp. Repeat from * around. Ch 1, sl st to top of beginning ch-3. (4 corner puff stitches, 8 dc clusters)
- Round 3
Ch 3, dc in next 2 dc, *(3 dc, ch 2, 3 dc) in corner puff st for corner increase, dc in next 3 dc, dc in ch-1 sp, dc in next 3 dc.* Repeat from * around, ending with sl st to beginning ch-3. (4 corners, 15 dc per side including corners)
- Round 4
Ch 3, dc in each dc around, working (2 dc, ch 2, 2 dc) in each corner ch-2 space. Sl st to beginning ch-3. (19 dc per side including corners)
- Round 5
Ch 3, dc in each dc around, working (2 dc, ch 2, 2 dc) in each corner ch-2 space. Sl st to beginning ch-3. Fasten off. (23 dc per side including corners)Weave in ends on all squares. Block squares to 4 inches by 4 inches for easier assembly.
For the Main Body
Arrange 12 squares in a strip, 3 squares wide by 4 squares tall. This will wrap around to form the sides and front/back of the backpack.
To join, hold two squares with right sides together. Using MC, work sc through both layers along one edge, inserting your hook through corresponding stitches on each square. This creates a neat, slightly raised seam on the inside.
Join all 12 squares into a 3×4 rectangular panel. Then join the short ends together to form a tube.
For the Bottom
You’ll create an oval base to close the bottom of the bag.
- Round 1
Using MC ch 15. Sc in 2nd ch from hook and in next 12 ch, 3 sc in last ch (this creates a turn at the end). Working along the opposite side of the foundation chain, sc in next 12 ch, 2 sc in last ch. Sl st to first sc. (30 sc)
- Round 2
Ch 1, sc in first sc, sc in next 12 sc, 2 sc in each of next 3 sc, sc in next 13 sc, 2 sc in each of next 2 sc. Sl st to first sc. (36 sc)
- Round 3
Ch 1, sc in each sc around, increasing 6 stitches evenly around the curved ends. Sl st to first sc. (42 sc)Continue increasing until the oval base fits snugly into the bottom opening of your square tube. Typically 2 to 3 more rounds.
Pin the base to the tube and whip stitch in place using a yarn needle and MC.
Flap
The flap features a beautiful half-circle design with a puff stitch center and scalloped edge.
- Row 1(12)
Using MC ch 4. Sl st to first ch to form a ring. Ch 3, work 11 dc into ring. Turn. (12 dc, do not join)
- Row 2
Ch 3, dc in first dc, 2 dc in each dc across. Turn. (24 dc)
- Row 3
Ch 3, dc in first dc, *dc in next dc, 2 dc in next dc.* Repeat from * across. Turn. (36 dc)
- Row 4
Ch 3, dc in each dc across. Turn. (36 dc)
- Row 5
Ch 3, *dc in next 2 dc, 2 dc in next dc.* Repeat from * across. Turn. (48 dc)
- Row 6
Ch 3, dc in each dc across. Fasten off MC. (48 dc)
Scallop Edging
Join CC at the beginning of the curved edge.
*Sk 1 st, 5 dc in next st, sk 1 st, sl st in next st.* Repeat from * around the curved portion of the flap. Fasten off.
Straps
Using CC, ch 10.
- Row 1
Sc in 2nd ch from hook and in each ch across. Turn. (9 sc)
- Rows 2–90
Ch 1, sc in each sc across. Turn. (9 sc)
Adjust length as needed. Each strap should measure approximately 26 to 30 inches for comfortable wear.
Fasten off and weave in ends.
Front Pocket
- Rounds 1–5
Work exactly as the main granny square pattern.
- Round 6
Using CC join in any corner. Ch 1, sc in each st around, working 3 sc in each corner ch-2 space. Sl st to first sc. Fasten off.
Tassels
Cut approximately 20 strands of MC, each 8 inches long. Fold the bundle in half. Tie a separate strand tightly around the bundle about half an inch from the fold to create the tassel head. Trim ends evenly.
Assembly
Step 1 Attach the flap: Position the straight edge of the flap along the top back edge of the backpack. Whip stitch securely using MC.
Step 2 Attach the pocket: Center the pocket on the front of the backpack, approximately 2 inches from the bottom. Whip stitch three sides, leaving the top open.
Step 3 Attach tassels: Secure one tassel to each top corner of the pocket.
Step 4 Create drawstring: Using CC, ch 120 or desired length. Sc in 2nd ch from hook and in each ch across. Weave through the stitches around the top opening of the backpack.
Step 5 Add wooden bead: Thread both ends of the drawstring through the wooden bead.
Step 6 Attach button: Sew the wooden button to the front of the backpack, positioned so it aligns with the flap when closed.
Step 7 Create button loop: Using CC, ch 15. Sl st to form a loop. Attach to the underside of the flap tip.
Step 8 Attach straps: Position the bottom of each strap at the lower back corners of the backpack. Whip stitch securely. Attach the top of each strap to the upper back edges, approximately 3 inches apart.
More shots
Where it goes
- Carry it as a everyday bag for farmers market trips, paired with a denim jacket and canvas sneakers.
- Use it as a beach tote for sunscreen and a towel, since the cotton fiber holds its shape against sand and sun.
- Keep it by the door as a catch-all for keys and sunglasses, pairing well with linen or cotton outerwear.
- Bring it along on weekend errands as a hands-free alternative to a shoulder bag, worn over a simple cotton tee.
Color ideas
- Classic coastal Teal blue main color for the oval base and granny square tube, cream contrast color worked into the scallop edging around the top.
- Cream-forward Cream as the main body color throughout the tube and base, with teal blue reserved just for the scallop edging and drawstring accent.
Care
Hand wash the cotton yarn in cool water with a mild detergent, since cotton can lose shape if machine agitated too roughly.
Lay the backpack flat to dry rather than hanging it wet, which helps the granny square tube keep its structured form.
Reshape the oval base gently by hand while damp and store the finished bag stuffed with tissue paper to hold its shape.
Easy to get wrong
Uneven increases on the oval base
Space your increase stitches evenly around each curved end rather than bunching them together, so the oval stays symmetrical as it grows.
Oval base doesn't fit the tube opening
Keep checking the base against your granny square tube as you add rounds, and stop increasing as soon as it fits snugly rather than guessing the round count.
Scallop edging pulls the top opening tight
Work the scallop stitches with relaxed tension so the top edge stays open enough for the drawstring to move freely.
Between the songs
- What I love about this project is how the granny square tube gives you a familiar, portable rhythm while the oval bottom asks for real technique. Working increases evenly around the curved ends of that base so it fits snugly into the tube is a genuinely satisfying bit of problem solving. Then the scallop edging turns a plain top opening into something finished and considered. Add a wooden button and a wooden bead on the drawstring, and you've got natural touches against the cotton that feel intentional rather than decorative for decoration's sake. It's a project that teaches shaping, finishing, and construction all in one go, and you end up with something you'll actually use.
Listener questions
Can I use a different cotton blend yarn for this bag?
Yes, any sturdy cotton or cotton blend in worsted weight will work well here. Just check your gauge first and adjust your hook size if your granny squares come out too large or small.
Why does the oval base need an increasing round?
The increases shape the oval so its curved ends match the rounded bottom of the square tube. Without them, the base would stay flat and narrow instead of filling out to fit.
What if my oval base is too small for the tube opening?
Simply keep working increase rounds until it fits snugly, as the pattern notes this usually takes a couple more rounds than the sample shown. Measure against the tube opening as you go rather than committing to a fixed number of rounds.
Can I skip the wooden bead and button?
You can, though they add a nice natural detail that contrasts with the cotton texture. A plain drawstring knot works fine as a substitute if you prefer a simpler finish.
Is the scallop edging difficult for a newer crocheter?
It's more about patience than difficulty, since it comes after the bulk of the construction work. Taking it slow and keeping even tension makes it manageable even if you haven't worked a scalloped edge before.
Original pattern: https://bunnypatterns.com/ocean-blue-coastal-granny-square-backpack-crochet-pattern/
About the Author

Marisol QuinteroWho runs Crochet Obsessed, why a stitch count sits at the end of every round, how a pattern gets written here, and the things this site will never do.
More Patterns
- IntermediateNo. 01

Rose Granny Square Tote Crochet Pattern
Rose granny square tote crochet pattern made from 18 dimensional rose squares for a sturdy, romantic everyday bag.
- IntermediateNo. 02
Tropical octopus baby blanket crochet pattern with appliqués
Tropical octopus baby blanket crochet pattern: a cream filet base with coral and turquoise octopus appliqués, leaves, and…
- IntermediateNo. 03
Sunny lemon couple amigurumi crochet pattern
Sunny lemon couple amigurumi crochet pattern with embroidered slices and safety eyes for a cheerful handmade shelf pair.


