- LevelIntermediate
- Time8-14 hours
- Hook6.0 mm
- YarnWorsted
About This Pattern
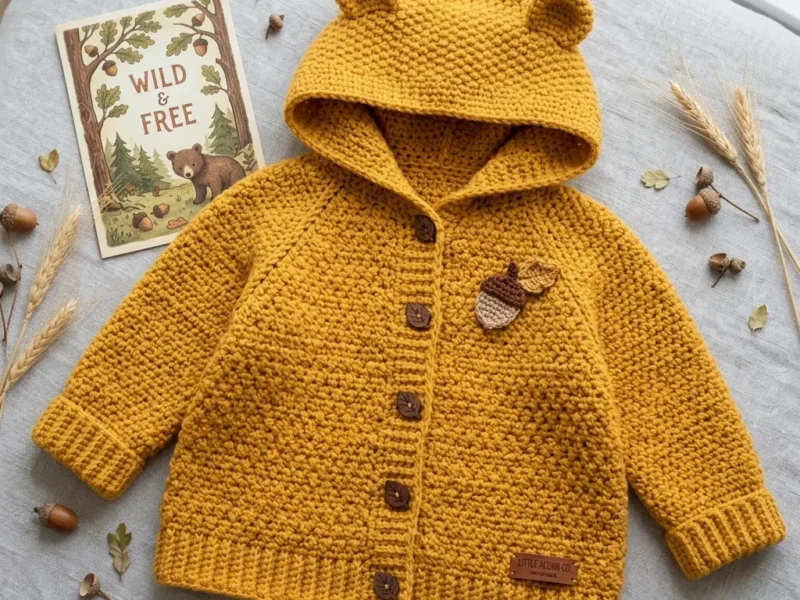
There is something so cozy about this one, and I mean that literally. The mustard yellow pulls warm and golden against the cream and brown acorn bits, and the whole jacket has that cuddly, textured look before you even pick up a button. It feels like the kind of piece you make when you want a baby gift that reads as handmade in the best way.
Your hands will spend most of their time in moss stitch, that steady single crochet and chain rhythm that locks into a dense, even grid. But you will also pick up raglan shaping along diagonal lines, join to work the sleeves in the round, pick up stitches for the button bands and hood edge, and seam two flat hood panels into a peak. It is a pattern that asks you to shift gears more than it asks you to learn new stitches.
Picture this jacket draped over the back of a chair in a nursery, hood flopped forward with its little bear ears catching the light. It photographs beautifully on its own, folded on a shelf, buttons facing out. On a baby it reads structured and sweet at once, the acorn applique adding a quiet, earthy detail near the hem or front.
- Start at the neckline with a foundation chain worked in moss stitch, placing markers to divide the five raglan sections.
- Increase along the raglan lines on right side rows until the yoke reaches full width across front, sleeve, and back sections.
- Separate the sleeve stitches from the body stitches and continue the body flat with gentle A-line shaping at the sides.
- Rejoin at each underarm to work the sleeves in the round, finishing each cuff with the same ribbed hook.
- Pick up stitches along the front edges to work the button bands, placing buttonholes to match your buttons.
- Crochet two flat hood panels and seam them together at the top to create the peaked shape.
- Make the bear ears in the round and the acorn applique pieces, then sew everything in place by hand.
On the desk
- Lion Brand Pound of Love in Butterscotch is my top pick. This 100% acrylic yarn is machine washable, budget friendly, and widely available. It produces beautiful stitch definition in the moss stitch.
- Paintbox Yarns Simply DK held double is another excellent option. Holding two strands together gives you worsted weight fabric with a slightly softer hand. The Mustard color is nearly identical to the pictured garment.
- Paintbox Yarns Simply Worsted in Mustard Yellow works beautifully if you want a single strand option. Pure acrylic with excellent washability.
- When substituting yarn, choose any smooth worsted weight that achieves gauge. Avoid fuzzy or heavily textured yarns because they will hide your moss stitch texture. For baby items, machine washable fibers are your friend.
Yarn
- Worsted weight yarn (CYCA 4) in mustard yellow, approximately 400 / 450 / 500 yards total depending on size
- Small amount of brown yarn, approximately 15 yards, for the acorn cap
- Small amount of cream yarn, approximately 10 yards, for the acorn body
Hooks
- US size J-10 (6.0 mm) for the body and sleeves
- US size H-8 (5.0 mm) for ribbed bands, cuffs, and ears
Notions
- At least 6 stitch markers
- Yarn needle for seaming and weaving ends
- 7 wooden leaf-shaped or natural wood buttons, approximately 3/4 inch (19 mm) diameter
- Sewing needle and thread to match yarn
- Scissors
Stitch shorthand
- ch — chain
- sl st — slip stitch (insert hook, yarn over, pull through both loops on hook)
- sc — single crochet (insert hook, yarn over, pull up a loop, yarn over, pull through both loops)
- hdc — half double crochet
- dc — double crochet
- BLO — back loop only (work into only the back loop of the stitch)
- FLO — front loop only
- st(s) — stitch(es)
- sp(s) — space(s)
- RS — right side (the side facing outward when worn)
- WS — wrong side
- PM — place marker
- SM — slip marker
- YO — yarn over
- sk — skip
- rep — repeat
- rem — remaining
- beg — beginning
- inc — increase (work 2 sc in the same stitch)
- dec or sc2tog — single crochet decrease (insert hook in next stitch, pull up loop, insert hook in following stitch, pull up loop, yarn over and draw through all 3 loops)
- tog — together
- rnd(s) — round(s)
- t-ch — turning chain
Mustard yellow hooded baby jacket with bear ears
Moss Stitch (Linen Stitch or Granite Stitch)
This stitch creates an alternating grid-like texture. You work single crochet and chain 1 skip sequences, offsetting the stitches on alternate rows.
To work moss stitch flat on a foundation chain: Your foundation chain must be an odd number.
- Round 1
(RS): Starting in the 3rd chain from hook, work 1 sc. Ch 1, skip 1 ch, 1 sc in next ch. Repeat across to the last chain. Turn.
- Round 2
(WS): Ch 2, skip the first sc. 1 sc in the ch-1 space, ch 1, skip the next sc. Repeat across, ending with 1 sc in the turning chain space. Turn.
- Round 3
(RS): Ch 2, skip first sc. 1 sc in ch-1 space, ch 1, skip sc. Repeat across, ending with 1 sc in the t-ch space. Turn.Repeat Rows 2 and 3 for the pattern.
One moss stitch unit equals 1 sc plus 1 ch-1 space. Throughout this pattern, stitch counts in brackets reflect the total number of sc stitches in the row.
Section 1: Yoke (Worked Flat, Top Down)
The yoke begins at the neckline and expands with raglan increases worked every right side row. It is divided into 5 sections: Left Front, Left Sleeve, Back, Right Sleeve, Right Front.
Foundation Chain: Size 6 to 12 months: ch 37 Size 12 to 18 months: ch 41 Size 18 to 24 months: ch 45
- Round 1
RS, setup row Starting in the 3rd ch from hook, work 1 sc. (Ch 1, skip 1 ch, 1 sc in next ch) across.Place markers as follows: For size 6 to 12 months (18 sc total): Left Front: 3 sc, Marker A Left Sleeve: 2 sc, Marker B Back: 8 sc, Marker C
Right Sleeve: 2 sc, Marker D Right Front: 3 sc For size 12 to 18 months (20 sc total): Left Front: 3 sc, Marker A Left Sleeve: 3 sc, Marker BBack: 8 sc, Marker C Right Sleeve: 3 sc, Marker D Right Front: 3 sc For size 18 to 24 months (22 sc total): Left Front: 4 sc, Marker ALeft Sleeve: 3 sc, Marker B Back: 8 sc, Marker C Right Sleeve: 3 sc, Marker D Right Front: 4 sc Turn.Understanding the raglan increases: On each RS row, work a raglan increase at each of the 4 markers, adding 8 sc total per RS row. On WS rows, work straight with no increases. The increase is worked by working (sc, ch 1, sc) into the ch-1 space immediately before AND after each marker.Row 2 (WS, all sizes): Ch 2, work moss stitch across with no increases. Turn. - Round 3
RS, increase row Work moss stitch across, working raglan increase at each marker position.6 to 12 months: 26 sc 12 to 18 months: 28 sc 18 to 24 months: 30 sc Row 4 (WS): Work straight. Same count.
- Round 5
RS, increase 6 to 12 months: 34 sc 12 to 18 months: 36 sc 18 to 24 months: 38 scContinue the increase pattern (increase on RS rows, work straight on WS rows) through the following rows:
- Round 7
42 / 44 / 46 sc
- Round 9
50 / 52 / 54 sc
- Round 11
58 / 60 / 62 sc
- Round 13
66 / 68 / 70 sc
- Round 15
74 / 76 / 78 sc
- Round 17
82 / 84 / 86 scSize 6 to 12 months: Stop increasing after Row 17. Proceed to Sleeve Separation.
Sizes 12 to 18 and 18 to 24 months continue:
- Round 19
92 / 94 scSize 12 to 18 months: Stop after Row 19.
Size 18 to 24 months continues:
- Round 21
102 sc
Section 3: Body (Worked Flat)
- Round 1
through 8: Work straight in moss stitch. Same counts as above. A-Line Shaping: Work 1 sc increase at each end of the body on RS rows, every 6 rows, 3 times total.
- Round 9
RS, increase 54 / 58 / 64 sc
- Round 15
RS, increase 56 / 60 / 66 sc
- Round 21
RS, increase 58 / 62 / 68 sc Continue working straight until the body measures approximately 7.5 / 8 / 9 inches from the underarm.
Section 4: Ribbed Hem
Switch to H-8 (5.0 mm) hook. Chain 7.
- Round 1
Starting in 2nd ch from hook, work 6 sc. Sl st into the first st on the jacket body edge. Turn. (6 sc)
- Round 2
Skip the sl st, work 6 sc BLO across. Turn.
- Round 3
Ch 1, work 6 sc BLO, sl st into the next body edge stitch. Turn. Repeat Rows 2 and 3 across the entire bottom edge. Seam the short ends together.
Section 8: Bear Ears (Make 2)
Using H-8 hook and mustard yarn, work in magic ring.
- Round 1
6 sc in ring. (6 sc)
- Round 2
2 sc in each sc around. (12 sc)
- Round 3
Sc in next sc, 2 sc in next sc. Repeat around. (18 sc)
- Round 4
Sc in each sc around. (18 sc) Fasten off, leaving a long tail. Fold ear in half and seam to the hood approximately 2 inches from the center seam on each side.
Section 2: Sleeve Separation and Body
On the next RS row, work across the Left Front in moss stitch, chain 5 to bridge the underarm, skip all Left Sleeve stitches, work across the Back, chain 5 for the second underarm, skip the Right Sleeve stitches, and work across the Right Front.
Place sleeve stitches on holders.
Body stitch counts after separation: Size 6 to 12 months: 52 sc Size 12 to 18 months: 56 sc Size 18 to 24 months: 62 sc
Section 5: Sleeves (Worked in the Round)
- Round 1
Rejoin yarn at underarm center. Pick up 3 stitches from the underarm chain and work held sleeve stitches.
- Round 2(26)
Total sleeve stitches: 22 / 24 / 26 sc Work in moss stitch in the round for 4 rounds.
- Round 3
Decrease rounds: Work sc2tog twice per decrease round at Rounds 5, 11, and 17.
- Round 4(20)
Final sleeve counts: 16 / 18 / 20 sc Continue until sleeve measures 5 / 5.5 / 6 inches from underarm.
- Round 5(18)
Cuffs: Switch to H-8 hook. Decrease to 14 / 16 / 18 sc. Work 6 rounds of sc BLO.
Section 6: Button Bands
Using H-8 hook, pick up approximately 38 to 50 sc along each front edge depending on size.
Right band: Work 3 rows of sc BLO.
Left band (with buttonholes): On Row 3, space 7 buttonholes evenly by working ch 2, skip 2 sc at each buttonhole position.
Sew buttons to right band.
Section 7: Hood
Hood Panel (make 2): Ch 35. Work 35 rows of moss stitch. (17 sc per row)
Seam the two panels along one short edge (the top) with right sides together. Attach the hood to the neckline, centering the seam at the back neck.
Section 9: Acorn Applique
Acorn Body (cream yarn):
Work in magic ring: 6 sc, then increase to 9 sc, work 3 rounds even, decrease to close. Stuff lightly.
Acorn Cap (brown yarn): Ch 8, work 3 rows of sc, shaping into a dome. Attach to body top.
Sew completed acorn to left chest of jacket.
Where it goes
- A take-home outfit layer for a newborn, paired with a simple onesie and soft leggings underneath.
- A photo-session piece for fall portraits, where the mustard yellow and bear hood do the visual work on their own.
- A baby shower gift that stands alone, since the button band and hood make it feel like a finished outfit rather than an accessory.
- A stroller layer for cool mornings, worn open over a sleeper and buttoned once the temperature drops.
Color ideas
- Classic mustard woodland Mustard yellow for the entire yoke, body, sleeves, hood panels, and button bands, with brown for the acorn cap and bear ear centers and cream for the acorn body and ear edges.
- Softened neutral mustard Mustard yellow worked only through the body and sleeves, cream carried into the ribbed hem, cuffs, and button bands for contrast, and brown reserved for the acorn cap alone.
Care
Machine wash the finished jacket on a gentle cycle in cool water if you used an acrylic yarn like Pound of Love or Paintbox Simply Worsted, since both are machine washable.
Lay the jacket flat to dry rather than hanging it, which keeps the moss stitch panels from stretching out of shape under the weight of wet acrylic yarn.
Store it folded rather than on a hanger, and reshape the hood points gently with your fingers while still slightly damp if they have flattened in storage.
Easy to get wrong
Losing the moss stitch offset
Check that each chain-1 space sits above a single crochet from the row below before you continue; if the pattern starts running sc-over-sc, unravel back to the last correct row rather than pushing forward.
Mixing up raglan markers
Move your markers up with every right side increase row instead of leaving them in place, since Marker A through D define the Left Front, Left Sleeve, Back, Right Sleeve, and Right Front sections throughout the yoke.
Rushing the hood panel seam
Pin the two flat hood panels together at the top before seaming so the peak lines up evenly, since an uneven seam here throws off the whole hood silhouette.
Between the songs
- What I love about this one is how the construction keeps working for you. Starting at the neckline in moss stitch and expanding with raglan increases means you can hold the piece up against a baby at any point and see exactly how it will fit. Moving from flat yoke to a separated sleeve and body section, then back to flat for the button bands, keeps the project from ever feeling repetitive. The hood, built as two seamed panels with the bear ears worked separately in the round, is where the project earns its intermediate rating. None of the individual techniques are hard, but stringing raglan shaping, in-the-round sleeves, picked-up ribbing, and panel seaming together in one garment is genuinely satisfying to pull off.
Listener questions
Can I make this jacket without working in the round?
Most of it, yes, since the yoke, body, and button bands are all worked flat. The sleeves are the one section worked in the round after you rejoin at the underarm, so you do need to be comfortable with that step.
Do I need to know how to pick up stitches along an edge?
Yes, this comes up for the ribbed hem, cuffs, button bands, and hood edge. It is a skill worth practicing on a swatch first if you have not done it before, since the whole garment depends on clean pick-up rows.
What yarn weight and hook sizes does this pattern actually need?
You will need worsted weight yarn (CYCA 4) in mustard yellow, plus small amounts of brown and cream for the acorn applique. The body and sleeves use a J-10 (6.0 mm) hook while the ribbed bands, cuffs, and ears use a smaller H-8 (5.0 mm) hook.
How many buttons do I need for the button bands?
The materials list calls for 7 wooden leaf-shaped or natural wood buttons, approximately 3/4 inch (19 mm) in diameter. Any smooth button close to that size will work as long as it suits a baby garment.
Is the hood really two separate pieces?
Yes, the hood is built as two flat panels that you seam together at the top, which is what gives it that structured peaked shape. The bear ears are worked separately in the round and sewn on afterward.
Original pattern: https://crochetwithmia.com/mustard-yellow-hooded-baby-jacket-free-crochet-pattern/
About the Author

Marisol QuinteroWho runs Crochet Obsessed, why a stitch count sits at the end of every round, how a pattern gets written here, and the things this site will never do.
More Patterns
- IntermediateNo. 01

Blush pink bow front cardigan crochet pattern
Blush pink bow front crochet cardigan pattern builds a V-neck mesh cardigan with ribbed trim and soft tie…
- IntermediateNo. 02
Flamingo, pineapple and monstera leaf charm trio pattern
Flamingo pineapple monstera leaf charm trio: tiny thread crochet and amigurumi shaping turn small motifs into three charming…
- IntermediateNo. 03
Sage green daisy bow bucket bag crochet pattern
Sage green daisy bow bucket bag crochet pattern with a sculpted bucket base, gathered rim, and a petaled…