- LevelIntermediate
- Time18-24 Hours
- Hook6.0 mm
- YarnWorsted
About This Pattern
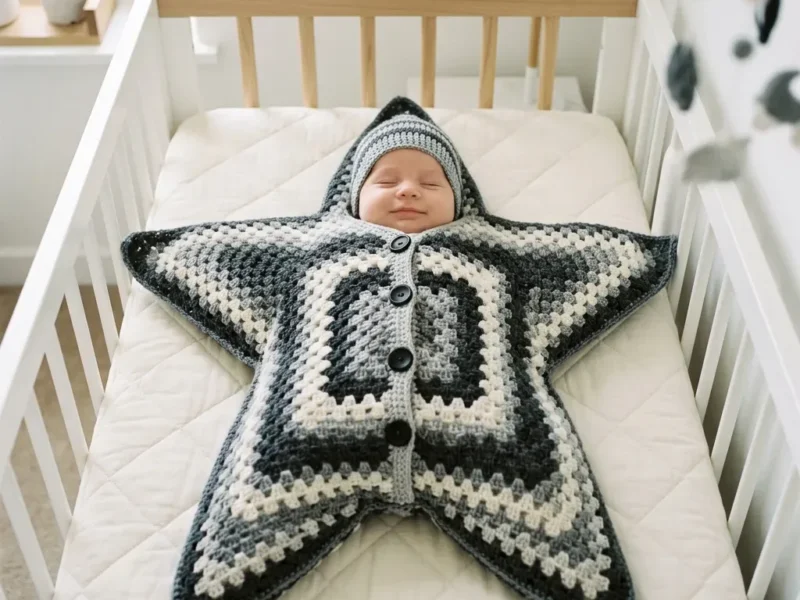
This swaddle transforms the humble granny cluster into something truly special: a five-pointed star cocoon that wraps a newborn in soft, structured elegance. Two identical star panels, built from a central granny square that radiates outward in four coordinating grey tones, join together with a simple single crochet seam. It's the kind of pattern that makes people gasp at a baby shower, and it's perfect for the crocheter who wants their gift to look like it came from a boutique, not a big-box store.
You'll move between working in the round for the central square and pentagonal transition, then shift to working flat rows to shape each star point—a technique combo that keeps this pattern genuinely intermediate rather than beginner-friendly. Expect to spend 7 to 9 hours on each star panel, plus 2 to 3 hours joining and finishing, and about 2 more hours for the coordinating pointed hat. All told, budget 18 to 24 hours for the full set, which makes for a satisfying multi-weekend project.
The finished swaddle measures a generous 26 inches point to point, with an 18-inch interior pocket depth that gives baby plenty of cozy room to stretch. The buttoned front slit lets you dress and change baby without fully unwrapping the star, while the four-tone charcoal-to-cream palette keeps it strikingly gender-neutral. Paired with its matching hat sized for a 12- to 14-inch head, this is a set that photographs beautifully and gets handed down for years.
- Build the central granny square base through eight rounds, establishing the color-block foundation for one star panel.
- Continue through the pentagonal transition rounds, expanding the square outward into a five-sided shape.
- Shift from working in joined rounds to working flat rows to shape each of the five star points individually.
- Repeat the entire panel construction a second time to create two identical star-shaped pieces.
- Block both panels lightly so the points lay flat and the color bands line up cleanly.
- Mark and cut a vertical slit at the top point of the front panel only for the diaper-change opening.
- Join Color A along the front slit edge and single crochet a button band with evenly spaced stitches.
- Seam the two star panels together around the edges, then crochet the matching pointed hat to complete the set.
Materials
Yarn
- Worsted weight (category 4), approximately 680 yards total broken down as follows:
- Color A (charcoal): 200 yards
- Color B (dark grey): 150 yards
- Color C (medium grey): 150 yards
- Color D (cream/off-white): 100 yards
Additional for hat
- 80 yards in the same colors
Recommended yarns
- Lion Brand Pound of Love works beautifully for this project. The Charcoal, Oxford Grey, Silver Grey, and Fisherman shades create the perfect monochrome palette. Cascade 220 Superwash is another excellent choice if you prefer wool.
Hook
- US size J-10 / 6.0 mm
Notions
- Yarn needle for seaming
- Scissors
- 4 buttons, 3/4 inch diameter, in dark charcoal or black
- 4 to 6 locking stitch markers
- Pins for blocking
Crochet Abbreviations
- ch
- chain
- dc
- double crochet (yarn over, insert hook, pull up loop, yarn over and pull through 2 loops twice)
- sl st
- slip stitch
- sc
- single crochet
- sp
- space
- st(s)
- stitch(es)
- RS
- right side
- WS
- wrong side
- rnd
- round
- Granny Cluster (GC)
- This is the building block of the entire pattern. Work 3 double crochets into the same space. Here is how: Yarn over, insert hook into the indicated space, pull up a loop. Yarn over, pull through 2 loops. Repeat this two more times into the same space, then yarn over and pull through all 4 loops on your hook. You have made one granny cluster.
- Corner Granny Shell (CGS)
- Work (GC, ch 2, GC) all into the same corner chain-2 space. This creates the characteristic corner of a granny square.
- Side Granny Unit (SGU)
- Work (GC, ch 1, GC) all into the same side chain-1 space.
Monochrome Grey Star Swaddle Free Crochet Pattern
Phase A: Central Square Base (Rounds 1 through 8)
These rounds build the traditional granny square center visible in the finished swaddle.
Join Color A. Make a magic ring.
- Round 1
(Color A): Chain 3 (counts as first dc), work 2 dc into ring, ch 2, (work 3 dc into ring, ch 2) 3 times, join with sl st to top of beg ch-3. Pull magic ring closed. (4 GC clusters, 4 ch-2 corner spaces)
- Round 2
(Color A): Sl st into corner ch-2 sp. Ch 3, work 2 dc into same corner sp, ch 2, work 3 dc into same corner sp, ch 1, (CGS into next corner ch-2 sp, ch 1) 3 times, join with sl st to top of beg ch-3. (8 GC clusters total)Change to Color D.
- Round 3
(Color D): Sl st into corner ch-2 sp. Ch 3, 2 dc into same sp, ch 2, 3 dc into same sp (CGS), ch 1, 3 dc into next ch-1 side sp, ch 1, (CGS into next corner sp, ch 1, 3 dc into next ch-1 side sp, ch 1) 3 times, join. (12 GC clusters total)
- Round 4
(Color D): Sl st into corner ch-2 sp. Work CGS, ch 1, work GC into each ch-1 sp along side with ch 1 between each, repeat around all 4 corners. Each side now has 2 side GC groups between corners. (16 GC clusters total)Change to Color C.
Round 5 (Color C): Work as Round 4 pattern, adding one more GC group per side. (20 GC clusters total)Round 6 (Color C): Continue pattern. Each side now has 4 side GC groups. (24 GC clusters total)Change to Color A.Round 7 (Color A): Continue pattern. Each side now has 5 side GC groups. (28 GC clusters total)Round 8 (Color A): Continue pattern. Each side now has 6 side GC groups. (32 GC clusters total)Checkpoint: Your square should measure approximately 8 inches across. You should have 4 ch-2 corner spaces and 7 ch-1 spaces per side.
Main Pattern
- Round 1
Ch 3, work 11 dc into ring, join. (12 dc)
- Round 2
Ch 3, dc in same st, 2 dc in each dc around, join. (24 dc)
- Round 3
Ch 3, dc in same st, dc in next dc, (2 dc in next dc, dc in next dc) around, join. (36 dc)
- Round 4
Ch 3, dc in same st, dc in next 2 dc, (2 dc in next dc, dc in next 2 dc) around, join. (48 dc)
- Round 5
Ch 3, dc in same st, dc in next 3 dc, (2 dc in next dc, dc in next 3 dc) around, join. (60 dc)Change to Color D.
- Round 6
and 7: Ch 3, dc in each dc around, join. (60 dc) Change to Color C.
- Round 8
and 9: Ch 3, dc in each dc around, join. (60 dc) Change to Color A.
- Round 10
Ch 3, dc in each dc around, join. (60 dc)
- Round 11
Ch 3, (dc2tog over next 2 dc, dc in next 4 dc) around, join. (50 dc)
- Round 12
Ch 3, (dc2tog, dc in next 3 dc) around, join. (40 dc)
- Round 13
Ch 3, (dc2tog, dc in next 2 dc) around, join. (30 dc)
- Round 14
Ch 3, (dc2tog, dc in next dc) around, join. (20 dc)
- Round 15
Ch 3, (dc2tog) around, join. (10 dc)
- Round 16
(dc2tog) 5 times, join. (5 dc) Fasten off, leaving a 10-inch tail. Thread through remaining stitches, pull tight, and secure on the wrong side.Hat edging: Join Color A at brim. Ch 1, sc in each dc around. Join, fasten off.
Phase B: Star Point Shaping
Each of the five ch-2 corner spaces becomes a star point. You will work each point flat, decreasing until you reach the tip.
For each point, identify the ch-2 corner space. Count 4 ch-1 spaces to the left and 4 to the right. This section of 9 spaces is your working area. Join Color A to the 4th ch-1 space to the right of the corner.
Point Base Row (Row 1, RS): Ch 3, complete GC in same space, (ch 1, GC in next sp) 3 times to reach corner, ch 1, CGS in corner ch-2 sp, (ch 1, GC in next sp) 4 times. Turn. (10 GC clusters)
Row 2 (WS): Ch 3, GC in first ch-1 sp, (ch 1, GC in next ch-1 sp) across to corner ch-2 sp, ch 1, CGS in corner ch-2 sp, (ch 1, GC in next ch-1 sp) across. Turn. (10 GC clusters)
- Round 3(8)
(RS, first decrease): Sl st across first ch-1 sp and first GC. Ch 3, GC in next ch-1 sp, (ch 1, GC in next ch-1 sp) across to corner, ch 1, CGS in corner, (ch 1, GC in next ch-1 sp) across until 1 cluster remains. Turn. (8 GC clusters)
- Round 4(6)
(WS, decrease): Sl st across first cluster and ch-1 sp. Continue pattern. (6 GC clusters)
- Round 5(4)
(RS, decrease): Sl st across first cluster. Continue pattern. (4 GC clusters)
- Round 6
(WS, decrease): Sl st across first cluster. Ch 3, GC in next ch-1 sp, ch 1, CGS in corner ch-2 sp, ch 1, GC in next ch-1 sp. Turn. (2 GC clusters flanking the corner)
- Round 7
(RS, final tip): Ch 3, 2 dc in corner ch-2 sp. Sl st into last dc to close tip. Fasten off. (1 GC cluster at tip)Repeat for all 5 corners. Then make a second identical star panel.
Phase A: Pentagonal Transition (Rounds 9 through 16)
Here is where the magic happens. You will transform your square into a pentagon by adding a fifth corner.
Round 9 (Color D): Begin at any existing ch-2 corner. Work CGS into this corner. Along the next side, work 3 GC groups into the ch-1 spaces. At the midpoint of this side, work (GC, ch 2, GC) into the center ch-1 space to create a new fifth corner. Continue with 3 more GC groups along the remainder of that side. Work CGS into the next existing corner. Continue around the remaining 3 original sides with CGS at each corner, filling side ch-1 spaces with single GC groups. Join. (5 ch-2 corner spaces, approximately 40 GC clusters)
Round 10 (Color D): Work a full expansion round treating all 5 ch-2 spaces as corners. Work CGS into each of the 5 corners, fill all ch-1 side spaces with single GC groups. (Approximately 50 GC clusters)
Change to Color B.
Rounds 11 and 12 (Color B): Continue expansion pattern with 5 corners. (Approximately 60 to 70 GC clusters)
Change to Color C.
Rounds 13 and 14 (Color C): Continue expansion pattern. (Approximately 80 to 90 GC clusters)
Change to Color A.
Rounds 15 and 16 (Color A): Continue expansion pattern. (Approximately 100 to 110 GC clusters)
Checkpoint: Your pentagon should measure approximately 22 inches across at its widest span. Do not fasten off.
Assembly Instructions
- Step 1 Weave in all ends securely. Wet block by submerging in cool water, squeezing gently, and laying flat. Pin each point outward to emphasize the star shape. Allow to dry completely.
- Step 2 Machine wash cold on gentle cycle, inside out. Lay flat to dry. Never tumble dry or iron directly.
Important Notes
- 💡 Use a US J-10 / 6.0mm hook and check your gauge swatch before starting—if your 4-round granny square isn't close to 4 inches after light blocking, the whole swaddle's fit will be off for a newborn.
- 💡 Wind Color A, B, C, and D into separate labeled bobbins or small balls before you begin so color changes at each round transition go smoothly without tangling.
- 💡 Block both star panels lightly before seaming and before cutting the front slit—this keeps the five points crisp and makes the single crochet seam lay flat.
- 💡 When working the Right Button Band, count your sc stitches in ranges of 5 using markers so your 4 buttons end up evenly spaced along the 20-24 stitch edge.
- 💡 Save your yarn tails at each color change to weave in later rather than knotting—this keeps the granny cluster fabric from puckering at transition points.
Common Mistakes and Fixes
- Losing track of which grey is which mid-project since Colors A through D are close in value.
Label your skeins with painter's tape marked A, B, C, D right away, and keep a stitch marker clipped to your current working yarn's label.
- Cutting the 5-inch front slit before both panels are fully complete and blocked.
Wait until the front panel is finished and lightly blocked, then carefully re-measure and mark the center top point with a locking stitch marker before cutting.
- Uneven sc counts along the Right Button Band edge, causing the buttonhole spacing to look lopsided.
Count your edge sc in the 20-24 range as you go, placing a stitch marker every 5 stitches so you can quickly verify even spacing before working buttonholes.
- Skipping the gauge swatch and ending up with a swaddle too big or small for a newborn.
Always make the 4-round granny square swatch first; if it's larger than 4 inches after light blocking, drop to a smaller hook, and size up if it's smaller.
- Seaming the two star panels with mismatched color bands not lined up.
Lay both blocked panels right sides together and pin at each color transition point before single crocheting the seam, so Color A meets Color A all the way around.
Variations
- The monochrome grey palette is gorgeous, but this construction begs for color play. Try a sunset ombre Pound of Love in Blush, Coral, Peach, and Cream for a warm, girl-leaning version, or swap in 's Sapphire, Denim, Sky, and Fisherman for a rich blue nautical take. For a truly gender-neutral rainbow effect, work each of the four color bands (Color A through D) in a different soft pastel—sage, lavender, buttercream, and dusty rose all blend beautifully with the charcoal button accents. If wool isn't your thing, substitute Bernat Blanket Yarn for an ultra-plush, machine-washable version—just expect a slightly bulkier, warmer finished cocoon since it runs heavier than the called-for worsted weight. To scale down for a preemie, work one fewer round in the Central Square Base phase and adjust your Right Button Band sc count down proportionally to match the shorter edge; conversely, add a round or two to the Pentagonal Transition phase if you want extra room for a chunkier 0-3 month baby. Consider swapping the 3/4 inch charcoal buttons for wood or shell buttons for a more heirloom, natural-fiber aesthetic. You could also personalize the hat by adding a small pom-pom in Color D at the tip for a playful contrast against the structured star panels. For an extra-special baby shower gift, monogram the inside seam allowance with a tiny embroidered initial using leftover Color A yarn before you join the two panels together.
- I'm obsessed with how this pattern takes the everyday granny cluster and turns it into architecture—those concentric grey bands radiating from the central square genuinely feel like watching a star grow under your hook. There's something so satisfying about the moment you shift from working joined rounds through the Pentagonal Transition into flat rows for the Star Point Shaping; it's a real 'aha' construction trick that keeps intermediate hands engaged. I also love the practical thoughtfulness baked in here: the 5-inch cut slit and buttoned Right Button Band mean this isn't just a pretty wrap, it's one a sleep-deprived parent can actually use for 3am diaper changes without unswaddling a sleeping baby. And that matching pointed hat? It's the detail that turns a lovely gift into an unforgettable one. Working through four colors—charcoal, dark grey, medium grey, and cream—gives you constant small wins as each band completes, so the project never feels like a slog even at 18-24 hours total. This is the pattern I reach for when I want to make something that looks like it took a professional pattern designer months to develop.
Frequently Asked Questions
How much yarn do I need for the whole swaddle and hat set?
You'll need approximately 680 yards total: 200 yards of Color A (charcoal), 150 yards each of Colors B and C, 100 yards of Color D, plus an extra 80 yards in the same colors for the hat. Pound of Love in Charcoal, Oxford Grey, Silver Grey, and Fisherman gives you the exact monochrome palette shown.
How long does this swaddle set actually take to make?
Plan for 18 to 24 hours total: each of the two star panels takes 7 to 9 hours, joining and finishing adds another 2 to 3 hours, and the matching hat takes about 2 hours. Most crocheters spread this over several weekends rather than finishing in one sitting.
Why does gauge matter so much for this particular pattern?
Since the finished swaddle needs to measure 26 inches point to point with an 18-inch interior pocket to properly fit a newborn, an off gauge swatch throws off the entire finished size. Always make the 4-round granny square test swatch and adjust your hook size before starting the actual panels.
Can I add the buttoned front opening after both panels are already joined?
No, the front slit and Right Button Band need to be worked on the front panel before final assembly, since the 5-inch vertical cut and button band construction are specific to that single panel. Cutting the slit after seaming would make it much harder to finish the raw edges neatly.
Original pattern: https://crochetwithmia.com/monochrome-grey-star-swaddle-free-crochet-pattern/
About the Author

Marisol QuinteroWho runs Crochet Obsessed, why a stitch count sits at the end of every round, how a pattern gets written here, and the things this site will never do.
More Patterns
- IntermediateNo. 01

Slouchy everyday beanie worked flat in half double crochet
Crochet beanie pattern for a slouchy everyday look worked flat with hdc rows, then seamed into a soft,…
- IntermediateNo. 02
Crochet amigurumi doll with dress, shoes, and hat
Crochet amigurumi doll pattern with dress, shoes, and hat details for a soft, huggable keepsake you build one…
- IntermediateNo. 03
Chunky moss stitch crochet sweater with raglan-free shoulders
Chunky crochet sweater pattern using moss stitch, worked flat with a 10mm hook for a soft, fast, cool-weather…


