- LevelIntermediate
- Time8-12 hours
- Hook4.0 mm
- YarnDK
About This Pattern
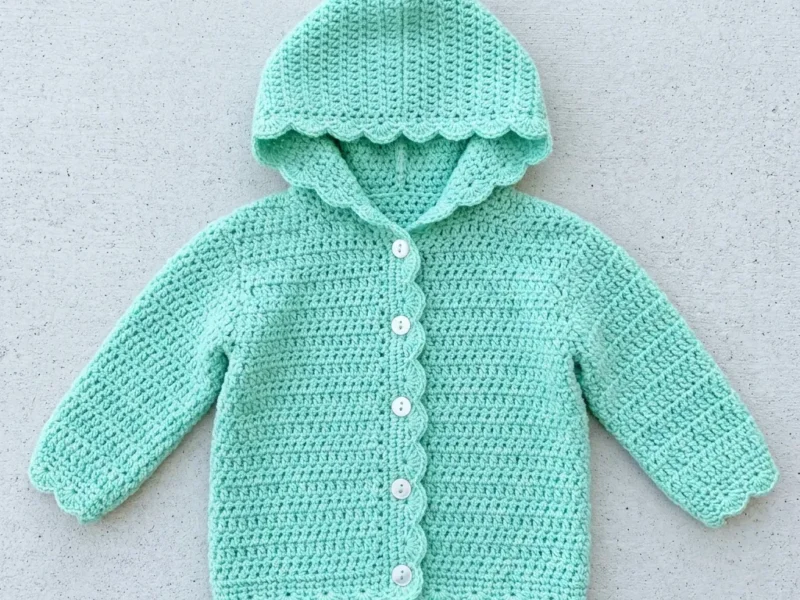
There's something so calm about this one. Mint green always reads a little like a held breath before spring, soft and quiet without being plain. This cardigan has that same gentle energy, a piece built for naps and stroller walks rather than anything flashy.
Your hands get a nice variety here. You start flat with the yoke, shift into joined rounds for the sleeves, then pick up stitches along the neckline for the hood. It keeps you engaged without ever asking for anything you haven't done in a basic sweater or a raglan hat.
Picture it folded on a changing table shelf, or hanging on a tiny wooden hanger next to onesies. The scallop trim catches light along the hem and hood opening. Five small buttons line up down the front like a row of punctuation, neat and done.
This pattern is rated intermediate. You should be comfortable with: working flat in rows (back and forth); working in joined rounds for the sleeves; picking up stitches along edges; and basic increasing and decreasing. If you've made a basic sweater or worked a raglan hat before, you have all the skills you need. The scallop border is a simple three-step shell that adds gorgeous detail without complexity.
This pattern includes four sizes to fit babies from newborn through toddler. Size 0 to 3 months: Chest 16 in / 40.5 cm, Length 9 in / 23 cm, Sleeve 6 in / 15 cm. Size 3 to 6 months: Chest 17 in / 43 cm, Length 9.5 in / 24 cm, Sleeve 6.5 in / 16.5 cm. Size 6 to 12 months: Chest 18 in / 45.5 cm, Length 10 in / 25.5 cm, Sleeve 7 in / 18 cm. Size 12 to 18 months: Chest 19 in / 48 cm, Length 10.5 in / 26.5 cm, Sleeve 7.5 in / 19 cm. All instructions are written for size 0 to 3 months; changes for larger sizes appear in parentheses in that order.
16 hdc x 12 rows = 4 in / 10 cm in half double crochet, blocked. Gauge matters for garments: make a swatch and adjust your hook size up or down as needed to match, so your finished sweater fits properly.
The cardigan is worked from the top down, flat (back and forth in rows), from the neckline to the underarms; then the body and sleeves are worked separately. The turning chain at the beginning of every row counts as a stitch: ch 2 at the start of each hdc row counts as 1 hdc. Right and left are given from the wearer's perspective. Place stitch markers at the 4 raglan seam points and move them up as you work to keep your increases lined up perfectly.
- Chain a foundation row and work the first hdc row to set your stitch count for the chosen size.
- Place stitch markers at the four raglan seam points so the increases stay lined up as you go.
- Continue the yoke in rows, increasing at each marked seam until the yoke reaches full depth.
- Divide the piece at the underarms, setting the sleeve stitches aside and continuing the body alone.
- Work the body flat in hdc rows until it reaches the finished length from the underarm.
- Join yarn at each underarm to work the sleeves in rounds, decreasing gradually toward the cuff.
- Pick up stitches around the neckline to build the hood, then seam the top closed.
- Finish with the scallop edging around the hem, cuffs, hood opening, and front bands, then sew on the buttons.
On the desk
- Lion Brand Pound of Love (100% acrylic, 1020 yards per 16 oz skein) in color Pastel Green. Machine washable, very soft against infant skin, widely available.
- Paintbox Yarns Simply DK (100% acrylic, 137 yards per 50 g ball) in color Spearmint Green. Consistent twist, great stitch definition, affordable.
- Cascade 220 Superwash (100% superwash merino wool, 220 yards per 100 g skein) in color Mint. Luxuriously soft, excellent drape, machine washable on gentle cycle.
- Choose a smooth DK weight yarn with minimal halo so the half double crochet stitch definition remains visible. Avoid bulky or fuzzy fibers that will obscure the scallop trim detail.
Yarn
- DK weight, approximately 300 (330, 370, 410) yards / 275 (300, 340, 375) meters in mint green
Hook
- US size G-6 / 4.0 mm
Notions
- Yarn needle, 5 small buttons approximately 3/8 in / 10 mm diameter, stitch markers (at least 4), scissors
Stitch shorthand
- beg — beginning
- ch — chain, the foundation stitch where you pull a loop through another loop
- ch-sp — chain space, the gap created by a chain in the previous row
- dc — double crochet, a taller stitch where you yarn over, insert hook, pull up a loop, then yarn over and pull through two loops twice
- hdc — half double crochet, yarn over, insert hook, pull up a loop, yarn over and pull through all three loops at once
- hdc2tog — half double crochet two together, a decrease that turns two stitches into one
- pm — place marker
- rem — remaining
- rep — repeat
- rnd — round
- RS — right side, the public-facing side of your work
- sc — single crochet, insert hook, pull up a loop, yarn over and pull through both loops
- sk — skip
- sl st — slip stitch, insert hook, yarn over and pull through both the stitch and the loop on your hook
- sp — space
- st(s) — stitch(es)
- t-ch — turning chain
- WS — wrong side, the inside of your work
- yo — yarn over
Mint Green Hooded Baby Cardigan with Scallop Trim
Yoke
Foundation Chain: Ch 36 (38, 40, 42).
- Round 1
(WS): Hdc in 3rd ch from hook and in each ch across. Turn. [35 (37, 39, 41) hdc]The 4 raglan seam points divide this row as follows for size 0 to 3 months: Right front 6 hdc, pm, seam st 1 hdc, pm, right sleeve 5 hdc, pm, seam st 1 hdc, pm, back 10 hdc, pm, seam st 1 hdc, pm, left sleeve 5 hdc, pm, seam st 1 hdc, pm, left front 6 hdc. Total: 35 hdc.
For size 3 to 6 months: Right front 7, seam 1, sleeve 5, seam 1, back 10, seam 1, sleeve 5, seam 1, left front 7. Total: 37 hdc.For size 6 to 12 months: Right front 7, seam 1, sleeve 5, seam 1, back 12, seam 1, sleeve 5, seam 1, left front 7. Total: 39 hdc.For size 12 to 18 months: Right front 7, seam 1, sleeve 6, seam 1, back 12, seam 1, sleeve 6, seam 1, left front 8. Total: 41 hdc. - Round 2
RS, Raglan Increase Row Ch 2, turn. Work 2 hdc in first st. Hdc to 1 st before first marker. Work 2 hdc in next st, hdc in marked seam st, 2 hdc in next st. Hdc to 1 st before second marker. Work 2 hdc in next st, hdc in marked seam st, 2 hdc in next st. Continue in this manner across all 4 seam points, ending 2 hdc in last st. Turn. [43 (45, 47, 49) hdc]
- Round 3
WS, even row Ch 2, turn. Hdc in each st across. Turn. [43 (45, 47, 49) hdc]
- Round 4
RS, Raglan Increase Row Rep Row 2 format, adding 8 hdc. [51 (53, 55, 57) hdc]
- Round 5
WS, even Ch 2, turn. Hdc across. [51 (53, 55, 57) hdc]
- Round 6
RS, Raglan Increase Row [59 (61, 63, 65) hdc]
- Round 7
WS, even Hdc across. [59 (61, 63, 65) hdc]
- Round 8
RS, Raglan Increase Row [67 (69, 71, 73) hdc]
- Round 9
WS, even Hdc across. [67 (69, 71, 73) hdc]
- Round 10
RS, Raglan Increase Row [75 (77, 79, 81) hdc]
- Round 11
WS, even Hdc across. [75 (77, 79, 81) hdc]
- Round 12
RS, Raglan Increase Row [83 (85, 87, 89) hdc]
- Round 13
WS, even Hdc across. [83 (85, 87, 89) hdc]
- Round 14
RS, Raglan Increase Row [91 (93, 95, 97) hdc]
- Round 15
WS, even Hdc across. [91 (93, 95, 97) hdc]Sizes 6 to 12 months and 12 to 18 months only: Continue with 2 more increase rows (Rows 16 and 17 for 6 to 12 months, Rows 16 through 19 for 12 to 18 months, working even rows between each) until you reach (103, 113) hdc total.
Checkpoint: After Row 15, the stitch distribution for size 0 to 3 months should read: Right front 20 hdc, seam 1, right sleeve 19 hdc, seam 1, back 24 hdc, seam 1, left sleeve 19 hdc, seam 1, left front 20 hdc = 91 hdc total. Verify your markers match these counts before dividing.
The piece from neck edge to needle should measure approximately 3.25 in / 8.5 cm tall.
Body
Work flat across all body sts, back and forth in rows.
- Round 1
(WS): Ch 2, turn. Hdc in each st across. [72 (75, 80, 84) hdc] Rep Row 1 (working even in hdc) until body measures 5.75 (6, 6.5, 7) in / 14.5 (15, 16.5, 18) cm from underarm, ending on a WS row. Do not fasten off.
Checkpoint: The total garment length from the back neck should be approximately 9 in / 23 cm for the smallest size.
Set the body aside and work the sleeves first.
Sleeves (Make 2)
With RS facing, join yarn at the center of the underarm chain.
Setup Rnd: Ch 2. Pick up and hdc in each of the 2 underarm chain sts, then hdc in each sleeve st around (19 sts for size 0 to 3 months), hdc in rem underarm chain st. Sl st to top of beg ch-2 to join. [22 (23, 25, 27) hdc]
- Rounds 1–3
Ch 2, hdc in each st around, sl st to top of ch-2. [22 (23, 25, 27) hdc]
- Decrease Rnd
Ch 2, hdc2tog over next 2 sts, hdc to last 2 sts, hdc2tog, sl st to top of ch-2. [20 (21, 23, 25) hdc]Work 4 even rnds in hdc. [20 (21, 23, 25) hdc]
Rep the last 5 rnds (4 even, then 1 decrease rnd) once more. [18 (19, 21, 23) hdc]Continue even in hdc until sleeve measures 5 (5.5, 6, 6.5) in / 12.5 (14, 15, 16.5) cm from underarm pickup.Final Rnd: Sl st in each st around. Fasten off.
Checkpoint: Each sleeve should measure approximately 6 in / 15 cm from underarm to cuff for the smallest size.
Hood
With RS facing, join yarn at the top right front corner of the neckline.
Pickup Row: Ch 2. Work 1 hdc in each st along the top of the foundation chain across all 35 (37, 39, 41) neckline sts. Turn. [35 (37, 39, 41) hdc]
- Round 1
(WS): Ch 2, turn. Hdc in each st across. [35 (37, 39, 41) hdc]
- Round 2
RS, Increase Row Ch 2, turn. Hdc in first 16 (17, 18, 19) sts. Work 2 hdc in next st. Hdc in next st (center back). Work 2 hdc in next st. Hdc to end. Turn. [37 (39, 41, 43) hdc]
- Round 3
Ch 2, turn. Hdc across. [37 (39, 41, 43) hdc]
- Round 4
Increase Row Ch 2, turn. Hdc in first 17 (18, 19, 20) sts. Work 2 hdc in next st. Hdc in next st. Work 2 hdc in next st. Hdc to end. Turn. [39 (41, 43, 45) hdc]
- Round 5
Hdc across. [39 (41, 43, 45) hdc]
- Round 6
Increase Row Ch 2, turn. Hdc in first 18 (19, 20, 21) sts. Work 2 hdc in next st. Hdc in next st. Work 2 hdc in next st. Hdc to end. Turn. [41 (43, 45, 47) hdc]
- Round 7
Hdc across. [41 (43, 45, 47) hdc]
- Round 8
Increase Row [43 (45, 47, 49) hdc]
- Round 9
Hdc across. [43 (45, 47, 49) hdc]
- Round 10
Increase Row [45 (47, 49, 51) hdc] Continue working even in hdc (no more increases) until hood measures 6 (6.25, 6.5, 6.75) in / 15 (16, 16.5, 17) cm from the pickup row.Hood Seam: Fold the hood in half with RS together so the two short ends are aligned. Sl st through both layers across the top to seam. Fasten off and weave in end. Turn RS out.
Divide for Body and Sleeves
Dividing Row (RS): Ch 2, turn. Hdc across right front sts up to and including seam st (21 sts for size 0 to 3 months). Ch 2 (underarm chain). Skip all right sleeve sts plus seam st (20 sts). Hdc across back sts including both seam sts at back (26 sts). Ch 2 (underarm chain). Skip all left sleeve sts plus seam st (20 sts). Hdc across left front sts to end (21 sts). Turn.
Stitch count for body only: Size 0 to 3 months: 72 hdc. Size 3 to 6 months: 75 hdc. Size 6 to 12 months: 80 hdc. Size 12 to 18 months: 84 hdc.
Front Band and Button Loops
With RS facing, join yarn at the lower right front corner.
Right Front Band (button loop side): Ch 1. Work sc evenly up the right front edge, placing 1 sc per row end. You should have approximately 26 (28, 30, 32) sc up the right front body, then continue up the hood opening edge.
At the hood edge: Place a marker after the 3rd sc from the bottom. Place 4 additional markers evenly spaced, each approximately 5 (5, 6, 6) sc apart. At each marked position, work ch 2, sk 2 sc (button loop made). Continue sc to the top of the hood face opening. Fasten off.
Left Front Band (button side): With RS facing, join yarn at the top left front corner. Work sc evenly down the entire left front edge mirroring the right band. Fasten off.
Sew 5 buttons to the left front band opposite the button loops.
Scallop Edging
Special Stitch Special Stitch: Scallop Border. This decorative edging creates the beautiful waves you see at the hem, cuffs, and hood. Step 1: Join yarn with a sl st in the first st. Step 2: Ch 1, sc in the same st. Step 3: Sk 1 st, work 5 dc in the next st (this creates the shell). Step 4: Sk 1 st, sc in the next st. Step 5: Rep Steps 3 and 4 across or around the edge, ending with a sc. Fasten off. The scallop border requires a stitch count divisible by 4, plus 1 extra stitch for the final sc; each round below tells you exactly how to adjust your pickup counts where needed.
- Round 1
Bottom Hem With RS facing, join yarn at the lower right front corner. Work sc along the entire bottom edge of the body. Count sts. Adjust to the nearest multiple of 4 plus 1 if needed. Then work the scallop stitch sequence across the entire bottom hem. Fasten off.
- Round 2
Cuffs Join yarn at the underarm join point of one sleeve cuff. Pick up sc around the cuff, adjusting to nearest multiple of 4 plus 1: 17 (21, 21, 25) sc. Work scallop border in the round, joining at end. Fasten off. Repeat for second sleeve.
- Round 3
Hood Face Opening Join yarn at the right front top corner of the hood opening. Work sc evenly around the face opening of the hood. Adjust to nearest multiple of 4 plus 1. Work one round of scallop stitch around the hood opening. Fasten off.
Where it goes
- A layering piece for stroller walks or car rides, paired with a plain cotton onesie underneath.
- A gift for a baby shower, nice alongside a soft knit blanket in a coordinating neutral.
- A take-home outfit for a newborn, worn over a simple bodysuit for photos at home.
- An everyday nursery staple, hung near the changing table for quick layering before naps.
Color ideas
- Mint and cream contrast Keep the yoke, body, sleeves, and hood in mint green, then work the scallop edging, front bands, and buttons in a soft cream for a crisp, finished contrast at every opening.
Care
If you used acrylic (Pound of Love or Simply DK), machine wash on gentle and lay flat to dry since acrylic holds its shape well but can stretch if hung wet.
If you used the superwash merino option, hand wash or use the gentle cycle in cool water, then press out excess moisture in a towel rather than wringing.
Store folded flat in a drawer rather than on a hanger, so the hood and scallop edging keep their shape between wears.
Assembly
- Step 1 Weave in all ends securely, especially at sleeve joins and hood seam.
- Step 2 Blocking: Wet block by submerging the finished sweater in cool water, gently pressing out excess water in a towel, and pinning flat to a foam mat. Pin the scallop edges open slightly to accentuate the shell detail. Allow to dry completely.
- Step 3 Buttons: Sew buttons firmly with doubled thread, stitching through all layers of the front band.
Easy to get wrong
Losing track of raglan seam markers
Check your four seam-point markers against the stitch counts at the end of every yoke row. If a count is off, it is almost always a missed increase at one marker, so backtrack to the last correct row before continuing.
Picking up the wrong stitch count for the hood
Count your neckline stitches before starting the hood pickup round rather than estimating as you go. An uneven pickup will throw off the hood's shaping and make the top seam sit crooked.
Rushing the scallop edging join
Join the new yarn with a slip stitch exactly in the first stitch as directed, not a stitch or two over. Starting in the wrong spot shifts the whole shell pattern out of alignment with the hem or cuff.
Between the songs
- This is a raglan done the honest way: you watch the four seam lines grow right out of the yoke rows, no guessing where the sleeves will land. The half double crochet fabric is dense enough to feel protective but still drapes, which matters on something this small. Picking up stitches for the hood after the body is finished feels like a reward, proof the shaping worked. And the scallop border ties the whole piece together, same simple shell repeated at the hem, cuffs, hood edge, and front bands so every opening matches. It is the kind of project where each part teaches you something you then reuse immediately.
Listener questions
Can I use a different DK weight yarn than the ones listed?
Yes, as long as it is a smooth DK weight with minimal halo so the half double crochet stitches stay visible. Avoid bulky or fuzzy fibers, since they will blur the scallop trim detail.
Do I need to know how to work in the round for this?
Yes, but only for the sleeves, which are worked in joined rounds after you divide at the underarms. Everything else, including the yoke and body, is worked flat in rows.
How do I know which size stitch counts to follow?
The pattern lists counts for four sizes together in parentheses, ordered smallest to largest. Circle your size's numbers at the start so you do not lose track partway through the yoke.
What if my gauge does not match the pattern's gauge?
Make a swatch in half double crochet and compare it to the stated gauge of 16 hdc by 12 rows over 4 inches. If your swatch runs bigger or smaller, go down or up a hook size before starting the garment.
Is the scallop edging difficult for an intermediate crocheter?
No, it is a simple three-step shell repeated around each opening. It reads as detailed but the stitch pattern itself stays consistent from the hem to the hood.
Original pattern: https://bunnypatterns.com/mint-green-baby-hooded-sweater-free-crochet-pattern/
About the Author

Marisol QuinteroWho runs Crochet Obsessed, why a stitch count sits at the end of every round, how a pattern gets written here, and the things this site will never do.
More Patterns
- IntermediateNo. 01

Rose Granny Square Tote Crochet Pattern
Rose granny square tote crochet pattern made from 18 dimensional rose squares for a sturdy, romantic everyday bag.
- IntermediateNo. 02
Tropical octopus baby blanket crochet pattern with appliqués
Tropical octopus baby blanket crochet pattern: a cream filet base with coral and turquoise octopus appliqués, leaves, and…
- IntermediateNo. 03
Sunny lemon couple amigurumi crochet pattern
Sunny lemon couple amigurumi crochet pattern with embroidered slices and safety eyes for a cheerful handmade shelf pair.


