- LevelIntermediate
- Time4-6 hours
- Hook3.5 mm
- YarnWorsted
About This Pattern
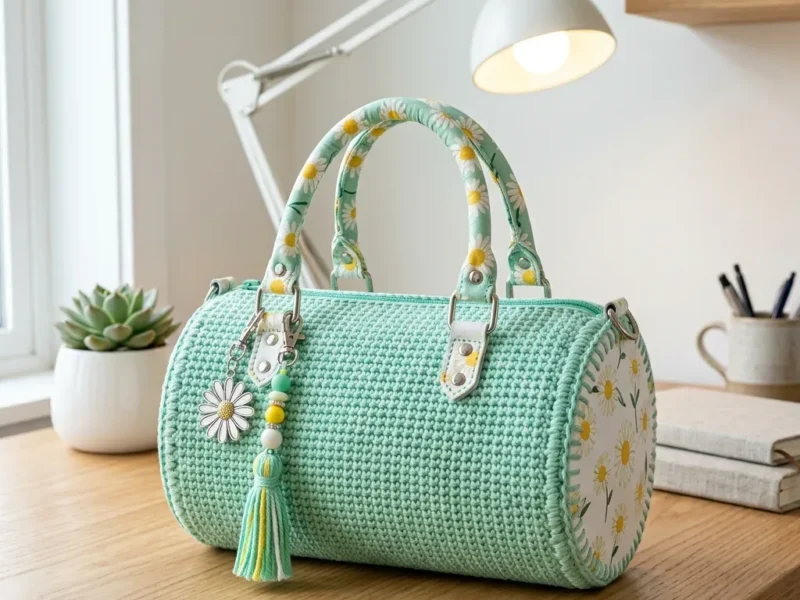
This one has that bright, just-washed feeling of the first warm week of the year. Mint green cotton against a daisy print does something cheerful to a room without shouting about it. It is the kind of bag that looks like you planned your whole outfit around it, even on the days you absolutely did not.
Set on a counter or a shelf, the finished bag holds its own barrel shape without leaning or slumping, which is the whole point of the firm cotton fabric. The daisy print peeking from the ends reads as a deliberate design choice, not an afterthought. It is a piece that looks equally at home holding court on a hook by the door or sitting upright in a closet between outings.
Gauge: 18 single crochet stitches and 20 rounds = 4 inches (10 cm). Make a gauge swatch before starting: chain 22, then work 24 rows of single crochet. Your swatch should measure about 4 inches wide by 4.8 inches tall. If your swatch is too big, go down a hook size; if it's too small, go up a hook size. Don't skip this step, since a bag that's significantly larger or smaller than intended won't work well with the zipper and hardware you've purchased.
Finished dimensions: Length 22 cm (8.7 inches). Diameter 14 cm (5.5 inches). Height with handles 18 cm (5.5 inches from bag top to handle top). Handle drop 11 cm (3.9 inches). These measurements give you a bag that's roomy enough for a phone, wallet, keys, a small makeup bag, and a few extras without being oversized or cumbersome.
- Chain a foundation ring and work it into a tube using continuous single crochet rounds.
- Work one increase round to widen the tube, then settle into many straight rounds for the body.
- Build two small crocheted circles separately, starting from a magic ring and increasing outward.
- Wet block the finished tube and both circles so the stitches sit even before sewing.
- Cut matching fabric circles for the end panels, sized generously for seam allowance.
- Sew the crocheted circles to their fabric counterparts to form the two solid end panels.
- Attach the end panels to the body and install the zipper, D-rings, and rivets.
- Finish with the handles, daisy charm, and tassel for the final detail.
On the desk
Yarn
- Worsted weight cotton yarn in mint green, 250 to 300 yards
Fabric
- Cotton print fabric with daisy pattern (for lining, handles, and end panels)
Tools
- 3.5 mm crochet hook
- Sewing needle and thread
- Fabric scissors
- Stitch markers (optional but helpful)
Hardware and Accessories
- 22 cm zipper (about 8.7 inches)
- 2 D-rings
- 8 rivets
- Daisy charm (1 piece)
- Tassel and beads (1 set)
- Polyester fiberfill (light stuffing, optional for structure)
- Fabric glue (optional for durability)
Stitch shorthand
- ch — chain: Wrap yarn over hook, pull through loop on hook. This creates the foundation.
- sl st — slip stitch: Insert hook into stitch, yarn over, pull through both the stitch and the loop on your hook in one motion. Used for joining rounds.
- sc — single crochet: Insert hook into stitch, yarn over and pull up a loop (two loops on hook), yarn over and pull through both loops. This is your main stitch for the entire bag body.
- inc — increase: Work two single crochet stitches into the same stitch. This adds one stitch to your count.
- dec — decrease: Insert hook into first stitch, pull up a loop, insert hook into next stitch, pull up a loop (three loops on hook), yarn over and pull through all three loops. This reduces your count by one stitch.
Mint daisy barrel handbag crochet pattern for spring
Crocheting the Bag Body
The body is worked in continuous rounds. I recommend using a stitch marker to track the beginning of each round, moving it up as you go.
Foundation: Chain 40, join with a slip stitch to form a ring. Be careful not to twist your chain.
- Round 1(40)
Single crochet in each chain around. (40 stitches)
- Round 2(80)
Increase in every stitch around. This means working 2 single crochet into each stitch. (80 stitches)
- Rounds 3–28(80)
Single crochet in each stitch around. (80 stitches per round)That's 26 rounds of straight single crochet after your increase round. Keep your tension consistent throughout. Not too tight or your hands will hurt and the fabric will be stiff. Not too loose or the bag will be floppy. Aim for a firm but flexible fabric.
When you finish Round 28, slip stitch to join and fasten off. Weave in your end securely.
Creating the End Circles
You'll need two crocheted circles that match the diameter of your fabric end panels. These provide structure and a clean edge for attaching the fabric.
Work each circle in continuous rounds:
- Round 1(6)
Create a magic ring, work 6 single crochet into the ring. Pull tight. (6 stitches)
- Round 2(12)
Increase in every stitch. (12 stitches)
- Round 3(18)
*Single crochet in next stitch, increase in next stitch* repeat around. (18 stitches)
- Round 4(24)
*Single crochet in next 2 stitches, increase in next stitch* repeat around. (24 stitches)
- Round 5(30)
*Single crochet in next 3 stitches, increase in next stitch* repeat around. (30 stitches)
- Round 6(36)
*Single crochet in next 4 stitches, increase in next stitch* repeat around. (36 stitches)
- Round 7(48)
*Single crochet in next 5 stitches, increase in next stitch* repeat around. (48 stitches)
- Round 8(80)
*Single crochet in next 6 stitches, increase in next stitch* repeat around. (80 stitches)Slip stitch to join, fasten off, and weave in ends. Make two identical circles.
These circles should measure approximately 5.5 inches (14 cm) in diameter to match the opening of your bag body. If yours are coming out a different size, adjust your hook size or add/remove rounds as needed.
Where it goes
- An everyday crossbody for running errands, paired with simple cotton separates so the print gets to stand out.
- A structured market bag that holds its shape with produce or a water bottle inside, no slouching.
- A gift bag swap piece, handed over already loaded with a small treat tucked inside the lined interior.
- A desk or vanity catch-all once retired from daily carry, holding small tools or jewelry upright on a shelf.
Color ideas
- Mint and daisy classic Mint green cotton for the entire barrel body and both end circles, with the daisy print fabric reserved for the end panels, lining, and handles exactly as the pattern calls for.
- Soft spring swap Swap the mint for any light spring-toned worsted cotton on the body and end circles, then pick a coordinating print fabric for the end panels, lining, and handles instead of the daisy.
Care
Hand wash only in cold water, since the fabric elements and hardware won't survive a washing machine.
Lay the bag flat to dry after washing, reshaping the barrel gently with your hands while it is still damp.
Store it stuffed lightly or upright on a shelf between uses so the cotton body holds its round shape over time.
Assembly
- Step 1 This is where everything comes together. Take your time with these steps for a professional finish.
- Step 2 Step 1: Attach the End Panels
- Step 3 Cut two circles from your daisy print fabric, each about half an inch larger than your crocheted circles to allow for seam allowance. You can back these with interfacing for extra stability if desired.
- Step 4 Place a crocheted circle against a fabric circle (wrong sides together if your fabric has a distinct right side). Using whip stitch or a sewing machine, join the fabric to the crocheted edge all the way around. Repeat for the second end.
- Step 5 Now position these fabric covered panels at each end of your crocheted tube. Using matching thread and small stitches, sew the edge of the crocheted circle to the edge of the bag body. Work slowly and check your alignment frequently.
- Step 6 Step 2: Insert the Zipper and Lining
- Step 7 Cut a lining piece from your fabric that matches the interior of the bag. Sew the zipper to the top edge of the lining first, then carefully hand stitch the zipper assembly to the top opening of your crocheted body.
- Step 8 The zipper should run along the length of the bag at the top. Take your time here because a neatly installed zipper makes a huge difference in the finished look.
- Step 9 Step 3: Attach the Handles and Hardware
- Step 10 For the handles, you can either purchase premade fabric covered handles or create your own by wrapping the daisy print fabric around cord or batting and stitching closed.
- Step 11 Secure the handles to the bag body using the rivets and D-rings. Position them evenly on either side of the zipper, about 2 to 3 inches from each end of the bag. The rivets punch through the fabric handle tabs and the crocheted body to create a secure attachment.
- Step 12 Step 4: Add the Finishing Touches
- Step 13 Clip your daisy charm and tassel with beads to one of the D-rings. This adds a playful detail that really completes the springtime look.
- Step 14 If you want extra structure, you can lightly stuff the end panels with a small amount of polyester fiberfill before closing everything up.
Easy to get wrong
Tension drifting over 26 rounds
Check your round width every few rounds against your starting rounds, and slow down if the fabric starts looking looser or tighter than where you began.
Fabric circles cut to the wrong size
Measure your blocked crocheted circles before cutting fabric, and add the seam allowance after that measurement rather than guessing ahead of time.
Skipping blocking before assembly
Wet block the body tube and both end circles first, since uneven stitches are much harder to sew around once the fabric panels are attached.
Between the songs
- The satisfaction here is structural: you are building a true cylinder from a chain of 40, through one increase round, into 26 straight rounds of single crochet that never wobble if your tension holds. Then you shift to two small circles worked from a magic ring, watching flat rounds of increases turn into a disc that matches your fabric panels exactly. Add in the hand-sewing, the optional fiberfill for shaping, and the hardware install with rivets and D-rings, and you have a project that stretches you past yarn alone. It is the rare pattern where crochet, fabric, and metal hardware all have to agree on the same finished shape, and getting that agreement right feels genuinely earned.
Listener questions
Can I use a different fiber instead of cotton yarn?
I would not recommend it here, since the pattern specifically calls for cotton because it gives the bag structure and body. Acrylic would be too floppy for a handbag that needs to hold its shape on its own.
Do I need the fiberfill in the end panels?
It is optional, but a light stuffing helps the barrel shape hold if your finished bag feels too soft. I would try the bag without it first and add a little only if it needs the extra support.
Is fabric glue necessary on the inner seams?
No, it is listed as optional in the pattern notes. It adds longevity and durability, especially if you plan to use the bag often, but the sewing alone will hold things together.
What if I cannot find the exact mint shade of yarn?
Any light spring color works beautifully in its place, according to the materials notes. Just pick a coordinating print fabric to go with whatever shade you land on.
Why does this pattern rate as intermediate rather than beginner?
It combines steady continuous-round crochet with separate sewing skills, including hand or machine sewing and installing hardware like rivets and D-rings. If you are comfortable with both crochet and basic sewing, you are ready for it.
Original pattern: https://bunnypatterns.com/mint-daisy-spring-barrel-handbag-free-crochet-pattern/
About the Author

Marisol QuinteroWho runs Crochet Obsessed, why a stitch count sits at the end of every round, how a pattern gets written here, and the things this site will never do.
More Patterns
- IntermediateNo. 01

Rose Granny Square Tote Crochet Pattern
Rose granny square tote crochet pattern made from 18 dimensional rose squares for a sturdy, romantic everyday bag.
- IntermediateNo. 02
Tropical octopus baby blanket crochet pattern with appliqués
Tropical octopus baby blanket crochet pattern: a cream filet base with coral and turquoise octopus appliqués, leaves, and…
- IntermediateNo. 03
Sunny lemon couple amigurumi crochet pattern
Sunny lemon couple amigurumi crochet pattern with embroidered slices and safety eyes for a cheerful handmade shelf pair.


