- LevelIntermediate
- Time4-6 hours
- Hook2.00 mm
- YarnThread/Lace
About This Pattern
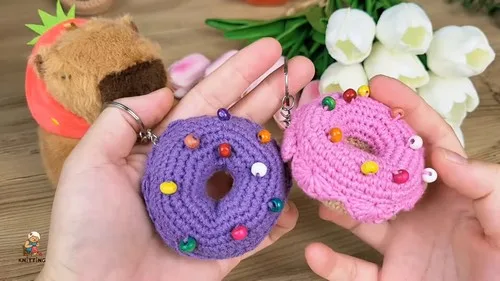
This one has that bakery-case cheerfulness, the kind of sweet that makes you smile before you even taste it. The purple icing with its wavy edge does all the personality work here. It is playful without trying too hard, which is exactly what a keychain should be.
Clipped to a bag zipper or a set of house keys, this little donut just sits there looking pleased with itself. It is small enough to disappear into a pocket and bright enough to spot across a room. On a shelf next to its amigurumi cousins, it holds its own as a tiny, finished thing.
- Chain a small ring with thread and a 2 mm hook to start the first donut half.
- Work single crochet increases round by round so the circle widens evenly.
- Line up both donut pieces and sew around the edge with a needle.
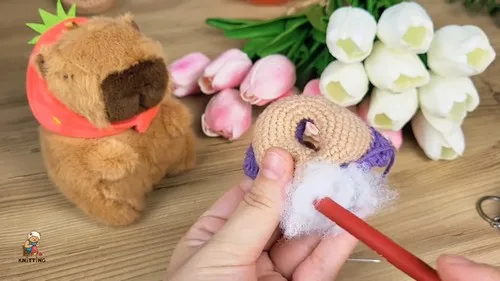
- Pause partway through sewing to stuff the donut lightly with cotton filling.
- Finish sewing the seam closed so the shape holds its donut form.
- Thread multi-colored beads onto the top surface to look like sprinkles.
- Attach a keychain ring through the top so it is ready to clip on.
On the desk
- 2.00mm crochet hook
- Purple cotton thread
- Tan cotton thread
- Sewing needle (to stitch pieces together and sew on beads)
- Cotton stuffing/filling
- Multi-colored beads (for sprinkles)
- Keychain ring
Stitch shorthand
- ch — chain
- st — stitch
- sl st — slip stitch
- sc — single crochet
- hdc — half double crochet
- dc — double crochet
- inc — increase
- dec — decrease
- mr — magic ring
- fo — finish off
Mini crochet donut keychain amigurumi pattern
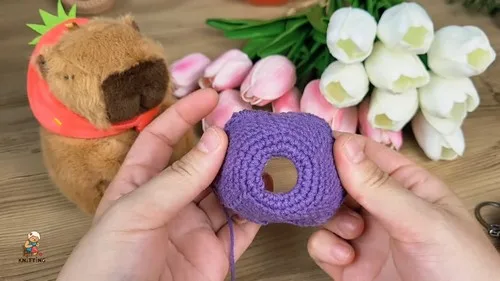
Donut "Icing" (Purple)
Materials: 2.00mm crochet hook and purple cotton thread
- Round 1
Chain 18 and slip stitch to form a ring.
- Round 2
Single crochet in each stitch around (24 total stitches).
- Round 3
(3 single crochet, increase) x 6 (30 total stitches).
- Round 4
(4 single crochet, increase) x 6 (36 total stitches).
- Round 5
(5 single crochet, increase) x 6 (42 total stitches).
- Round 6
(6 single crochet, increase) x 6 (48 total stitches).
- Rounds 7–9
Single crochet in each stitch around (48 total stitches). Donut Petals: Crochet 8 double crochet stitches, skip 1 stitch, slip stitch, skip 1 stitch, and repeat for 4 more double crochet stitches.
This forms the wavy "icing" edge. Cut the thread and tie off.
Donut "Dough" (Tan)
Materials: 2.00mm crochet hook and tan cotton thread
- Round 1
(2 single crochet, increase) x 6 (24 total stitches).
- Round 2
Single crochet in each stitch around (24 total stitches).
- Round 3
(3 single crochet, increase) x 6 (30 total stitches).
- Round 4
(4 single crochet, increase) x 6 (36 total stitches).
- Round 5
(5 single crochet, increase) x 6 (42 total stitches).
- Round 6
(6 single crochet, increase) x 6 (48 total stitches).
- Rounds 7–9
Single crochet in each stitch around (48 total stitches).Cut the thread and tie off.
More shots
Where it goes
- Clip it onto a backpack zipper so it is easy to spot among other bags at pickup or on a bus.
- Attach it to a house key or car key ring to make your keys easier to find by feel in a pocket.
- Give it as a small handmade add-on tucked into a wrapped gift or card, no occasion needed.
- Set it on a desk or shelf with other amigurumi minis as a tiny collection piece.
Color ideas
- Classic bakery purple Purple thread for the wavy icing half, tan thread for the donut base half, with multi-colored beads scattered across the top.
- Soft pastel swap Replace the purple icing section with a pale pastel thread of your choice, keep the tan base as written, and pick two or three bead colors that complement the pastel.
Care
Hand wash gently in cool water if the cotton thread needs cleaning, since the stuffing can hold water longer than the stitches suggest.
Lay the donut flat on a towel to air dry rather than wringing it, so the wavy icing edge keeps its shape.
Store it away from direct sun so the purple cotton thread does not fade, and keep the keychain ring from snagging on other hard keys in a bag.
Assembly
- Step 1 Align the two donut pieces and use a needle to stitch them together.
- Step 2 Periodically stuff the donut with cotton filling.
- Step 3 Continue sewing around until the two pieces are fully attached.
- Step 4 Use a needle to add multi-colored bead "sprinkles" to the top of the donut.
- Step 5 Attach a keychain ring to the donut.
Easy to get wrong
Losing count on the increase rounds
Place a stitch marker at the start of each round and count stitches before moving to the next round. With thread this fine it is easy to drift a stitch without noticing.
Sewing the seam too tight before stuffing
Leave a gap open partway around the edge and add stuffing in small pinches as you sew, rather than trying to stuff through a tiny closed opening. This keeps the donut shape rounded instead of lumpy.
Beads sitting crooked or too sparse
Plan rough bead placement across the top before sewing any of them on, spacing them so they cover the surface evenly. A few test beads pinned in place first can save unpicking later.
Between the songs
- What I love about this piece is how much shape comes out of such a short sequence of rounds. You start with a simple chained ring, then watch the single crochet increases build a flat circle before it curves into dimension. The wavy edge on the purple icing is the real payoff, that gentle ripple that reads instantly as frosting. Sewing the two halves together while stuffing a little at a time teaches real control over tension and fill. Then adding bead sprinkles by hand is the most relaxing part of the whole project, almost like decorating an actual donut. By the end you have used thread work, shaping, hand sewing, and embellishment all in one small piece.
Listener questions
What hook size does this pattern actually need?
A 2 mm crochet hook is what the pattern calls for throughout. That small size is what gives the finished donut its compact keychain scale.
Can I make the icing a different color than purple?
Yes, the purple is simply the sample color used for the icing half. Swap in any cotton thread color you like and the wavy edge shaping will look the same.
How much stuffing does the donut need?
The pattern has you stuff periodically as you sew the two halves together rather than all at once. Add small amounts and check the shape as you go so the donut stays rounded, not overfilled.
Do I need special beads for the sprinkles?
Any small multi-colored beads that fit on a sewing needle will work for the sprinkle detail. Mixing a few different colors is what gives that sprinkle look.
Is this a good project for a beginner?
Working with fine thread and a 2 mm hook takes a steadier hand than worsted weight amigurumi. I would call it intermediate, mainly because of the thread scale and the hand-sewing finish work.
Original pattern: https://crocheteverything.com/amigurumi-keychain-donut-crochet-pattern-free-sweet-and-easy-craft/
About the Author

Marisol QuinteroWho runs Crochet Obsessed, why a stitch count sits at the end of every round, how a pattern gets written here, and the things this site will never do.
More Patterns
- IntermediateNo. 01

Rose Granny Square Tote Crochet Pattern
Rose granny square tote crochet pattern made from 18 dimensional rose squares for a sturdy, romantic everyday bag.
- IntermediateNo. 02
Tropical octopus baby blanket crochet pattern with appliqués
Tropical octopus baby blanket crochet pattern: a cream filet base with coral and turquoise octopus appliqués, leaves, and…
- IntermediateNo. 03
Sunny lemon couple amigurumi crochet pattern
Sunny lemon couple amigurumi crochet pattern with embroidered slices and safety eyes for a cheerful handmade shelf pair.


