- LevelIntermediate
- Time4-6 hours
- Hook4.0 mm
- YarnWorsted
About This Pattern
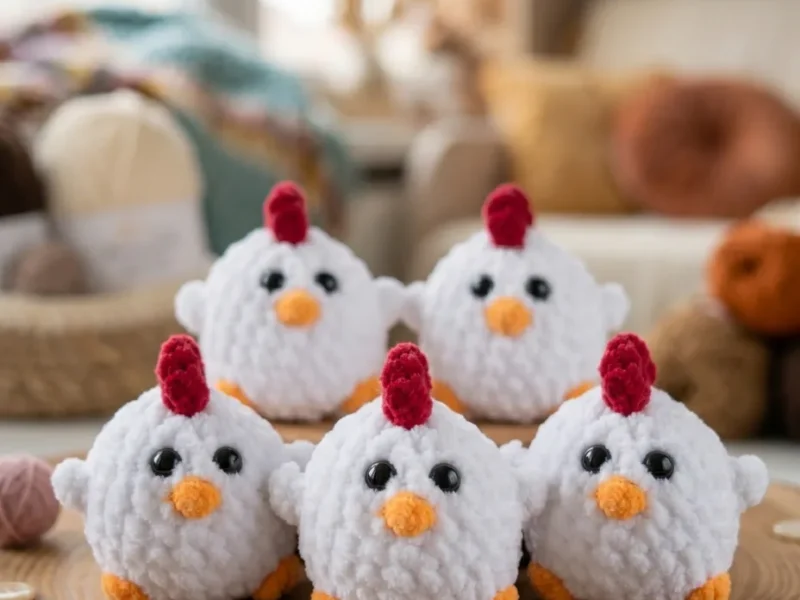
There is something so cheerful about a tiny chicken swinging in midair, and that is exactly the mood I am chasing with this one. She is round, plush, and a little bit ridiculous in the best way. Every time I finish a piece like this I catch myself grinning at my own hook.
Your hands get a nice mix of work here: continuous spiral rounds for the body, a fussy little bobble-leg maneuver where you drop in and fasten off orange yarn mid-round, and a flat, structured seat worked in rows with a cotton-blend yarn on a smaller hook. Then there is the comb, stitched fresh right onto the head. It keeps your attention without ever feeling like a slog.
Set her on a shelf, a windowsill, or hanging from a hook near a reading nook and she just makes the corner feel warmer. She is small enough not to dominate a room but detailed enough that people lean in for a closer look. I love how a five-minute project turns into a permanent little resident.
Gauge is not critical for this project, but maintain a firm, tight tension throughout the chicken so stuffing does not show through the fabric.
- Start the chicken body with a magic ring and build the rounds in one continuous spiral without joining.
- Work the increase rounds that shape the rounding belly, pausing partway to attach orange yarn for each leg cluster.
- Fasten off the orange yarn after each leg bobble and continue on in white without breaking your spiral.
- Stuff the body firmly as you close the rounds so the shape holds and stays smooth.
- Anchor a loop of yarn to the top of the head and crochet the small comb strip directly onto it.
- Chain a long cord from the last stitch of the seat to form the hanging line for the swing.
- Thread the cord behind each wing, sew the ends to the seat underside, and center the chicken so she sits level.
On the desk
- Yarn (Chicken): Plush yarn, approx. 120 m / 100 g — White
- Yarn (Legs/Beak accent): Plush or contrast yarn — Orange
- Yarn (Swing seat): Cotton-blend (half-cotton) yarn, approx. 105 m / 50 g — your choice of color
- Hook (Chicken): US G-6 / 4.0 mm
- Hook (Swing seat): US D-3 / 3.0 mm
Safety eyes
- 5 mm, 2 pieces
- Fiberfill stuffing
- Stitch markers
- Yarn needle / tapestry needle
- Scissors
Stitch shorthand
- ch — Chain
- dc — Double Crochet
- dec — Decrease (invisible decrease — 2 sc crocheted together)
- FLO — Front Loop Only
- BLO — Back Loop Only
- hdc — Half Double Crochet
- inc — Increase (2 sc in same stitch)
- MR — Magic Ring
- sc — Single Crochet
- sl st — Slip Stitch
- st / sts — Stitch / Stitches
- tr — Treble Crochet
Little chicken on a swing amigurumi crochet pattern
Chicken Body
- Round 1
6 sc in MR. (6)
- Round 2
inc in each st around. (12)
- Round 3
sc, inc repeat 6 times. (18)
- Round 4
inc, 2 sc, inc, 1 sc, attach orange yarn and work leg: 3 dc in same st (bobble/toe cluster), fasten off orange, continue in white , inc, 2 sc, inc, 2 sc, attach orange yarn and work leg: 3 dc in same st, fasten off orange, continue in white , inc, 2 sc, inc, 1 sc. (24)
- Rounds 5–7
sc in each st around. (24) Work 3 rounds even.
- Round 8
7 sc, Wing: (hdc, dc, hdc) all in same st worked in FLO , 11 sc, Wing: (hdc, dc, hdc) all in same st worked in FLO , 4 sc. (24)
- Round 9
7 sc, 1 sc in BLO (behind the wing), 11 sc, 1 sc in BLO (behind the wing), 4 sc. (24)The wing clusters in Round 8 are worked in FLO, leaving a natural gap at the back created by working Round 9 in BLO behind the wing. Use that gap as the channel for threading the swing cord during assembly — it holds the cord neatly and keeps the chicken sitting upright on her swing without any additional sewing.
- Round 10
2 sc, dec repeat 6 times. (18)
- Round 11
sc, dec repeat 6 times. (12)Insert safety eyes now. Embroider the beak using orange yarn. Stuff the body firmly with fiberfill before continuing.
- Round 12
dec 6 times. (6)Pull the opening closed and weave in the end securely.
Swing Seat
Use cotton-blend yarn and the US D-3 / 3.0 mm hook. The seat is worked flat, beginning with a foundation chain.
- Row 1
Ch 14. Starting in the 2nd ch from hook: 11 sc, 3 sc in the last ch (corner), then work 10 sc back along the opposite side of the foundation chain, inc in the final st. (26)
- Row 2
inc, 10 sc, inc 3 times, 10 sc, inc 2 times. (32)
- Row 3
1 sc, inc, 10 sc, (sc, inc) repeat 3 times, 10 sc, (sc, inc) repeat 2 times. (38)From the last stitch of Row 3, chain 90. This long chain forms the hanging cord for the swing.
Comb (Crest)
The comb is worked directly onto the top of the chicken’s head after the body is complete.
Insert your hook into the top of the head at the desired position and pull up a loop of yarn.
Draw the working yarn through the loop on your hook (as if making a slip knot) and gently tighten the yarn tail.
Working across the small bridge of yarn now anchored to the head, crochet the comb strip: sc, hdc, dc, hdc, sc, sl st.
Fasten off yarn.
Tie both yarn tails together in a secure knot and tuck them inside the head.
Where it goes
- A little shelf accent for a nursery or kid's room, paired with other mini amigurumi animals for a small farmyard scene.
- A gift topper tied onto a wrapped present, since the swing gives it a bit of dimension beyond a flat toy.
- A desk or windowsill companion that hangs from a small hook, adding a playful note to a plain corner.
- A photo prop for craft fairs or shop displays, where the swinging seat catches the eye better than a seated toy.
Color ideas
- Classic barnyard White plush yarn for the chicken body and comb worked in the standard sc-hdc-dc strip, orange accent yarn for the leg bobbles in Round 4, and a warm yellow cotton-blend for the swing seat.
- Soft nursery Cream or off-white plush yarn for the entire chicken body, a muted coral or peach substituted for the orange leg accent, and a pale sage or blush cotton-blend for the swing seat and hanging cord.
Care
Hand wash the plush chicken body in cool water since plush yarn can mat or lose loft in a machine wash, then press out excess water in a towel rather than wringing.
Lay both the chicken and the cotton-blend swing seat flat to dry, reshaping the body gently with your hands while it is still damp so the rounds sit evenly.
Store the finished piece somewhere it can hang or sit without weight on the seat, since the cotton-blend cord can stretch a little if it is left folded or crushed for long periods.
Assembly
- Step 1 Hold the completed chicken so her wings face outward. Thread the 90-ch cord through the space behind each wing (between the wing cluster and the body), centering the swing seat below the chicken.
- Step 2 With a yarn needle, sew each end of the cord firmly to the underside edges of the swing seat, making sure the seat hangs level.
- Step 3 Adjust the position of the chicken on the cord so she sits evenly in the center of the seat.
- Step 4 Weave in all remaining yarn ends on both the chicken and the swing seat.
Easy to get wrong
Losing the round marker in the spiral
Since the chicken body is worked in a continuous spiral with no joins, drop a stitch marker into the first stitch of every round the moment you make it. Move it up each round so you never have to guess where a round started — this matters most on Rounds 10–12, where plush yarn can hide the stitch structure and make counting during the decreases tricky.
Leaving a gap at the leg color change
When you attach orange for the bobble cluster and fasten off to continue in white, that join point is the most common place for a hole to open near the belly. Pull the white working yarn snug through the last orange stitch and check the tension before moving on.
Overstuffing before finishing the last rounds
Adding all the fiberfill too early makes it hard to close the final rounds neatly and can distort the round shape. Stuff gradually as the rounds narrow, pressing gently to check firmness — aim for a firm squeeze-and-spring-back feel before closing Round 12, rather than packing it all in at once.
Body parts sitting off-center
Because the chicken body and swing seat use different yarn weights and hook sizes, slight tension differences can cause elements to sit off-center. Use offset stitches (slip stitches) to shift your starting point subtly and realign components before sewing — this keeps the finished piece symmetrical.
Listener questions
Can I use regular acrylic yarn instead of plush yarn for the chicken?
Yes, you can substitute a standard worsted weight acrylic yarn using the same US G-6 / 4.0 mm hook. Keep in mind that the finished chicken will have a smoother appearance and slightly different dimensions compared to the plush version. You may also need to stuff the body a little more firmly, as acrylic yarn has less natural loft than plush.
How do I keep the legs from looking uneven on the finished chicken?
The legs are worked as small 3-dc bobble clusters directly into the body during Round 4, so their placement depends on counting your stitches carefully before you begin that round. Mark the stitch positions with stitch markers before attaching your orange yarn to ensure both legs land symmetrically. If they look slightly off after finishing, you can tack each leg cluster gently with a few invisible stitches using your yarn needle to adjust its angle.
Is this toy safe for young children?
The swing cord (90-chain length) makes this project better suited as a decorative nursery piece or a toy for older children rather than infants or toddlers. If you want to make the chicken as a toy for a baby, omit the swing entirely and replace the safety eyes with embroidered eyes using yarn. Always use a tight tension throughout so no stuffing can be pulled out through the fabric.
What does "working in FLO" mean for the wing stitches in Round 8?
Every crochet stitch has two loops at the top — a front loop (closest to you) and a back loop (away from you). Working in Front Loop Only (FLO) means you insert your hook under just the front loop instead of both loops as usual. For the wings in Round 8, this creates a raised cluster on the surface while leaving the back loop free, which Round 9 then uses to continue the body seamlessly behind the wing.
Original pattern: https://amigurumiarts.com/crocheted-chicken-on-a-swing-free-amigurumi-pattern/
About the Author

Marisol QuinteroWho runs Crochet Obsessed, why a stitch count sits at the end of every round, how a pattern gets written here, and the things this site will never do.
More Patterns
- IntermediateNo. 01

Slouchy everyday beanie worked flat in half double crochet
Crochet beanie pattern for a slouchy everyday look worked flat with hdc rows, then seamed into a soft,…
- IntermediateNo. 02
Crochet amigurumi doll with dress, shoes, and hat
Crochet amigurumi doll pattern with dress, shoes, and hat details for a soft, huggable keepsake you build one…
- IntermediateNo. 03
Chunky moss stitch crochet sweater with raglan-free shoulders
Chunky crochet sweater pattern using moss stitch, worked flat with a 10mm hook for a soft, fast, cool-weather…


