- LevelIntermediate
- Time4-6 hours
- Hook4.5 mm
- YarnWorsted
About This Pattern
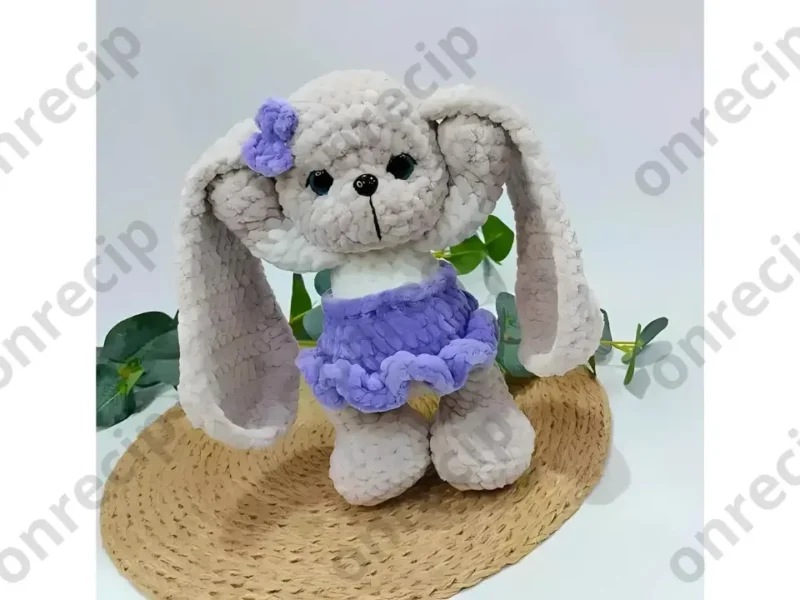
There is something gentle about this one, the kind of make you start on a slow evening with the radio low. Those long ears give the whole bunny a soft, dreamy tilt, like she is always listening for something nice. It is a piece that asks for patience but rewards you with real personality by the end.
Once she is stuffed and dressed, this bunny sits well on a shelf edge or tucked into a child's arm at bedtime. The long ears flop just enough to look alive without going floppy and shapeless. She holds her own on a windowsill, a nursery dresser, or wherever you want one small handmade thing to soften the room.
- Work the body in a continuous spiral, joining the legs and arms right into the stitches as you reach those rounds.
- Crochet a pair of ears in rows rather than in the round, which changes the feel of the work.
- Stuff each piece firmly as you close it so the finished parts hold their shape once assembled.
- Add the safety eyes and nose before closing the head, since they need to go in while you can still reach inside.
- Sew the finished ears onto the head using the tails you left for that exact purpose.
- Sew the completed head onto the body using its own tail to finish the join cleanly.
- Dress your bunny in the skirt or pants version depending on whether you are making a girl or boy.
On the desk
- Plush yarn (Himalaya Dolphin Baby): Main color (1 skein), additional color (if the bunny will be in a dress)
- Cotton yarn or embroidery floss
- Crochet hook (4-4.5 mm)
- Toy safety eyes (11 mm)
- Toy safety nose
- Stuffing
- Stitch markers
- Pins
- Needle for sewing parts
- Scissors
Stitch shorthand
- MR — magic ring
- ch — chain
- sl st — slip stitch
- sc — single crochet
- dc — double crochet
- tr — treble crochet
- inc — increase
- dec — decrease
- (…) x n — repeat n times
Long-eared bunny in a dress amigurumi pattern
Head
Begin with the additional color for rounds 1-3.
Change to the main color starting round 4.
Cut the yarn, leaving a 10-15 cm tail; close the hole and weave in the remaining thread.
- Round 1
6 sc in MR. (6)
- Round 2
Inc in each st around. (12)
- Round 3
(1 sc, inc) x 6. (18)
- Round 4
6 sc, 6 inc, 6 sc. (24)
- Round 5
6 sc, (1 sc, inc) x 6, 6 sc. (30)
- Round 6
(4 sc, inc) x 6. (36)
- Rounds 7–12
36 sc. (36)
- Round 13
(4 sc, dec) x 6. (30)
- Round 14
(3 sc, dec) x 6. (24)
- Round 15
(2 sc, dec) x 6. (18)
- Round 16
(1 sc, dec) x 6. (12)
- Round 17
6 dec. (6)
Ears
Make 2- Round 1
6 sc in MR. (6)
- Round 2
6 inc. (12)
- Round 3
(1 sc, inc) x 6. (18)
- Round 4
(2 sc, inc) x 6. (24)
- Round 5
(5 sc, inc) x 4. (28)
- Rounds 6–9
28 sc. (28)
- Round 10
(5 sc, dec) x 4. (24)
- Rounds 11–12
24 sc. (24)
- Round 13
(4 sc, dec) x 4. (20)
- Round 14
20 sc. (20)
- Round 15
(3 sc, dec) x 4. (16)
- Rounds 16–18
16 sc. (16)
- Round 19
(2 sc, dec) x 4. (12)
- Rounds 20–25
12 sc. (12)
- Round 26
(4 sc, dec) x 2. (10)
- Rounds 27–28
10 sc. (10)
- Round 29
Fold the ear in half and work 5 sc through both layers.Leave a tail of 15-20 cm for sewing the ears to the head.
Legs
Make 2- Round 1
6 sc in MR. (6)
- Round 2
6 inc. (12)
- Round 3
(1 sc, inc) x 6. (18)
- Round 4
18 sc in the back loops only. (18)
- Round 5
18 sc. (18)
- Round 6
(1 sc, dec) x 3, 9 sc. (15)
- Round 7
(1 sc, dec) x 3, 6 sc. (12)
- Rounds 8–12
12 sc. (12)
- Round 13
Sc 11, fold the leg in half and work 6 sc through both layers.Cut the yarn, leaving a 10 cm tail, fasten off, and weave in the end.
Body
The legs and arms are attached while crocheting the body.
If making the bunny in a dress, change to the additional color in round 8; otherwise continue with the same color.
For a bunny in a dress, work round 9 in the back loops only; otherwise crochet as usual.
If the bunny is in a dress, after completing round 10, go back to round 9 and crochet the skirt by working an increase (1 dc) in every stitch.
Cut the yarn, leaving a tail of 25-30 cm to sew the head to the body.
- Round 1
6 sc in MR. (6)
- Round 2
6 inc. (12)
- Round 3
(1 sc, inc) x 6. (18)
- Round 4
(1 sc, inc) x 9. (27)
- Round 5
(2 sc, inc) x 9. (36)
- Round 6
Attach the legs: 6 sc with one leg, 12 sc, 6 sc with the other leg, 5 sc, 5 tr worked together (this forms the tail), 6 sc. (36)
- Round 7
36 sc. (36)
- Round 8
36 sc. (36)
- Round 9
(2 sc, dec) x 9. (27)
- Round 10
27 sc. (27)
- Round 11
(1 sc, dec) x 9. (18)
- Rounds 12–13
18 sc. (18)
- Round 14
(4 sc, dec) x 3. (15)
- Round 15
Attach the arms: 1 sc, 4 sc with the arm, 3 sc, 4 sc with the other arm, 3 sc, sl st.
Arms
Make 2- Round 1
6 sc in MR. (6)
- Round 2
6 inc. (12)
- Rounds 3–4
12 sc. (12)
- Round 5
3 dec, 5 sc. (9)
- Rounds 6–12
9 sc. (9)
- Round 13
Fold the arm in half and work 4 sc through both layers.Cut the yarn, leaving a 10 cm tail, fasten off, and weave in the end.
Ears (one layer)
Make 2This is an alternative one-layer ear worked in rows instead of in the round.
- Round 1
Ch 6; starting from the second chain, 5 sc. (5)
- Round 2
Ch, 5 sc. (5)
- Round 3
Ch, 2 sc, inc, 2 sc. (6)
- Rounds 5–10
Ch, 6 sc. (6)
- Round 11
Ch, inc, 4 sc, inc. (8)
- Rounds 12–14
Ch, 8 sc. (8)
- Round 15
Ch, inc, 6 sc, inc. (10)
- Round 16
Ch, 10 sc. (10)
- Round 17
Ch, inc, 8 sc, inc. (12)
- Rounds 18–19
12 sc. (12)
- Round 20
Ch, inc, 10 sc, inc. (14)
- Round 21
Ch, 14 sc. (14)
- Round 22
Ch, dec, 10 sc, dec. (12)
- Round 23
Ch, dec, 8 sc, dec. (10)
- Round 24
Ch, dec, 6 sc, dec. (8)
- Round 25
Ch, dec, 4 sc, dec. (6)
- Round 26
Ch, dec, 2 sc, dec. (4)
- Round 27
2 dec. (2)
- Round 28
Work sc around the entire ear.
Where it goes
- A nursery shelf companion that pairs nicely with soft blankets and other plush amigurumi in the same room.
- A handmade baby shower gift that sits alongside a knit cap or a small crocheted blanket.
- A keepsake for a child's first stuffed toy, meant for gentle cuddling rather than rough outdoor play.
- A craft fair or market item that pairs well displayed next to other dressed amigurumi animals.
Color ideas
- Soft blush and cream Blush for the accent rounds at the start of the head and for the dress, cream as the main color for the rest of the head, body, ears, legs and arms.
- Warm honey and ivory Honey as the main color across the body, head, legs and arms, ivory for the dress and the inner accent rounds of the head.
Care
Hand wash gently in cool water since plush yarn like this holds its softness better without a washing machine's agitation.
Reshape the ears and limbs by hand while damp and let the bunny air dry flat, away from direct heat that can flatten the plush texture.
Store her uncrushed, ears smoothed flat, so the long ears do not develop a permanent crease over time.
Assembly
- Step 1 Sew the ears to the head using the tail left after finishing the ears.
- Step 2 Sew the head to the body using the tail left after finishing the body.
- Step 3 The legs and arms are attached directly while crocheting the body (see Body part rounds 6 and 15).
Easy to get wrong
Losing the round in the spiral
Place a stitch marker at the start of every round on the head and body so you always know where each new round begins.
Ears too stiff or too floppy
Keep your tension even across the rows on the ears, and only stuff them lightly if you want the long-eared droop rather than a stiff, standing ear.
Limbs attached crooked to the body
Pin the legs and arms in place before joining them into the body rounds, and check they sit level from the front and side before you crochet them on.
Listener questions
Can I make a boy bunny instead of a girl in a dress?
Yes, the notes mention you can crochet a boy version in pants instead. The head, body, ears, legs and arms stay the same, only the outfit changes.
Why are the ears worked differently from the rest of the bunny?
Every other part is crocheted in a continuous spiral, but the ears are worked in rows instead. That row-by-row structure is what lets the ears hang long rather than curl into a tube.
Do I attach the arms and legs after the body is done?
No, they are joined directly into the body while you crochet it, specifically at the rounds noted in the body instructions. This skips a separate sewing step for those two parts.
How do I get a clean face on the bunny?
The notes call for smooth black thread, like thin yarn or embroidery floss, rather than the plush main yarn. That finer thread lets you embroider crisper details than the bulkier plush fiber would allow.
Original pattern: https://onrecip.com/amigurumi-bunny-long-eared-in-a-dress-crochet-pattern/
About the Author

Marisol QuinteroWho runs Crochet Obsessed, why a stitch count sits at the end of every round, how a pattern gets written here, and the things this site will never do.
More Patterns
- IntermediateNo. 01

Slouchy everyday beanie worked flat in half double crochet
Crochet beanie pattern for a slouchy everyday look worked flat with hdc rows, then seamed into a soft,…
- IntermediateNo. 02
Crochet amigurumi doll with dress, shoes, and hat
Crochet amigurumi doll pattern with dress, shoes, and hat details for a soft, huggable keepsake you build one…
- IntermediateNo. 03
Chunky moss stitch crochet sweater with raglan-free shoulders
Chunky crochet sweater pattern using moss stitch, worked flat with a 10mm hook for a soft, fast, cool-weather…


