- LevelIntermediate
- Time4-6 hours
- YarnWorsted
About This Pattern
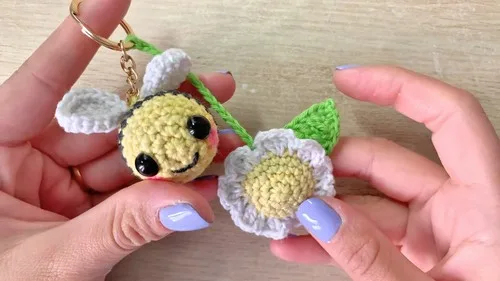
This one has a cheerful little buzz to it, honestly. Yellow and black stripes stacked up around a round body, a white daisy riding along beside it. It feels like the kind of make you finish in one sitting and immediately want to clip onto something.
Your hands get real practice here: steady single crochet in the round, clean increase rounds that build the body's curve, and carrying a second strand of yarn without it showing through. You will also tuck in safety eyes at just the right round and stitch delicate wings into place after the stripes are done.
Hung from a bag strap or a set of keys, this bee catches the eye in a way that is almost funny for something so small. It brings a little color into a pocket of everyday life, the kind of detail people ask about while you are digging for your keys.
- Begin the bee's body with a magic ring and build it outward through a few steady increase rounds.
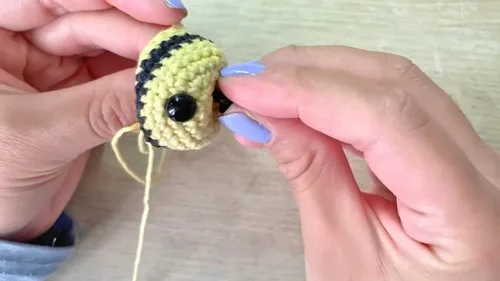
- Carry the yellow strand through the black rounds so the stripe pattern appears without breaking yarn.
- Pause partway through to insert the safety eyes before the body closes up any further.
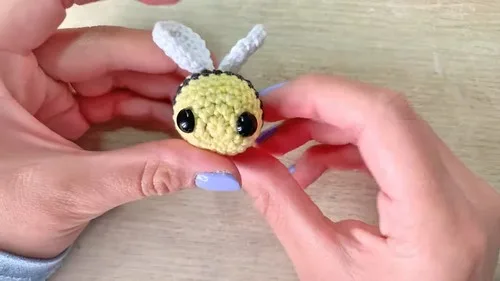
- Shape a pair of white wings on their own and set them aside to attach later.
- Work the daisy flower separately, starting from its own magic ring and growing it with the same increase method.
- Stitch the wings onto the bee's back between the later stripe rounds once the body is finished.
- Join the leaf to the flower and attach the daisy to the bee to complete the keychain.
On the desk
- Yellow and black yarn for the bee
- White yarn for the wings
- A crochet hook suitable for the yarn sizes
- Filler material
- Safety eyes
- Keychain ring
- Acrylic marker or blush for cheeks
- Sewing needle
- Thread for assembling
- Yellow and white yarn for the flower parts
- Green yarn for the leaf
- Sewing needle
Stitch shorthand
- sc — single crochet
- inc — increase
Little bee keychain amigurumi with daisy charm
Bee Body
With yellow yarn, start with a magic ring.
Chain 1 (this does not count as a stitch).
Inside the ring, make 6 single crochets (sc).
Pull ring tight to close.
- Round 2
Make 6 increases (inc) (2 sc in each stitch around). You'll have 12 stitches.
- Round 3
1 sc, 1 inc – repeat around. You will have 18 stitches. For Round 4: 2 sc, 1 inc – repeat 6 times to get 24 stitches.
- Rounds 5–6
Work 24 sc around without increasing or decreasing. Change to black yarn: Work 24 sc around for round 7 and 8, still keeping a stitch count of 24.Ensure to carry the yellow strand along and hide it within your stitches.
Switch back to yellow yarn:and repeat the process as with the black yarn switch for rounds 9 and 10, maintaining 24 stitches in each round.
Before continuing
- Round 2
6 inc (2 sc in each stitch). You’ll have 12 stitches.
- Round 3
1 sc, 1 inc – repeat around to get 18 stitches. After round 3: slip stitch to join and finish off, leaving a long tail for sewing. Stitch wings to the bee between rounds 9 and 10.
Daisy Flower
With yellow yarn, start with a magic ring.
Chain 1 (this doesn't count as a stitch).
Make 6 sc in the ring.
For Round 2: Perform 6 inc. You'll have 12 stitches.
- Round 3
1 sc, 1 inc – repeat around to get 18 stitches.Rounds 4 onward: Work with stitches over stitches for a few rounds to build up the flower shape.
Finish off with a slip stitch and leave a long tail for sewing.
More shots
Where it goes
- Clip it to a backpack zipper so it is easy to spot among a row of bags at school or work.
- Thread it onto a keychain ring and let it sit alongside house and car keys as a cheerful marker.
- Give it as a small handmade gift paired with a plain tote or pencil case for a garden-lover.
- Tuck it into a child's lunch bag or backpack loop for a tiny bit of color on an ordinary day.
Color ideas
- Classic honeybee Yellow and black alternate in stripes down the bee's body rounds, white yarn for the wings and daisy petals, green for the leaf.
- Soft garden bee Keep the black rounds as worked for the bee's stripes, but use a pale yellow for the daisy center and leave the petals white for a gentler, muted finish.
Care
Hand wash gently in cool water if the yarn is acrylic or cotton, since both hold their shape well and resist shrinking.
Lay the bee and daisy flat to dry rather than hanging them, so the stuffing doesn't shift or sag out of shape.
Store the finished keychain away from direct sun so the yellow and black colors stay bright, and reshape the wings by hand if they get squashed in a bag.
Assembly
- Step 1 Attach the leaf to the flower using the tail or adhesive.
- Step 2 Combine the bee and daisy, either by sewing or with adhesive based on preference.
Easy to get wrong
Dropping the carried yarn strand
Keep tension on the floating yellow strand as you crochet the black rounds so it doesn't peek through gaps. Give it a gentle tug every stitch or two to keep it snug against the back of the work.
Placing safety eyes too late
Insert the eyes between the rounds noted in the pattern, before the opening narrows too much to reach inside. Trying to add them after stuffing makes it much harder to center them evenly.
Between the songs
- What I love about this one is the color-carrying. You are not cutting yarn every few rounds, you are floating the yellow strand along inside the black stitches so the stripes snap into place without a single weak spot or hole. The increase sequence at the start builds a tidy, round little head and body with no guesswork, and because the wings and daisy are worked separately, you get three small, satisfying finishes instead of one long slog. Adding the safety eyes mid-body, right at that specific round, is the moment it stops being a yellow-and-black blob and starts looking back at you. It is quick enough to be a weekend win but detailed enough to feel like real amigurumi.
Listener questions
Can I make the bee without the daisy attachment?
Yes, the bee body and wings stand on their own as a complete keychain. The daisy and leaf are a nice addition but not required for the piece to work.
What's the trickiest part of this pattern?
Carrying the yellow strand cleanly through the black rounds takes a little care the first time. Once you get a feel for the tension, the stripes come out even and tidy.
When exactly do I attach the wings?
The wings get stitched onto the bee's back between the later stripe rounds, after the body is fully worked and closed. This placement keeps them sitting naturally along the spine.
Do I need safety eyes, or can I embroider them instead?
The pattern calls for safety eyes inserted at a specific round for a clean, secure finish. You could embroider instead if you prefer, just do it before the body closes up too far to reach inside.
Is this a good project if I'm newer to amigurumi?
The increase rounds and single crochet are approachable, but the color carrying and the separate flower piece push this toward an intermediate skill level. It is a great next step after a simple single-color amigurumi.
Original pattern: https://crocheteverything.com/easy-beautiful-crochet-bee-keychain-amigurumi-tutorial/
About the Author

Marisol QuinteroWho runs Crochet Obsessed, why a stitch count sits at the end of every round, how a pattern gets written here, and the things this site will never do.
More Patterns
- IntermediateNo. 01

Rose Granny Square Tote Crochet Pattern
Rose granny square tote crochet pattern made from 18 dimensional rose squares for a sturdy, romantic everyday bag.
- IntermediateNo. 02
Tropical octopus baby blanket crochet pattern with appliqués
Tropical octopus baby blanket crochet pattern: a cream filet base with coral and turquoise octopus appliqués, leaves, and…
- IntermediateNo. 03
Sunny lemon couple amigurumi crochet pattern
Sunny lemon couple amigurumi crochet pattern with embroidered slices and safety eyes for a cheerful handmade shelf pair.


