- LevelIntermediate
- Time8-14 hours
- YarnDK
About This Pattern
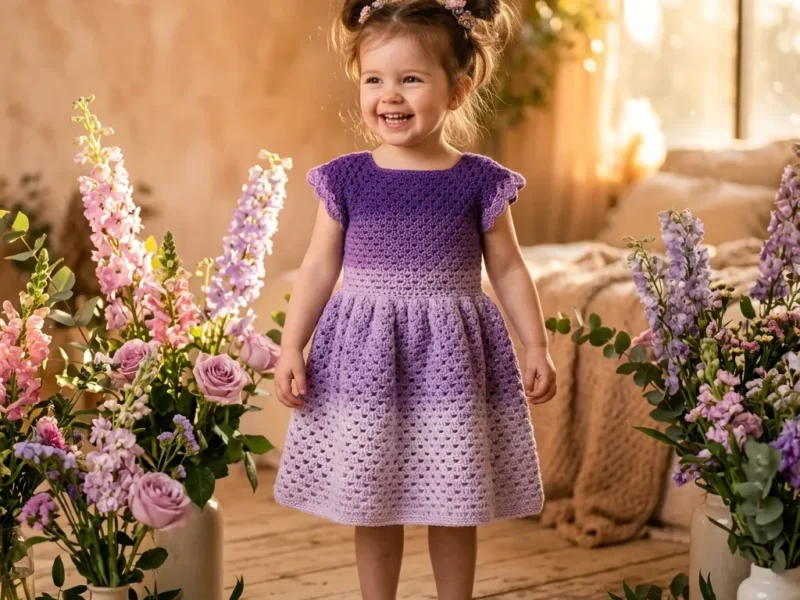
There is something quietly romantic about watching a color shift happen stitch by stitch instead of row by row. This dress starts in deep violet at the neck and drifts, almost on its own, into pale lilac by the hem. I love patterns that do the hard visual work for me, and a gradient cake does exactly that here.
Your hands stay busy but never frantic. You are working in joined rounds the whole way, shaping raglan increases through the yoke, then settling into the rhythm of the heart shell stitch across the skirt. It is the kind of project where row one of a new stitch feels fussy and row three feels like muscle memory.
Picture this dress on a hanger by a sunlit window, the lilac fading toward the hem like it is catching the light on purpose. The scalloped edge moves when a small person moves. It reads as special-occasion without ever using the words 'special occasion' on the care tag.
- Chain and join to form a ring, then work the yoke downward in hdc rounds with raglan increases shaping the shoulders.
- Separate for the armholes, bridging the gap with chains so the body can continue in one joined piece.
- Work the bodice lower section in hdc, adjusting stitch counts for your size to set up the waistband.
- Complete the waistband gather round, which pulls the fitted bodice into the fuller skirt below.
- Shift into the heart shell stitch for the skirt, letting the gradient yarn carry the color change for you.
- Finish the skirt hem with its scalloped edging so the heart shells open fully along the bottom.
- Add the neckline edging and button loop, then stitch on flutter sleeves to complete the armholes.
- Weave in ends, wet block thoroughly, and pin the hem open so the heart shell pattern shows its full shape.
On the desk
Yarn
- 300 (320, 360, 400, 440, 480) yards of DK weight yarn in a gradient that moves from deep violet through medium lavender to pale lilac. Alternatively, use three separate skeins of coordinating solid DK yarn in those three shades, each approximately 100 (107, 120, 133, 147, 160) yards.
Notions
- Yarn needle for weaving ends
- 2 stitch markers
- 1 small button, approximately half an inch in diameter
- Sewing needle and thread to match yarn
- Blocking mat and pins
Stitch shorthand
- ch — chain
- sl st — slip stitch
- sc — single crochet (insert hook, yarn over, pull up a loop, yarn over, pull through both loops)
- hdc — half double crochet (yarn over, insert hook, yarn over, pull up a loop, yarn over, pull through all three loops)
- dc — double crochet (yarn over, insert hook, yarn over, pull up a loop, yarn over, pull through two loops, yarn over, pull through remaining two loops)
- sk — skip
- st(s) — stitch(es)
- sp — space
- rep — repeat
- pm — place marker
- rm — remove marker
- rnd — round
- RS — right side
- MC — main color (deep violet)
- CC1 — contrast color 1 (medium lavender)
- CC2 — contrast color 2 (pale lilac)
Lilac ombre dress with heart shell skirt pattern
Neckline and Yoke
The yoke works from the neckline downward in joined rounds. You will increase to shape the raglan-style shoulders before separating for armholes.
Foundation:
Using MC, ch 53 (55, 57, 61, 65, 69). Being careful not to twist, sl st to first ch to form a ring. Leave a 6-inch tail at the beginning for button loop finishing later.
The small gap between the first and last chain creates the center back slit. You will reinforce and edge this opening during finishing.
- Round 1
(RS): Ch 1 (does not count as st), hdc in each ch around, sl st to first hdc to join. (52, 54, 56, 60, 64, 68 hdc)
- Round 2
Ch 1, hdc in first 7 (7, 8, 8, 9, 9) sts (left back), pm in next st (raglan point), hdc in next 12 (13, 12, 14, 14, 16) sts (left sleeve), pm in next st (raglan point), hdc in next 14 (14, 16, 16, 18, 18) sts (front), pm in next st (raglan point), hdc in next 12 (13, 12, 14, 14, 16) sts (right sleeve), pm in next st (raglan point), hdc in next 7 (7, 8, 8, 9, 9) sts (right back), sl st to join. (52, 54, 56, 60, 64, 68)
- Round 3
Increase round Ch 1, hdc to 1 st before first marker, 3 hdc in marked st (increase), hdc to 1 st before second marker, 3 hdc in marked st, hdc to 1 st before third marker, 3 hdc in marked st, hdc to 1 st before fourth marker, 3 hdc in marked st, hdc to end, sl st to join. Move markers up to center stitch of each 3-hdc group. (60, 62, 64, 68, 72, 76)
- Round 4
Ch 1, hdc in each st around, sl st to join. (60, 62, 64, 68, 72, 76)
- Round 5
Increase round Rep Round 3. (68, 70, 72, 76, 80, 84)
- Round 6
Ch 1, hdc in each st around, sl st to join. (68, 70, 72, 76, 80, 84)
- Round 7
Increase round Rep Round 3. (76, 78, 80, 84, 88, 92)
- Round 8
Ch 1, hdc in each st around, sl st to join. (76, 78, 80, 84, 88, 92)
- Round 9
Increase round Rep Round 3. (84, 86, 88, 92, 96, 100)
- Round 10
Ch 1, hdc in each st around, sl st to join. (84, 86, 88, 92, 96, 100) For sizes 3T, 4T, and 5T only:
- Round 11
Increase round Rep Round 3. (100, 104, 108)
- Round 12
Ch 1, hdc in each st around, sl st to join. (100, 104, 108) For sizes 4T and 5T only:
- Round 13
Increase round Rep Round 3. (112, 116)
- Round 14
Ch 1, hdc in each st around, sl st to join. (112, 116) After the final increase round, remove your markers.
Bodice Lower Section
Continue in hdc around the entire body, including into the chain bridge stitches at the underarm.
- Round 1
Adjustment round Ch 1, hdc around entire body, increasing or decreasing as indicated above for your size to reach the target count. Sl st to join.12 months and 18 months: (48)
2T: (48)
3T, 4T, and 5T: (60)
- Rounds 2–4
Ch 1, hdc in each st around, sl st to join. (48, 48, 48, 60, 60, 60) For sizes 4T and 5T only, work 2 additional hdc rounds here for a total of 6 bodice lower rounds.
Checkpoint: Your piece should measure approximately 5.5 (6, 6.5, 7, 7.5, 8) inches from shoulder to current working edge.
Color Change Note: If using separate skeins, join CC1 now. If using a gradient cake, just keep going.
Neckline Edging
With RS facing, join MC at the right back corner of the neckline opening.
- Round 1
Sc evenly along the right back edge of the opening (approximately 3 sc along the short vertical edge), then continue sc around the entire neckline, sc along the left back vertical edge. Do not join. Turn.Total neckline sc: approximately 59 (61, 63, 67, 71, 75) sc.
- Round 2
Ch 1. Sc in each sc across. At the end of the left back edge, ch 5, sl st into the last sc to form the button loop. Fasten off.Sew your button to the right back edge, positioned to align with the ch-5 button loop when the back edges overlap slightly.
Armhole Separation
This round separates the sleeve stitches from the body.
- Round 1
Separation Round Ch 1. Hdc across left back stitches (9, 9, 10, 11, 12, 12). Ch 4 (4, 4, 6, 6, 6) for the underarm bridge. Skip all left sleeve stitches (16, 17, 18, 19, 20, 21). Hdc across front stitches (18, 18, 20, 21, 22, 23). Ch 4 (4, 4, 6, 6, 6) for the underarm bridge. Skip all right sleeve stitches (16, 17, 18, 19, 20, 21). Hdc across right back stitches (9, 9, 10, 11, 12, 12). Sl st to first hdc to join.
- Round 2
Your body stitch count after separation (hdc plus chain bridge): 12 months: 44 sts 18 months: 44 sts 2T: 48 sts 3T: 55 sts (adjust to 57)4T: 58 sts 5T: 59 sts
- Round 3
For the skirt heart shell stitch to work evenly, your stitch count must be divisible by 6. On the next round, you will adjust to reach these target counts:
- Round 4
12 months: 48 (increase 4 evenly)
- Round 5
18 months: 48 (increase 4 evenly)
2T: 48 (even, no change)
- Round 6
3T: 60 (increase 3 evenly)
- Round 7
4T: 60 (increase 2 evenly)
- Round 8
5T: 60 (increase 1 evenly)
Checkpoint: Your piece should look like a small tank-top yoke. When laid flat, the chest width should measure approximately 9 (9.5, 10, 10.5, 11, 11.5) inches.
Waistband Gather Round
This round increases dramatically to create the fullness of the skirt.
Gather Round: Ch 2 (counts as first dc), dc in same st as join, 2 dc in each st around, sl st to top of ch-2 to join.
12 months, 18 months, and 2T: (96 sts)
3T, 4T, and 5T: (120 sts)
Skirt
- Round 1
Now for the fun part. The skirt uses the heart shell stitch pattern throughout.
- Round 2
Heart Shell Setup Round (Round 1 of skirt):
- Round 3(2)
Ch 1. Sc in first dc. Ch 1, sk 1 dc. (2 dc in next dc, ch 1), this is one heart shell unit. Sk 1 dc. Sc in next dc. Ch 1, sk 1 dc.
- Round 4(2)
Continue this 6-stitch repeat around: [sc in st, ch 1, skip 1 st, (2 dc, ch 1) in next st, skip 1 st].
- Round 5
Repeat 16 (16, 16, 20, 20, 20) times total. Sl st to first sc.
- Round 6
Heart Shell Continuation Round (all remaining skirt rounds):
- Round 7(2)
Sl st to the ch-1 space between the 2 dc of the first heart shell. Ch 1. Sc in that ch-1 sp (between the 2 dc, at the top of the heart). Ch 1. Skip to next sc. (2 dc, ch 1) in that sc, forming the new heart shell.
- Round 8(2)
Continue the pattern: [sc in ch-1 sp of heart shell, ch 1, skip sc position, (2 dc, ch 1) in next sc, skip ch-1 sp].
- Round 9
Repeat 16 (16, 16, 20, 20, 20) times. Sl st to first sc to join.
- Round 10
Work the Heart Shell Continuation Round for the following total rounds (including the setup round): 12 months: 14 rounds18 months: 15 rounds 2T: 17 rounds 3T: 18 rounds 4T: 20 rounds 5T: 21 rounds
Color Change Note: If using separate skeins, change from CC1 to CC2 after completing 60 percent of the skirt rounds, approximately round 10 for 2T.
Checkpoint: The skirt section alone should measure approximately 7 (7.5, 8.5, 9, 10, 10.5) inches.
Skirt Hem Edging
Hem Round: Sl st to the ch-1 sp at the top of the first heart shell. Ch 1. In each heart shell ch-1 sp work (sc, ch 2, sc). In each sc position between heart shells work sc. Rep around. Sl st to first sc to join. Fasten off and weave in end.
Flutter Sleeves
The flutter sleeves are worked by picking up stitches around the armhole opening.
- Round 1
With RS facing, join MC at the base of the underarm chain bridge.
- Round 2(1)
Pickup Round Ch 1. Sc evenly around the entire armhole opening, working 1 sc in each skipped sleeve stitch position along the top of the armhole, and 1 sc in each chain of the underarm bridge. Sl st to join.Stitch count around armhole (adjust to nearest even number): 12 months: 20 18 months: 22 2T: 22 3T: 26 4T: 26 5T: 28 Flutter Edging Round:
- Round 3
(Sc, ch 2, dc) in first st. Sk 1 st. Rep [(sc, ch 2, dc) in next st, sk 1 st] around. Sl st to first sc to join.Fasten off and weave in end. Repeat for second armhole.
Where it goes
- A warm-weather dress for everyday wear with sandals and a simple cardigan on cooler evenings.
- A photo-session outfit that pairs well with bare feet on grass or a plain backdrop that lets the ombre show.
- A handmade gift for a baby shower or birthday that grows with the child across the 12-month to 5T range.
- A layering piece over a short-sleeve bodysuit in cooler months, with the flutter sleeves left as the finishing detail.
Color ideas
- Classic gradient cake Use a single gradient yarn cake so the neckline and yoke sit in deep violet, the bodice lower section and waistband move into medium lavender, and the skirt and hem fade into pale lilac on their own.
Care
Hand wash the finished dress in cool water for about 10 minutes, the same soak used for blocking, then press out water in a towel rather than wringing.
Reshape it while damp by pinning the skirt hem so each heart shell repeat opens fully, and let it air dry flat on the blocking mat for a full day.
Store the dress folded rather than hung, since DK yarn can stretch out of shape on a hanger over time, and keep it away from direct sun so the ombre tones do not fade unevenly.
Assembly
- Step 1 Weave in all yarn ends securely.
- Step 2 Blocking transforms this dress, so please do not skip it. Wet block by soaking in cool water for 10 minutes. Gently press out excess water in a towel. Pin the dress to measurements on a blocking mat, making sure to pin the skirt hem to open the heart shell pattern fully. Allow to dry completely, which takes 12 to 24 hours.
- Step 3 If your neckline gaps after blocking, thread a length of matching yarn through the neckline foundation stitches as a drawstring. Adjust slightly before tying off invisibly.
Easy to get wrong
Twisting the foundation ring
Check that your starting chain lies flat with no twist before you slip stitch to join, since a twisted ring is hard to fix once you are rounds into the yoke.
Rushing the first heart shell repeat
Work through one full repeat slowly and count stitches before continuing, because the heart shape only becomes clear after blocking, not while you are crocheting it.
Skipping the gauge swatch
Make the hdc swatch in the round and block it before starting, since the heart shell measurements and final sizing both depend on blocking behaving the way your swatch predicted.
Between the songs
- The real reward here is the heart shell stitch texture across the skirt, those small heart impressions that only reveal themselves once a full repeat is blocked open. Pair that with a gradient yarn cake and you get an ombre effect with zero extra color-change fuss, just violet sliding into lavender into lilac as you crochet. The raglan-style yoke shaping is satisfying too, a top-down construction with minimal seaming that keeps ends to a minimum. By the time you reach the waistband gather round and watch the fitted bodice open into a full A-line skirt, the whole shape finally clicks into place. It is a dress that rewards patience in the middle and pays you back with drama at the hem.
Listener questions
Can I make this without a gradient yarn cake
Yes, the pattern gives yardage for three separate skeins in coordinating shades as an alternative. You simply change skeins at the points where the gradient would naturally shift.
How do I know if I am ready for the heart shell stitch
If you have finished at least two shell stitch projects before, you have the foundation you need. The instructions read as more complicated than the actual motion, and it settles in after one full repeat.
What size should I start with if I am between sizes
Check the finished chest and length measurements given for each size against your child's current measurements, then size up if you want extra wear from the dress. The pattern is written for 2T with every other size noted in parentheses throughout.
Why does my neckline feel loose after blocking
This can happen with hdc worked in the round once it relaxes from wet blocking. The notes include a fix: thread a length of matching yarn through the neckline foundation stitches as a drawstring.
Is blocking really necessary for this pattern
Yes, blocking is what opens the heart shell pattern into its visible heart shapes along the skirt. Skipping it leaves the stitch texture looking flat and tight instead of lacy.
Original pattern: https://crochetwithmia.com/lilac-ombre-spring-dress-free-crochet-pattern/
About the Author

Marisol QuinteroWho runs Crochet Obsessed, why a stitch count sits at the end of every round, how a pattern gets written here, and the things this site will never do.
More Patterns
- IntermediateNo. 01

Rose Granny Square Tote Crochet Pattern
Rose granny square tote crochet pattern made from 18 dimensional rose squares for a sturdy, romantic everyday bag.
- IntermediateNo. 02
Tropical octopus baby blanket crochet pattern with appliqués
Tropical octopus baby blanket crochet pattern: a cream filet base with coral and turquoise octopus appliqués, leaves, and…
- IntermediateNo. 03
Sunny lemon couple amigurumi crochet pattern
Sunny lemon couple amigurumi crochet pattern with embroidered slices and safety eyes for a cheerful handmade shelf pair.


