- LevelIntermediate
- Time15-22 Hours
- Hook3.5 mm
- YarnDK
About This Pattern
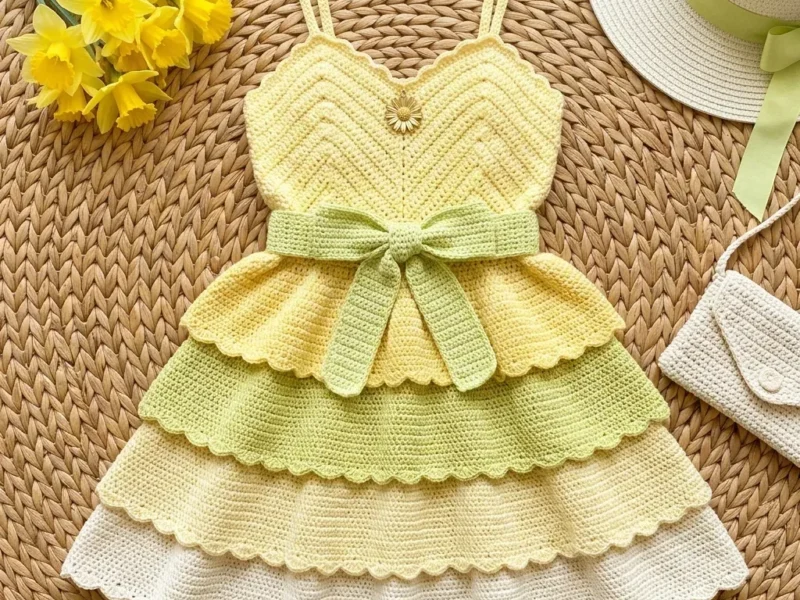
This tiered ruffle dress brings together a textured chevron bodice, a sage green tie-front waistband, and four graduated ruffles that cascade all the way to the hem. Sized for little ones around 2 to 3 years old, it's the kind of special-occasion piece that photographs beautifully and gets worn again and again. What makes it stand out is the layered construction: a fitted, structured top paired with a soft, swishy skirt that moves when your child twirls, topped off with a tiny daisy button at the neckline.
You'll work the bodice front and back flat, join them at the sides, then build downward through waist shaping, a waistband with a front bow, and four color-blocked ruffle tiers, each finished in a scalloped shell edge. Expect to use chevron or ripple stitch, shell stitches, working in the round after flat pieces, and juggling four yarn colors. Budget 15 to 22 hours total, with the bodice alone taking 5 to 7 hours, so this is a project best enjoyed over several relaxed sessions rather than one sitting.
The finished dress measures about 17 inches from shoulder to hem with a 20-inch chest and 19-inch waist, giving a lightweight, breathable fit that's perfect for spring photos, birthdays, or garden parties. The chevron texture and cream, sage, and white ruffle tiers give it a polished, boutique-made look rather than a homespun feel. It makes a gorgeous handmade gift for a baby shower, a first birthday, or any little one whose closet deserves something truly one of a kind.
- Crochet the bodice front and back separately as flat chevron-textured panels worked in rows.
- Join the front and back bodice pieces together at the side seams to form the top.
- Shape the waist with a short decrease section so the bodice tapers in before the skirt begins.
- Add the sage green waistband and crochet the center bow piece to tie at the front.
- Work the front and back neckline scallop edging, then attach the spaghetti straps at the shoulders.
- Crochet Ruffle Tier 1 in bright yellow directly onto the waistband to start the skirt.
- Add Ruffle Tiers 2, 3, and 4 in sage green, pale yellow, and white, each graduating outward.
- Finish each tier's lower edge with a shell stitch scallop, then sew on the daisy button at the neckline.
Materials
- Color A (Bright Yellow): approximately 280 yards (256 m)
- Color B (Sage Green): approximately 160 yards (146 m)
- Color C (Pale Yellow/Cream Yellow): approximately 200 yards (183 m)
- Color D (White): approximately 180 yards (165 m)
Yarn Suggestions
- Paintbox Yarns Simply DK works wonderfully for this project. It is 100% acrylic with 137 yards per 50 g skein. Machine washable and available in perfect lemon and sage colorways.
- Lion Brand Yarn Pound of Love offers excellent value. This 100% premium acrylic comes in a large 1020 yard skein. One skein of yellow and one of white will cover most of your color needs.
- Scheepjes Softfun provides beautiful drape with its 60% cotton and 40% acrylic blend. The cotton content makes it more breathable for warm weather wear.
- Any DK weight yarn that achieves gauge will work. Avoid yarn with too much stretch like pure superwash wool since the ruffle tiers need to hold their shape. Choose machine washable fiber for a child’s garment.
- US size E-4 (3.5 mm) crochet hook
- Adjust as needed to match gauge.
- Yarn needle for weaving ends
- Scissors
- At least 6 stitch markers
- Small daisy button or flower embellishment, approximately 12 mm diameter
- Sewing needle and matching thread for button attachment
- Blocking mat and pins
Crochet Abbreviations
- ch (chain)
- Yarn over, pull through loop on hook
- sl st (slip stitch)
- Insert hook, yarn over, pull through stitch and loop on hook in one motion
- sc (single crochet)
- Insert hook, yarn over, pull up loop, yarn over, pull through both loops
- hdc (half double crochet)
- Yarn over, insert hook, yarn over, pull up loop, yarn over, pull through all three loops
- dc (double crochet)
- Yarn over, insert hook, yarn over, pull up loop, yarn over, pull through two loops, yarn over, pull through remaining two loops
- sk (skip)
- Pass over the indicated stitch without working into it
- st/sts (stitch/stitches)
- The individual loops you work into
- sp (space)
- The gap between stitches
- RS (right side)
- The public facing side of your work
- WS (wrong side)
- The back side of your work
- rep (repeat)
- Work the bracketed instructions again
- pm (place marker)
- Put a stitch marker in the indicated location
- beg (beginning)
- The start of a row or round
- inc (increase)
- Work 2 single crochet in the same stitch
- dec or sc2tog
- Single crochet decrease. Insert hook in next stitch, pull up loop. Insert hook in following stitch, pull up loop. Yarn over and draw through all 3 loops on hook.
- yo (yarn over)
- Wrap yarn around hook from back to front
Lemon Garden Tiered Ruffle Dress Crochet Pattern
Section 1: Bodice Front
Using Color A and hook E-4, begin at the neckline.
Foundation chain: Chain 49. This gives 48 working stitches.
The bodice back is worked identically to the front but without sweetheart neckline shaping.
Step by step: Using Color A and hook E-4, chain 49.
- Round 1
(RS): Sc in second ch from hook and in each ch across. Turn. (48 sc)
- Round 2
(WS): Ch 1, sc in each st across. Turn. (48 sc) Now establish the chevron pattern. The bodice front uses 4 full chevron repeats across 48 stitches.
- Round 3
(RS, chevron begins): Ch 1. Work (sc2tog, sc in next 3 sts, 3 sc in next st, sc in next 4 sts, sc2tog) 4 times. Turn. (48 sc)
- Round 4
through 24: Ch 1. Work (sc2tog, sc in next 3 sts, 3 sc in next st, sc in next 4 sts, sc2tog) 4 times. Turn. (48 sc)Step by step: Rows 25 through 30 (waist shaping): Same as front.
Work (sc2tog, sc in next 2 sts, 3 sc in next st, sc in next 4 sts, sc2tog) 4 times. Turn. (44 sc)through 30: Continue with 44 stitch pattern. Turn. (44 sc) Fasten off, leaving a long tail for seaming.
Section 5: Waistband
Using Color B and hook E-4, chain 121.
- Round 1
Sc in second ch from hook, sc in each ch across. Turn. (120 sc)
- Round 2
through 4: Ch 1, sc in each st across. Turn. (120 sc) Fasten off after Row 4. The waistband strip measures approximately 26 inches long by 0.8 inches tall.Center the waistband strip around the waist of the joined bodice. Position the long edge at the junction between the bodice body and where the ruffles will attach. Sew or slip stitch the waistband to the bodice, overlapping at center front so the ends form bow tails.
Section 6: Ruffle Tier 1 (Peplum, Color A)
The waist circumference at attachment is 88 stitches total (44 stitches times 2 sides joined).
With RS facing and Color A, join yarn at right side seam of waist lower edge.
- Round 1
Sc 2 in each st around. (176 sc) Work all rounds in the round with RS facing.
- Round 2
through 8: Sc in each st around. (176 sc per round) Work shell scallop edging on final round, adjusting to a multiple of 6 stitches for clean shell math.
Waist Shaping
On Rows 25 through 30, reduce stitch count slightly to shape the waist.
- Round 25
(decrease): Work (sc2tog, sc in next 2 sts, 3 sc in next st, sc in next 4 sts, sc2tog) 4 times. Turn. (44 sc)
- Round 26
through 30: Continue with 44 stitch chevron pattern. Turn. (44 sc) Fasten off, leaving a long tail for seaming.
Checkpoint: Your bodice front should measure approximately 7 inches from top to bottom and about 9.5 inches wide unstretched. The four chevron peaks and valleys should be clearly visible.
Back Neckline Scallop Edging
With RS facing, attach Color A to top right corner of bodice back. Work across the top edge: sl st in first st, (skip 2 sts, 5 dc in next st, skip 2 sts, sl st in next st) across. Fasten off. (8 shells across 48 stitches)
Front Neckline Scallop Edging
With RS facing, attach Color A to top right corner of bodice front. Work scallop edge identically to back. Fasten off. (8 shells)
Section 3: Join Side Seams
Lay bodice front and back with wrong sides together. Using yarn needle and Color A, whipstitch or mattress stitch the side seams from underarm to waist on both sides. Leave the top open for the neckline and the bottom open for skirt attachment.
After joining, the dress body forms a tube at the waist with circumference of approximately 19 inches when lightly blocked.
Section 4: Spaghetti Straps
Make 2 straps in Color A.
Each strap: Chain 41 (approximately 7 inches). Sl st in second chain from hook, sl st in each chain across. Fasten off, leaving tails for attachment. (40 sl sts)
Attach one end of each strap to the top front corners of the bodice at the outer peaks of the chevron. Attach the other end to the corresponding back corners. Sew securely with yarn needle.
Bow Center Piece
Using Color B, chain 11. Sc in second ch from hook, sc in each ch across. Turn. (10 sc)
Work 4 rows of 10 sc. Fasten off.
Wrap this small piece around the center of the waistband knot. Sew the ends together at the back to form the classic bow center knot appearance.
Section 7: Ruffle Tier 2 (Color B, Sage Green)
Attach Color B to the lower edge of Tier 1. Work the tier body same as Tier 1, maintaining the gathered fullness. End with shell scallop edging.
Section 8: Ruffle Tier 3 (Color C, Pale Yellow)
Attach Color C to the lower edge of Tier 2. Work same as previous tiers. End with shell scallop edging.
Section 9: Ruffle Tier 4 (Hem, Color D, White)
Attach Color D to the lower edge of Tier 3. Work same as previous tiers. End with shell scallop edging.
Fasten off and weave in all ends.
Assembly Instructions
- Step 1 Sew the small daisy button to center front neckline between the two chevron peaks.
- Step 2 Block the entire dress lightly. Lay flat on blocking mat, gently shape the ruffles, and allow to dry completely.
Important Notes
- 💡 Swatch first with Color A using the chain-22 method — this dress relies on a precise 18 stitches to 4 inches gauge, and being off by even one stitch per inch will shift the finished chest size noticeably.
- 💡 Use at least 6 stitch markers to track your chevron repeats across the bodice front and back; losing your place mid-repeat is the single biggest cause of uneven bodice texture.
- 💡 Keep each ruffle tier's yarn in a separate small bag or bowl while you work Tiers 2 through 4, since Colors B, C, and D can tangle together if left loose in your project bag.
- 💡 Block the shell stitch scallop edges on all four ruffle tiers before final assembly — this is what gives that crisp, boutique-quality scalloped look rather than a curled, homemade edge.
- 💡 Sew the daisy button on last, after blocking and after the front neckline scallop edging is complete, so you can center it precisely against the finished neckline shape.
- 💡 Since this is a child's garment, choose a machine washable DK yarn and avoid superwash wool — the ruffle tiers need body and structure to hold their shape through wash cycles.
Common Mistakes and Fixes
- Losing track of the chevron stitch pattern and ending up with mismatched peaks and valleys on the bodice.
Place a stitch marker at the start of each chevron repeat and count your increase and decrease stitches every single row until the rhythm feels automatic.
- Joining the side seams with the front and back bodice panels twisted or mismatched at the underarm.
Lay both pieces flat and pin the top edges together before seaming so the chevron pattern lines up and the armholes sit evenly.
- Working the shell stitch scallop edging too tightly, causing the ruffle hem to cup inward instead of lying flat.
Use a slightly larger hook just for the scallop row, or consciously work each double crochet with a relaxed tension, then block the edge flat with pins before it fully dries.
- Carrying yarn incorrectly across color changes between the four ruffle tiers, leaving visible strands or bulky knots on the inside.
Cut yarn at the end of each tier, leave a 6-inch tail, and weave ends in along the color change line rather than carrying yarn up the inside of the dress.
- Skipping the gauge swatch and ending up with a bodice that doesn't match the 20-inch chest measurement.
Chain 22 with Color A, work single crochet for 20+ rows, block lightly, and measure the center 4 inches before committing to the full bodice.
- Attaching the spaghetti straps at uneven lengths or in the wrong spot, causing the neckline to gape or pull to one side.
Try the bodice on the child (or measure against a similar garment) before sewing straps permanently, and pin both straps in place to compare lengths side by side first.
Variations
- This dress is begging for a seasonal color remix. Swap Color A's bright yellow for a soft lavender, Color C's pale yellow for blush pink, and keep the white hem for a spring garden party look. For an autumn version, try rust orange, deep olive, and cream tones using Scheepjes Softfun for that cotton-acrylic drape. Want a beach vibe? Work all four tiers in shades of blue and aqua, from navy at the waist to the palest sky blue at the hem, and swap the daisy button for a tiny seashell charm. For sizing, this pattern is written for the 2-3 year range at a 20-inch chest, but you can size down for a doll or 18-inch stuffed friend by using a smaller hook like a US D-3 (3.25mm) with fingering weight yarn and working a shorter bodice with fewer rows before starting the ruffle tiers. To size up toward a 3-4T fit, add one extra chevron repeat width to the bodice front and back before joining side seams, and add a few more rows to each ruffle tier to maintain proportion. Yarn-wise, Pound of Love is a budget-friendly workhorse if you're making multiples as gifts, while Paintbox Simply DK gives you that soft acrylic hand in easy skein counts. If you want extra drape in the ruffle tiers specifically, work just those sections in Scheepjes Softfun even if you use a different yarn for the bodice — the cotton blend really lets the shells cascade. For a holiday-adjacent variation without going full theme, try deep red, forest green, cream, and gold for a festive twist that still reads as an everyday dress.
- I adore how this dress tricks you into thinking it's complicated when really it's just satisfying pieces stacked one on top of the other. There's something so meditative about working that chevron bodice — watching the peaks and valleys form row after row never gets old. Then you get to the fun part: four ruffle tiers, each one a fresh color, each one finished with a shell stitch scallop that curls up so prettily along the edge. The sage green waistband with its tie-front bow is my favorite detail; it cinches the waist and gives the whole dress a boutique finish that looks so much harder than it actually is. And that little daisy button at the neckline? Pure charm. I also love that this pattern stretches your skills without overwhelming you — you're joining pieces, shaping a waist, managing color changes, and executing shell edging, all skills that carry over beautifully into your next wearable project. By the time you weave in that last end, you'll feel like a genuinely more confident crocheter.
Frequently Asked Questions
What size child does this dress fit?
This pattern is written for children approximately 2 to 3 years old, with a 20-inch chest and 19-inch waist. The finished length from shoulder to hem is about 17 inches.
Can I substitute a different yarn brand for this dress?
Yes, any DK weight yarn that achieves the listed gauge will work well. Just avoid yarns with a lot of stretch, like pure superwash wool, since the ruffle tiers need to hold their shape.
Do I need to know chevron stitch before starting?
You should be comfortable executing chevron or ripple stitch correctly, since it forms the entire bodice texture. If you've only worked basic stitches so far, this pattern makes a great stretch project if you go slowly and read through all the instructions first.
How long does this dress actually take to make?
Plan for approximately 15 to 22 hours total, spread across multiple sessions. The bodice takes roughly 5 to 7 hours on its own, with the waistband and bow adding about 1 more hour.
Is this a good pattern for using up scrap DK yarn?
It can be, since each ruffle tier uses a distinct color, making it easy to substitute leftover DK weight skeins for Colors B, C, or D. Just be sure Color A for the bodice has enough consistent yardage for the full chevron texture.
Original pattern: https://crochetwithmia.com/lemon-garden-tiered-ruffle-dress-free-crochet-pattern/
About the Author

Marisol QuinteroWho runs Crochet Obsessed, why a stitch count sits at the end of every round, how a pattern gets written here, and the things this site will never do.
More Patterns
- IntermediateNo. 01

Slouchy everyday beanie worked flat in half double crochet
Crochet beanie pattern for a slouchy everyday look worked flat with hdc rows, then seamed into a soft,…
- IntermediateNo. 02
Crochet amigurumi doll with dress, shoes, and hat
Crochet amigurumi doll pattern with dress, shoes, and hat details for a soft, huggable keepsake you build one…
- IntermediateNo. 03
Chunky moss stitch crochet sweater with raglan-free shoulders
Chunky crochet sweater pattern using moss stitch, worked flat with a 10mm hook for a soft, fast, cool-weather…


