- LevelIntermediate
- Time4-6 hours
- Hook3.0 mm
- YarnSport/Light Worsted
About This Pattern
This one has that quiet, unhurried feeling of rolling up something small and watching it become something bigger. I think of it as a project that rewards patience in short bursts. You work flat strips, then you watch them transform into curls, and that shift from flat to dimensional is the whole charm here.
Your hands get three different jobs instead of one repeated motion. There is the tight, careful rolling of the center strip, the rhythm of single crochet and half double crochet building up petal clusters, and then the slower, almost sculptural work of curling and sewing each layer into place. It keeps your attention without ever asking for anything technically scary.
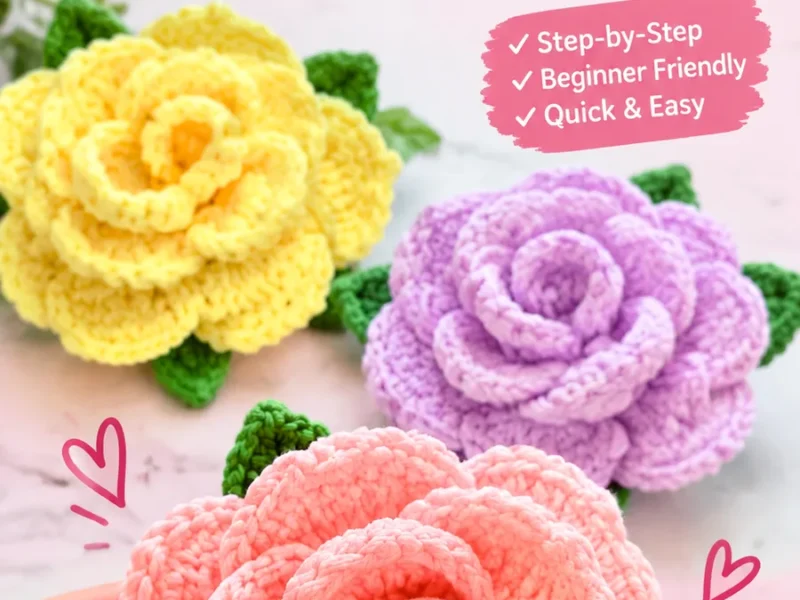
Set on a windowsill or tucked into a bowl with a couple of its siblings, this rose holds its shape instead of flopping flat. The layered petals catch light differently than a single flat flower would. It reads as handmade in the best way, with a little imperfection in every curl that a machine could never fake.
- Chain and work a simple strip for the rose center, then roll it tightly and stitch the base to hold the coil.
- Chain and crochet the inner petal layer, building small petal clusters along the second row for texture.
- Curl the inner petal strip around the finished center and sew it into place along its base.
- Chain and work the middle petal layer with its own row of petal clusters, slightly wider than the inner strip.
- Wrap the middle layer around the inner petals and stitch it securely at the base.
- Repeat the same chain, cluster, and wrap process for the outer petal layer, the largest of the three.
- Arrange all three petal layers by hand so they fan outward instead of sitting flat against each other.
- Block the finished rose lightly to help the petals hold their curl and definition.
On the desk
- Sport or light worsted yarn in rose, pink, yellow, cream, or any preferred flower color
- Small amount of green yarn for optional leaves
- 3.0 mm crochet hook (US C-2)
- Yarn needle for sewing pieces together
- Scissors
- Stitch marker or removable clip
Stitch shorthand
- ch — chain
- sl st — slip stitch
- sc — single crochet
- hdc — half double crochet
- dc — double crochet
- inc — increase, work 2 stitches into the same stitch
- st — stitch
- rep — repeat
Layered crochet rose with curled petals and a coiled center
Crochet Rose Center
Ch 18.
- Round 1
Starting in the second chain from hook, work 2 sc in each chain across. (34 sts)Fasten off, leaving a long sewing tail.
Roll the strip tightly from one end to create the flower center. Sew the base securely.
Inner Petal Layer
Ch 20.
- Round 1
Starting in second chain from hook, work 1 sc in each stitch across. (19 sts)
- Round 2(6)
Ch 1, turn. Work 1 sc in first stitch, then work petal clusters across the row, placing 1 cluster in every third stitch. Finish with sc stitches as needed. (6 petal clusters)Fasten off and gently curl the strip around the center. Sew in place.
Middle Petal Layer
Ch 28.
- Round 1
Starting in second chain from hook, sc across. (27 sts)
- Round 2
Ch 1, turn. Work 1 sc, then create 8 petal clusters evenly across the row. Fasten off and wrap around the inner petals. Stitch securely.
Outer Petal Layer
Ch 36.
- Round 1
Starting in second chain from hook, sc across. (35 sts)
- Round 2
Ch 1, turn. Work 1 sc, then create 10 petal clusters evenly across the row. Fasten off and arrange the strip around the flower base.Sew the outer layer firmly while spreading petals outward.
Special Stitch Explanation
Petal cluster: Work 1 sc, 1 hdc, 2 dc, 1 hdc, and 1 sc into the same stitch. This creates a rounded petal bump.
Optional Crochet Leaves
Ch 8.
Starting in second chain from hook, work sl st, sc, hdc, dc, hdc, sc, sl st across.
Fasten off and make 2 to 3 leaves.
Sew leaves behind the rose.
Blocking and Shaping
Lightly steam or mist the petals and shape them with your fingers. Allow the flower to dry naturally while arranged in the desired position. Avoid flattening the petals because the layered texture creates the rose effect.
Where it goes
- Pin or sew one onto a canvas tote for a soft, handmade accent that pairs well with denim or linen fabric.
- Group two or three roses with crochet leaves for a small decorative bouquet to set on a shelf or desk.
- Attach a single rose to a gift box ribbon for a dimensional topper instead of a flat bow.
- Stitch a rose onto a headband or hair clip base for a textured accessory that holds its shape.
Color ideas
- Classic rose and leaf Work the center and all three petal layers in rose or pink yarn, then use the small amount of green yarn for the optional leaves to frame the base of the flower.
Care
Hand wash acrylic or cotton-blend roses in cool water if needed, since both fibers listed here tolerate gentle washing better than delicate yarns.
Reshape the petals by hand while the piece is still slightly damp, then let it air dry flat so the curls set in place.
Store finished roses away from moisture and dust, tucking them into a box or drawer rather than leaving them exposed on an open shelf.
Assembly
- Step 1 For the best results, gently arrange the rose after sewing all layers together. A small amount of blocking can improve petal definition and help the flower maintain its shape.
- Step 2 Store finished crochet roses away from moisture and dust. If cleaning is needed, follow the care instructions for your chosen yarn. Cotton and acrylic yarns are usually easier to maintain than delicate fibers.
Easy to get wrong
Rolling the center strip too loosely
Keep steady tension as you roll the center strip so the coil stays compact, then sew through several layers at the base, not just the outer edge, to lock it tight.
Spacing petal clusters unevenly
Count stitches as you place each cluster rather than eyeballing the spacing, since uneven clusters make one side of a petal layer bulkier than the other.
Sewing petal layers flat instead of curled
Curl each strip into a loose spiral before you sew the base, so the petals stand up and overlap rather than lying in a flat ring around the center.
Between the songs
- What makes this rose satisfying is the contrast built into the stitches themselves. You are using single crochet, half double crochet, and double crochet within the same petal rows to create height variation, so the clusters naturally dome and curl without any special shaping stitches. The center starts as a plain strip of double single crochet that you roll and sew, which feels almost like a magic trick the first time you do it. Then each petal layer, inner, middle, and outer, gets wrapped around the one before it, so the rose grows outward in your hands rather than in your imagination. By the time the outer layer goes on, you can see the whole structure holding itself together.
Listener questions
Can I make this rose with cotton yarn instead of acrylic?
Yes, cotton or a cotton blend works well since both are named in the materials list for this pattern. Cotton tends to hold a crisper petal edge, while acrylic feels a touch softer in hand.
Do I need to crochet the leaves to finish the rose?
No, the leaves are listed as optional in this pattern. The rose is complete with just the center and the three petal layers sewn together.
Why does my petal layer look flat instead of curled?
This usually happens when the strip is sewn onto the previous layer without curling it first. Gently curl the strip into a loose spiral by hand before stitching the base in place.
What hook size does this pattern actually call for?
The materials list calls for a 3.0 mm hook, listed as US C-2. That smaller size is what keeps the petal edges firm enough to hold their curl.
Can I use a stitch marker to track the petal clusters?
Yes, a stitch marker or removable clip is listed in the materials for exactly this purpose. Clipping it at the start of each cluster row helps you keep the spacing even across the strip.
Original pattern: https://duniarecipe.com/easy-crochet-rose-pattern-tutorial-for-beautiful-handmade-flowers/
About the Author

Marisol QuinteroWho runs Crochet Obsessed, why a stitch count sits at the end of every round, how a pattern gets written here, and the things this site will never do.
More Patterns
- IntermediateNo. 01

Rose Granny Square Tote Crochet Pattern
Rose granny square tote crochet pattern made from 18 dimensional rose squares for a sturdy, romantic everyday bag.
- IntermediateNo. 02
Tropical octopus baby blanket crochet pattern with appliqués
Tropical octopus baby blanket crochet pattern: a cream filet base with coral and turquoise octopus appliqués, leaves, and…
- IntermediateNo. 03
Sunny lemon couple amigurumi crochet pattern
Sunny lemon couple amigurumi crochet pattern with embroidered slices and safety eyes for a cheerful handmade shelf pair.


