- LevelIntermediate
- Time4-6 hours
- Hook9.0 mm
- YarnChunky
About This Pattern
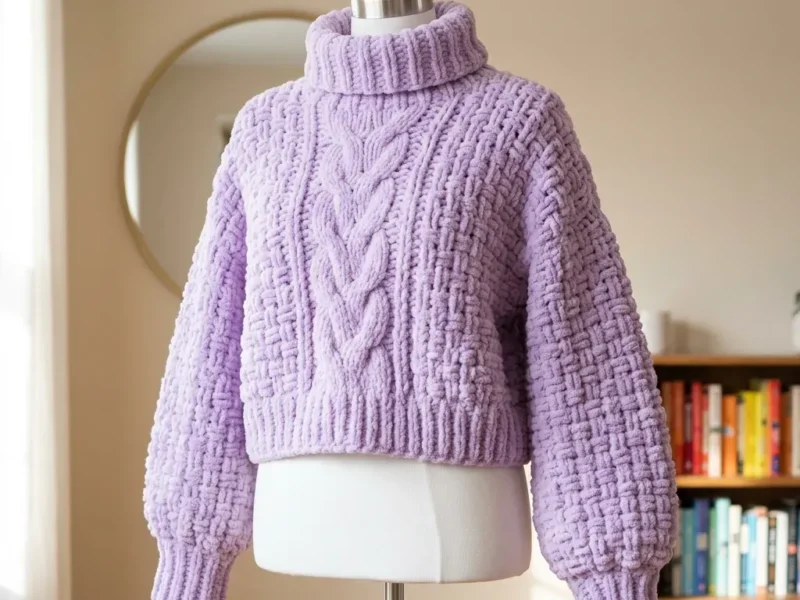
This sweater has the hushed, cozy mood of a Sunday with nowhere to be. The lavender or dusty lilac yarn keeps it soft-spoken, while the woven texture across the body and sleeves gives it just enough presence to feel intentional. It reads boxy and modern, not homespun.
Your hands spend most of this project learning to read posts instead of tops. Front post and back post double crochet ask you to wrap around the stitch stem, and the mock cable panel adds a moment of crossing FPdc pairs without ever touching a cable needle. It rewards patience over speed.
Picture this folded over a chair by the door, turtleneck collar slouched down, waiting for a cooler morning. In a room it reads like a piece pulled from a boutique rack, not a craft table. The thick chenille or blanket yarn makes it look expensive to the eye and feel soft to the hand.
- Start each ribbed section with the smaller hook, working short rows back and forth until the strip reaches its full length.
- Rotate the finished ribbing and pick up stitches along its long edge to build the body upward with the larger hook.
- Work the basket weave rows across the body sides and sleeves, alternating front post and back post blocks row by row.
- Center the eight-stitch cable panel on the front piece, crossing the FPdc pairs only on the designated right-side row.
- Repeat the plain FPdc and BPdc rows between crossings to let the cable column breathe and stay defined.
- Shape the sleeves using the same basket weave logic before seaming them into the body.
- Work the turtleneck collar and attach it once the body and sleeve pieces are seamed together.
- Block every piece flat before final seaming so the post stitch texture sits evenly.
On the desk
- Front post double crochet (FPdc) and back post double crochet (BPdc)
- Working in rows and counting stitches accurately
- Seaming pieces together
- If post stitches are new to you, I recommend practicing on a small swatch first. Once you understand how to wrap your hook around the post of a stitch instead of working into the top loops, the rest clicks into place.
Recommended yarn options
- Bernat Blanket Yarn (300g / 220 yards per skein) in Lavender or Lilac. You will need approximately 4 skeins.
- Paintbox Yarns Simply Chunky (200g / 218 yards) in Dusty Lilac or Vintage Pink. You will need 4 skeins.
- Lion Brand Thick and Quick in any chenille or velvet texture lavender colorway.
- Avoid fluffy mohair-type yarns. They will obscure the beautiful post stitch texture that makes this sweater special.
- US Size N-13 / 9.0 mm hook for the body and sleeves
- US Size L-11 / 8.0 mm hook (one size smaller) for the ribbing sections to keep them firm and stretchy
- Yarn needle for seaming and weaving in ends
- 4 to 6 stitch markers
- Measuring tape
- Rust-proof pins for blocking
Stitch shorthand
- ch — chain
- sl st — slip stitch
- sc — single crochet (insert hook, yarn over, pull up loop, yarn over, pull through both loops)
- dc — double crochet (yarn over, insert hook, yarn over, pull up loop, yarn over, pull through 2 loops, yarn over, pull through remaining 2 loops)
- FPdc — front post double crochet (yarn over, insert hook from front to back to front around the post of the stitch below, complete as dc)
- BPdc — back post double crochet (yarn over, insert hook from back to front to back around the post of the stitch below, complete as dc)
- st(s) — stitch(es)
- RS — right side (the public-facing side)
- WS — wrong side
- rep — repeat
- t-ch — turning chain
- BLO — back loop only
- dc2tog — double crochet two together (a decrease that combines 2 stitches into 1)
- Important note — Throughout this entire pattern, the turning chain of 2 does NOT count as a stitch. Always work your first dc into the first stitch at the base of the turning chain.
Lavender chunky knit-look sweater with cable panel
Basket Weave Stitch (BW)
This stitch creates the woven textured panels visible on the body sides, sleeves, and back. It alternates raised columns using front post and back post double crochets.
Set-up row (RS): Work dc across all stitches.
- Round 1
RS, BW Ch 2, turn. (FPdc over next 2 sts, BPdc over next 2 sts) across to last st, dc in last st.
- Round 2
(WS): Ch 2, turn. (BPdc over next 2 sts, FPdc over next 2 sts) across to last st, dc in last st.
- Round 3
(RS): Ch 2, turn. (BPdc over next 2 sts, FPdc over next 2 sts) across to last st, dc in last st.
- Round 4
(WS): Ch 2, turn. (FPdc over next 2 sts, BPdc over next 2 sts) across to last st, dc in last st.Rows 1 through 4 form the pattern repeat. The weave switches direction every two rows, creating that characteristic woven grid texture.
Ribbing (RIB)
- Round 1
Ch 2, turn. (FPdc in next st, BPdc in next st) across. Repeat Row 1 for all ribbing sections.
Back Panel
Hem Ribbing: With smaller hook, ch 9.
Foundation Row: Sc in 2nd ch from hook and in each ch across. (8 sc)
Ribbing Row: Ch 1, turn. Sc in back loop only (BLO) of each sc across. (8 sc)
Repeat Ribbing Row until ribbing measures 21 inches / 53 cm. Do not fasten off. Rotate ribbing 90 degrees to work across the long edge.
Body Pickup Row (RS): With primary hook, ch 2. Work 52 dc evenly across the long edge of the ribbing. (52 dc)
Set-up Row 2 (WS): Ch 2, turn. Dc in each st across. (52 dc)
Begin Basket Weave:
Work BW Rows 1 through 4 across all 52 sts. Repeat BW Rows 1 through 4 until back body measures approximately 11 inches / 28 cm from the pickup row. End on a WS row.
Armhole Shaping:
- Round 1
(RS): Sl st across first 5 sts, ch 2, work in BW pattern across to last 5 sts, leave last 5 sts unworked. (42 sts)Row 2 (WS): Ch 2, turn. Dc2tog over first 2 sts, work in BW pattern to last 2 sts, dc2tog. (40 sts)
Row 3 (RS): Ch 2, turn. Dc2tog, work in BW pattern to last 2 sts, dc2tog. (38 sts)Row 4 (WS): Ch 2, turn. Work even in BW pattern across. (38 sts) Work even in BW pattern on 38 sts until armhole measures approximately 8 inches / 20 cm from the first armhole row. Fasten off.
Shoulder Shaping:
Rejoin yarn at right edge. Work across first 12 sts in pattern. Turn. Ch 2, turn. Work across 12 sts. Fasten off.
Skip center 14 sts (back neckline). Rejoin yarn at left shoulder section and work across final 12 sts. Fasten off.
Sleeves (Make 2)
Cuff Ribbing: With smaller hook, ch 9.
Foundation Row: Sc in 2nd ch from hook and in each ch across. (8 sc)
Ribbing Row: Ch 1, turn. Sc in BLO of each sc across. (8 sc)
Repeat until cuff ribbing measures 8 inches / 20 cm. Rotate 90 degrees.
Cuff Pickup Row (RS): With primary hook, ch 2. Work 20 dc evenly across long edge of cuff. (20 dc)
Set-up Row 2 (WS): Ch 2, turn. Dc across. (20 dc)
Sleeve Increase Section: Begin BW pattern. Work 2 rows even. (20 sts)
Increase Row (RS): Ch 2, turn. 2 dc in first st, work BW pattern to last st, 2 dc in last st.
Work increase rows following this schedule, with 3 even rows between each: Inc Row 1: (22 sts)
Inc Row 2: (24 sts)
Inc Row 3: (26 sts)
Inc Row 4: (28 sts)
Inc Row 5: (30 sts)
Inc Row 6: (32 sts)
Inc Row 7: (34 sts)
Inc Row 8: (36 sts)
Inc Row 9: (38 sts)
Inc Row 10: (40 sts)
Inc Row 11: (42 sts)
Continue even on 42 sts until sleeve measures approximately 18 inches / 46 cm from cuff pickup row. End on WS row.
Sleeve Cap Shaping:
- Round 1
(RS): Sl st across first 5 sts, ch 2, work in BW pattern to last 5 sts, leave unworked. (32 sts)
- Round 2
through 9: Ch 2, turn. Dc2tog, work in pattern to last 2 sts, dc2tog. (Decrease by 2 sts each row)
After Row 9, you should have 16 sts remaining. Fasten off.
Make second sleeve identically.
Turtleneck Collar
Join yarn at right shoulder seam on RS of neckline. Pick up and work dc evenly around entire neckline opening. (approximately 40 dc total)
- Round 1
Sl st to first dc to join. Ch 2, (FPdc in next st, BPdc in next st) around. Sl st to first FPdc to join. (40 sts)Work in ribbing for approximately 25 rounds until collar measures 10 inches / 25 cm unfolded. Fasten off and weave in ends.
The collar folds in half downward to produce the finished 5-inch turtleneck.
Front Panel
Hem Ribbing: Work identical to Back Hem Ribbing until ribbing measures 21 inches / 53 cm.
Body Pickup Row (RS): With primary hook, ch 2. Work 52 dc evenly across long edge. (52 dc)
Set-up Row 2 (WS): Ch 2, turn. Dc across. (52 dc)
The front is divided into three zones: Left BW zone: 22 sts Center CP zone: 8 sts Right BW zone: 22 sts Place markers at st 22 and st 30 to mark Cable Panel boundaries.
Front Body Row 1 (RS, Cable Panel Row A):
Ch 2, turn. Work BW Row 1 pattern across first 22 sts. Work Cable Panel Row A across center 8 sts. Work BW Row 1 pattern across final 22 sts. (52 sts total)
Front Body Row 2 (WS, Cable Panel Row B):
Ch 2, turn. Work BW Row 2 across first 22 sts. BPdc across center 8 CP sts. Work BW Row 2 across final 22 sts. (52 sts)
Front Body Row 3 (RS, Cable Panel Row C):
Ch 2, turn. Work BW Row 3 across first 22 sts. FPdc across center 8 CP sts. Work BW Row 3 across final 22 sts. (52 sts)
Front Body Row 4 (WS, Cable Panel Row D):
Ch 2, turn. Work BW Row 4 across first 22 sts. BPdc across center 8 CP sts. Work BW Row 4 across final 22 sts. (52 sts)
Continue repeating Rows 1 through 4 until front body measures approximately 11 inches / 28 cm from pickup row. End on a WS row.
Armhole Shaping: Work identical to Back armhole shaping, maintaining established pattern. End with 38 sts.
Work even on 38 sts in established pattern until armhole measures approximately 5.5 inches / 14 cm. End on WS row.
Front Neckline Shaping:
Row 1 (RS): Ch 2, turn. Work across first 14 sts in pattern. Turn, leaving remaining sts unworked. (14 sts)
Right Shoulder Continuation: Row 2 (WS): Ch 2, turn. Dc2tog, work across. (13 sts)
Row 3 (RS): Ch 2, turn. Work across to last 2 sts, dc2tog. (12 sts)
Row 4 (WS): Ch 2, turn. Work even. (12 sts) Work even on 12 sts until armhole measures 8 inches / 20 cm. Fasten off.
Skip center 10 sts. Rejoin yarn at left shoulder (last 14 sts).
Left Shoulder: Row 1 (RS): Ch 2. Work across 14 sts. (14 sts)
Row 2 (WS): Ch 2, turn. Work across to last 2 sts, dc2tog. (13 sts)
Row 3 (RS): Ch 2, turn. Dc2tog, work across. (12 sts)
Row 4 (WS): Ch 2, turn. Work even. (12 sts) Work even until armhole matches back armhole depth. Fasten off.
Where it goes
- A layering piece over a plain tee for cool office days paired with straight-leg denim.
- An easy throw-on for coffee runs, worn open over a simple tank top and leggings.
- A statement piece for a casual weekend outfit paired with wide-leg trousers and boots.
- A cozy work-from-home top layered over a turtleneck for an extra-relaxed silhouette underneath.
Color ideas
- Soft Lavender Monochrome Work the entire body, sleeves, ribbing, and turtleneck collar in a single Lavender or Lilac skein family for an unbroken tonal look.
Care
Hand wash in cool water with a wool wash, since chenille and blanket-style yarns can mat under agitation.
Lay the sweater flat to dry rather than hanging it wet, so the weight of the thick yarn does not stretch the shoulders and hem.
Store it folded rather than on a hanger to keep the basket weave texture and collar shape from sagging over time.
Assembly
- Step 1 Block all pieces before seaming for best results. Soak in cool water with wool wash for 15 to 20 minutes. Press out water gently without wringing. Lay flat on blocking mats and pin to measurements. Allow to dry completely.
- Step 2 For care, machine wash cold on gentle cycle in a mesh bag. Tumble dry on low or lay flat to dry. Do not hang wet, as the weight will stretch the fabric.
Easy to get wrong
Losing count inside basket weave blocks
Place a stitch marker every four stitches before you start Row 1 so the FPdc and BPdc blocks stay aligned across all rows.
Crossing the cable on the wrong row
Mark Cable Panel Row A on your row tracker since the cross happens only once every fourth right-side row, not every row.
Between the songs
- The satisfaction here is textural. Basket weave stitch is only two techniques, front post and back post double crochet, alternated in blocks, but the visual payoff looks far more advanced than the actual footwork. The mock cable panel is the quiet showpiece: you cross FPdc stitches behind an already-worked pair every fourth right-side row, and suddenly there is a cable column with zero cable needle involved. Working the ribbing on the smaller L-11 hook while the body stays on the bigger N-13 also teaches you how hook size alone can control drape versus structure. By the end you understand post stitches from the inside out.
Listener questions
Do I need a cable needle for the front panel?
No, the mock cable effect comes entirely from crossing FPdc stitches behind an already-worked pair. It looks like a true cable but uses no extra tool.
Can I use mohair or another fuzzy yarn instead?
I would not recommend it. Fluffy mohair-type fibers blur the raised post stitch lines that make the basket weave and cable panel readable, so a smoother chenille, velvet, or plain chunky yarn works much better.
How do I know if I am working the FPdc or BPdc correctly?
Front post means you wrap your hook around the stitch post from the front and back post means from the back, never into the top loops. If new to this, practice a small swatch until the wrap feels automatic before starting the sweater.
How many skeins should I buy for this sweater?
Plan on about 4 skeins whether you choose Bernat Blanket Yarn or Paintbox Simply Chunky, since both are listed at that quantity in the materials. Buying from the same dye lot helps keep the basket weave texture looking even.
Original pattern: https://crochetwithmia.com/soft-lavender-chunky-knit-sweater-free-crochet-pattern/
About the Author

Marisol QuinteroWho runs Crochet Obsessed, why a stitch count sits at the end of every round, how a pattern gets written here, and the things this site will never do.
More Patterns
- IntermediateNo. 01

Slouchy everyday beanie worked flat in half double crochet
Crochet beanie pattern for a slouchy everyday look worked flat with hdc rows, then seamed into a soft,…
- IntermediateNo. 02
Crochet amigurumi doll with dress, shoes, and hat
Crochet amigurumi doll pattern with dress, shoes, and hat details for a soft, huggable keepsake you build one…
- IntermediateNo. 03
Chunky moss stitch crochet sweater with raglan-free shoulders
Chunky crochet sweater pattern using moss stitch, worked flat with a 10mm hook for a soft, fast, cool-weather…


