- LevelIntermediate
- Time4-6 hours
- Hook4 mm
- YarnBulky
About This Pattern
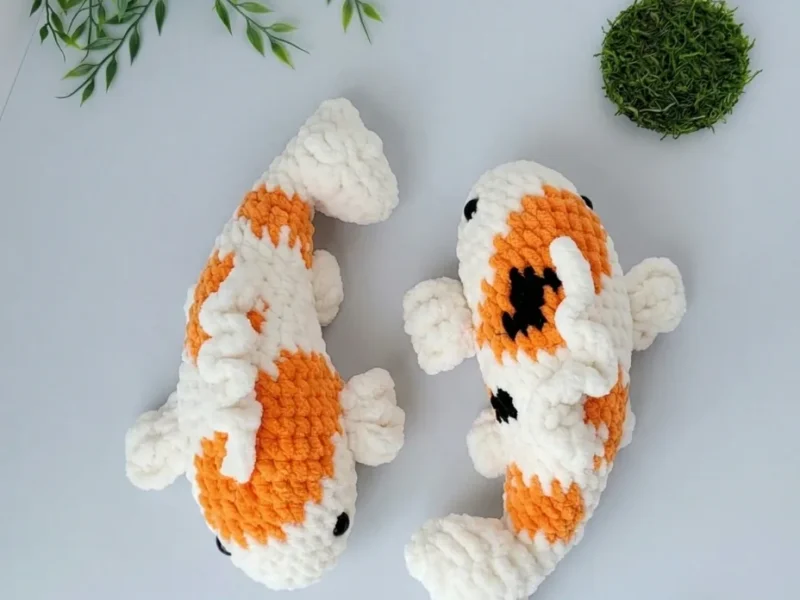
There is something calm about this one, like watching fish move slow circles in still water. The cream body and orange spots keep the palette quiet even while the shape does something unexpected. It is a plush toy that behaves like a small sculpture once it is stuffed and sitting on a shelf.
Finished, the koi sits with its tail curved and its ridge standing up along its back, looking like it just paused mid-swim. It reads well on a windowsill, a bookshelf, or tucked among other soft toys on a bed. The two large fins and two small fins give it just enough lift to look like it is still moving.
This pattern is written in US crochet terminology and produces a finished koi measuring approximately 8 inches (20 cm). Gauge is not critical, but your fabric should be tight enough that the fiberfill doesn't show through — go down a hook size if your stitches feel loose.
- Start the body at the mouth end with a small foundation chain and build outward in a continuous spiral, stuffing gradually as the rounds grow.
- Work the increase and decrease rounds without joining or turning, tracking the start of each round with a stitch marker.
- Set safety eyes into the head section before the body closes up too far to reach inside comfortably.
- Fold and seam the tail directly onto the closing chain at the body's end so no separate attachment step is needed.
- Slip stitch along the center top of the body across the marked rounds, then build the dorsal ridge upward with clustered double crochet stitches.
- Make the two large fins and two small fins separately, then pin and position them along the lower eye line and toward the tail.
- Knot and tuck every yarn tail inside the body as you finish each piece, sealing plush yarn ends with a lighter where needed.
On the desk
- Yarn (main color): Yarnart Dolce or Himalaya Dolphin Baby — 100 g / 120 m — cream/milk (Dolce #745) — or substitute any plush bulky-weight yarn in white or cream
- Yarn (spots): Himalaya Dolphin Baby — 100 g / 120 m — orange (#80316)
Hook
- US G-6 / 4 mm
Safety eyes
- 10 mm — 2 pieces
Stuffing
- Fiberfill / polyfill
Stitch Markers
- thin contrasting yarn works well for marking rounds
Other Supplies
- Scissors
- Lighter (for sealing plush yarn ends)
- Yarn needle / tapestry needle
Stitch shorthand
- ch — Chain
- dc — Double Crochet
- dec — Invisible Decrease
- dtr — Double Treble Crochet (4 loops on hook)
- hdc — Half Double Crochet
- inc — Increase (2 sc in same stitch)
- MR — Magic Ring
- sc — Single Crochet
- sl st — Slip Stitch
- tr — Treble Crochet
Koi carp amigurumi: a plush fish crochet pattern
Body
Begin with main color (cream). Stuff as you go.
- Round 1
Foundation chain of 3 ch. In the 2nd ch from hook: 1 sc, then 3 sc in the last ch (corner). Working along the second side of the foundation chain: 2 sc in the last stitch. (6)
- Round 2
Inc in each st around. (12)
- Round 3
(1 sc, inc) × 6. (18)
- Round 4
Sc in each st around. (18)
- Round 5
(2 sc, inc) × 6. (24)
- Round 6
24 sc total — cream: 16 sc; orange: 3 sc; cream: 5 sc. (24)
- Round 7
(3 sc, inc) × 6, worked as follows — cream: (3 sc, inc) × 3, 3 sc; orange: inc, 3 sc, inc; cream: 3 sc, inc. (30)Place safety eyes between Rounds 5 and 6, spaced 10 stitches apart.
- Round 8
30 sc total — cream: 17 sc; orange: 8 sc; cream: 5 sc. (30)
- Round 9
30 sc total — cream: 16 sc; orange: 8 sc; cream: 6 sc. (30)
- Round 10
30 sc total — cream: 16 sc; orange: 8 sc; cream: 6 sc. (30)
- Round 11
30 sc total — cream: 15 sc; orange: 8 sc; cream: 7 sc. (30)
- Round 12
30 sc total — cream: 14 sc; orange: 8 sc; cream: 8 sc. (30)
- Round 13
30 sc total — cream: 13 sc; orange: 9 sc; cream: 8 sc. (30)
- Round 14
30 sc total — cream: 15 sc; orange: 5 sc; cream: 10 sc. (30)
- Round 15
(3 sc, dec) × 6, all in cream. (24)
- Round 16
24 sc total — cream: 19 sc; orange: 2 sc; cream: 3 sc. (24)
- Round 17
24 sc total — cream: 17 sc; orange: 6 sc; cream: 1 sc. (24)
- Round 18
(6 sc, dec) × 3, worked as follows — cream: (6 sc, dec) × 2, 2 sc; orange: 4 sc, dec. (21)
- Round 19
21 sc total — cream: 18 sc; orange: 3 sc. (21)
- Round 20
(5 sc, dec) × 3, worked as follows — cream: (5 sc, dec) × 2, 4 sc; orange: 1 sc, dec. (18)
- Round 21
Sc in each st around, all cream. (18)
- Round 22
18 sc total — cream: 10 sc; orange: 2 sc; cream: 6 sc. (18)
- Round 23
(4 sc, dec) × 3, worked as follows — cream: 4 sc, dec, 3 sc; orange: 1 sc, dec; cream: 4 sc, dec. (15)
- Round 24
15 sc total — cream: 9 sc; orange: 6 sc. (15)
- Round 25
(3 sc, dec) × 3, worked as follows — cream: (3 sc, dec) × 2; orange: 3 sc, dec. (12)
- Round 26
Sc in each st around, all cream. (12)
- Round 27
(1 sc, dec) × 4, then 4 additional sc — all cream. (8 + 4 additional sc) Fold the piece in half and sc through both layers across 4 stitches to close the tail end. Do not cut yarn.
Tail
Work in main color (cream). This piece is worked flat in rows.
Foundation: Chain 10. In the 2nd ch from hook, work as follows:
- Row 1
Sl st, sc, hdc, 4 dc, hdc, sc — then join with sl st to the first chain at the base of the tail (where the foundation chain began). Ch 1, turn.
- Row 2
Working through the front loop only: sc, hdc, 4 dc, hdc, sc, sl st. Ch 1, turn.
- Row 3
Working through the back loop only: sl st, sc, hdc, 4 dc, hdc, sc — join with sl st to the 2nd chain at the base of the tail.For the second tail fluke: sl st into the 3rd chain at the base and repeat Rows 1–3 using the same construction. Cut yarn, secure, and hide ends inside the piece.
Dorsal Ridge
Work in main color (cream). Position along the center top of the body, spanning Rounds 11–21 from the beginning.
- Row 1
Sl st evenly along the body surface across this section.
- Row 2
Ch 2, turn. Work 3 dc in each stitch back along the row. When you reach the beginning, work 1 hdc and 1 sl st. Cut yarn, pull through, knot ends together, and hide inside.
Large Fins (make 2)
Work in main color (cream). Position each fin 6–7 rounds back from the eye, along the lower eye line.
Right fin: Sl st along the body for 2 sts. Chain 5, then work back: 3 tr into the 1st sl st on the body, ch 1, 2 dtr into the 2nd sl st on the body, ch 6. Join with sl st. Cut yarn, pull through, knot ends together, and hide inside.
Left fin (mirror image): Sl st along the body for 2 sts. Chain 6, then work back: 2 dtr into the 1st sl st on the body, ch 1, 3 tr into the 2nd sl st on the body, ch 5. Join with sl st. Cut yarn, pull through, knot ends together, and hide inside.
Small Fins (make 2)
Work in main color (cream). Position each fin 5 rounds toward the tail from the large fins, shifted 3 sc lower.
First small fin: Sl st along the body for 2 sts. Chain 5, then work back: 2 tr into the 1st sl st on the body, 2 tr into the 2nd sl st on the body, ch 5. Join with sl st. Cut yarn, pull through, knot ends together, and hide inside.
Second small fin: Work the same as the first small fin.
Where it goes
- A quiet reading-nook companion, propped on a shelf next to other amigurumi or plush animals.
- A soft centerpiece for a kid's room, paired with other water-themed or animal-shaped toys.
- A handmade gift for someone who keeps fish or loves pond gardens, sized to sit on a desk.
- A photography or craft-fair display piece, shown alongside other cream and orange yarn projects.
Color ideas
- Classic koi Cream Dolce or Dolphin Baby yarn for the entire body, tail, fins, and dorsal ridge, with orange worked in as the contrasting spot color across the body rounds.
- Soft monochrome Cream yarn for the body, tail, and dorsal ridge, with the orange spot yarn limited to just the two large fins and two small fins for a quieter, toned-down look.
Care
Hand wash the finished koi in cool water with a mild detergent, since plush bulky yarns like Dolce or Dolphin Baby hold shape better without a washing machine.
Reshape the body and fins gently while damp and let the toy air dry flat, easing the tail's curve and the dorsal ridge back into position as it dries.
Store the finished piece somewhere it will not be flattened for long periods, and keep it away from direct heat since the yarn ends were sealed with a lighter.
Assembly
- Step 1 Tail: The tail is formed at the end of the body by folding and seaming — no separate attachment is needed. The tail flukes are worked directly from the closing chain.
- Step 2 Large fins: Pin both large fins in position 6–7 rounds back from the eyes along the lower eye line, one on each side. The yarn tails from each fin are knotted and tucked inside the body — no additional sewing required.
- Step 3 Small fins: Pin 5 rounds toward the tail from the large fins, 3 sc lower on each side. Secure the same way as the large fins.
- Step 4 Dorsal ridge: Work the ridge directly onto the body surface — no attachment needed beyond what is worked in place.
- Step 5 Weave in all remaining ends. For plush yarn, trim ends close and use a lighter to gently seal before tucking inside.
Easy to get wrong
Losing track of the spiral
Place a stitch marker at the start of round one and move it up every round, since there is no join or turn to signal where a round ends.
Skipping loop-only stitches on the tail
Check each tail row against the pattern before starting, since front loop only and back loop only alternate and are easy to mix up.
Misplacing the dorsal ridge
Count from the very first round of the body to confirm you are working the slip stitch base across rounds 11 through 21, not an approximate center section.
Between the songs
- What makes this one satisfying is the contrast in techniques packed into a single small toy. The body is a long continuous spiral, so you get that meditative, no-counting-joins flow while shaping increases build the classic fish curve. Then the tail flips the whole approach: worked flat in rows, alternating front loop only and back loop only, folded and seamed into its own fin shape with no separate attachment. The dorsal ridge is its own small technical moment too, slip-stitched along rounds 11 through 21 and then built up with clusters of double crochet to stand proud off the back. Add two sizes of fins pinned and knotted into place, and you get a project where every part asks for a slightly different skill, so it never feels repetitive from cast-on to last stitch.
Listener questions
Can I use a different plush yarn than the ones listed?
Yes, the pattern notes that any plush bulky-weight yarn in white or cream works as a substitute for the main color. Just keep your fabric tight enough that the fiberfill inside does not show through.
Do I need to join or turn while working the body?
No, the body is worked in a continuous spiral with no joining or turning unless the pattern specifically says otherwise. A stitch marker at the start of each round keeps you oriented.
How is the tail attached to the body?
It is not sewn on separately. The tail flukes are worked directly from the body's closing chain, then folded and seamed to form their shape.
Where exactly does the dorsal ridge go?
It sits along the center top of the body, spanning rounds 11 through 21 from the very first round. You slip stitch along that section first, then build the ridge upward with a row of double crochet clusters.
How do I attach the fins without extra sewing?
Pin the large fins about 6 to 7 rounds back from the eyes along the lower eye line, and the small fins 5 rounds further toward the tail. Knot the yarn tails from each fin and tuck them inside the body instead of sewing a separate seam.
Original pattern: https://amigurumiarts.com/koi-carp-amigurumi-crochet-pattern/
About the Author

Marisol QuinteroWho runs Crochet Obsessed, why a stitch count sits at the end of every round, how a pattern gets written here, and the things this site will never do.
More Patterns
- IntermediateNo. 01

Slouchy everyday beanie worked flat in half double crochet
Crochet beanie pattern for a slouchy everyday look worked flat with hdc rows, then seamed into a soft,…
- IntermediateNo. 02
Crochet amigurumi doll with dress, shoes, and hat
Crochet amigurumi doll pattern with dress, shoes, and hat details for a soft, huggable keepsake you build one…
- IntermediateNo. 03
Chunky moss stitch crochet sweater with raglan-free shoulders
Chunky crochet sweater pattern using moss stitch, worked flat with a 10mm hook for a soft, fast, cool-weather…


