- LevelBeginner
- Time3-5 hours
- Hook2.5 mm
- YarnSport
About This Pattern
There is a certain hush that settles in when I sit down with pastel sport weight yarn and a small hook. This project has that soft-spoken, radio-at-midnight kind of charm, all rounded shapes and quiet colors. Nothing about it shouts, it just sits there being cute in a way that makes you want to keep one more round going before you set it down.
Your hands stay busy but never rushed here. You work tight rounds in the round, build up a body from a magic ring through steady increases, then, depending on the design, shape two small ears for the Cat with a handful of chains and slip stitches, or add tiny back spikes for the Dino the same way. Later your hands slow down further for the embroidery, placing a mouth or a few whiskers with care instead of speed.
Once it is stuffed and finished, this little piece earns a spot somewhere you actually look every day. Clipped to a bag or perched on a desk shelf, it adds a small patch of pastel color to an otherwise busy corner. It is the kind of object that gets picked up and turned over in someone's hand before it goes back down.
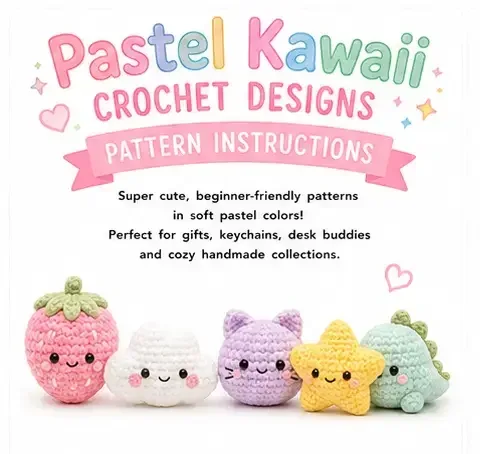
This collection includes five beginner-friendly designs worked in soft pastel colors: Strawberry, Cloud, Cat, Star, and Dino. Work in continuous rounds unless stated otherwise, use a stitch marker to mark the first stitch of each round, and stuff firmly as you go for a nice shape. To close a piece, cut the yarn and pull the tail through the front loops of the last round, pull tight to close, then weave in the end. Add blush cheeks for extra cuteness!
Use a smaller hook for tighter stitches, stuff as you go for a rounder shape, and remember that pastel colors look best worked with soft, even stitches.
- Begin the body with a magic ring, then work steady increase rounds until the round shape takes hold.
- Continue through the plain rounds to build height before you stuff the body firmly with fiberfill.
- Insert the safety eyes between the rounds indicated so the face sits at the right level on the head.
- the Cat design, crochet two small ears with simple chains and slip stitches, then sew them on top of the head.
- the Dino design, work the short chain-and-slip-stitch back spikes and sew them down the back for a small extra detail.
- Embroider the mouth, whiskers, or seeds with embroidery thread once the main shape is closed up.
- Finish by adding blush to the cheeks so the whole piece reads soft and kawaii.
On the desk
- Sport weight yarn (pastel colors)
- 2.0–2.5 mm crochet hook
- Yarn needle
- Scissors
- Stitch marker
- 6 mm safety eyes
- Fiberfill stuffing
- Blush (optional)
Stitch shorthand
- MR — magic ring
- sc — single crochet
- inc — increase (2 sc in next st)
- dec — decrease (invisible sc dec)
- sl st — slip stitch
- ch — chain
- st(s) — stitch(es)
- FO — fasten off
Kawaii pastel amigurumi crochet pattern
Strawberry Body
This design uses pink and green yarn.
- Round 1
MR 6 sc (6)
- Round 2
inc x6 (12)
- Round 3
(sc, inc) x6 (18)
- Round 4
(2 sc, inc) x6 (24)
- Rounds 5–8
sc around (24)
- Round 9
(2 sc, dec) x6 (18)
- Round 10
(sc, dec) x6 (12)
- Round 11
dec x6 (6)Step by step: Stuff firmly. Add green leaves on top. Embroider seeds with white yarn.
Cloud Body
This design uses white yarn.
- Round 1
MR 6 sc (6)
- Round 2
inc x6 (12)
- Round 3
(sc, inc) x6 (18)
- Round 4
(2 sc, inc) x6 (24)
- Round 5
sc around (24)
- Round 6
(2 sc, dec) x6 (18)
- Round 7
dec x6 (12)
- Round 8
dec x6 (6)Step by step: Stuff lightly. Embroider mouth. Add blush to cheeks.
Cat Body
This design uses lavender yarn.
- Round 1
MR 6 sc (6)
- Round 2
inc x6 (12)
- Round 3
(sc, inc) x6 (18)
- Round 4
(2 sc, inc) x6 (24)
- Rounds 5–9
sc around (24)
- Round 10
(2 sc, dec) x6 (18)
- Round 11
(sc, dec) x6 (12)
- Round 12
dec x6 (6)Step by step: Stuff firmly.
Cat Ears (Make 2)
- Row 1
ch 3, sc in 2nd ch from hook, sc, sl stStep by step: Sew on top. Embroider whiskers & mouth.
Star Body
This design uses yellow yarn.
- Round 1
MR 6 sc (6)
- Round 2
inc x6 (12)
- Round 3
(sc, inc) x6 (18)
- Round 4
sc around (18)
- Round 5
(2 sc, inc, 2 sc, inc, 2 sc) x3 (24)
- Round 6
sc around (24)
- Round 7
(2 sc, dec, 2 sc, dec, 2 sc) x3 (18)
- Round 8
sc around (18)
- Round 9
dec x6 (12)Step by step: Stuff firmly. Shape the points gently. Embroider mouth and add blush.
Dino Body
This design uses mint and green yarn.
- Round 1
MR 6 sc (6)
- Round 2
inc x6 (12)
- Round 3
(sc, inc) x6 (18)
- Round 4
(2 sc, inc) x6 (24)
- Rounds 5–9
sc around (24)
- Round 10
(2 sc, dec) x6 (18)
- Round 11
(sc, dec) x6 (12)
- Round 12
dec x6 (6)Step by step: Stuff firmly.
Dino Back Spikes
- Row 1
ch 3, sl st in 2nd ch from hook, sl st in nextStep by step: Repeat and sew down the back.
Where it goes
- Clip it onto a backpack or purse as a bag charm that pairs well with other pastel keyrings.
- Set it on a desk beside a mug and a notebook as a small, quiet desk buddy.
- Thread it onto a keychain ring so it rides along with everyday keys.
- Line a few finished pieces up on a shelf with other soft amigurumi for a small pastel collection.
Color ideas
- Strawberry Use pink and green yarn: work the body in pink, add green leaves on top, and embroider seeds with white yarn.
- Cloud Use white yarn throughout the body, then embroider the mouth and add blush to the cheeks to finish.
- Cat Use lavender yarn for the body and ears, then embroider whiskers and mouth to finish.
- Star Use yellow yarn throughout the body, shape the points gently, then embroider the mouth and add blush.
- Dino Use mint and green yarn for the body and back spikes, then sew the spikes down the back to finish.
Care
Hand wash gently in cool water only if needed, since the fiberfill stuffing and safety eyes hold up better away from a washing machine.
Reshape the body and ears while still damp, then let the piece air dry flat so the rounds keep their curve.
Store it away from direct sun so the pastel yarn keeps its soft tone, tucked in a drawer or box between uses.
Easy to get wrong
Loose magic ring center
Pull the starting tail firmly before working the first round, then check it again after a couple of rounds and snug it further if a gap is still showing.
Safety eyes placed on the wrong round
Dry-fit the eyes against the rounds indicated for the design before pressing the washers on, since they cannot be repositioned once secured.
Ears sewn on flat
Pinch the base of each ear slightly as you stitch it down so it holds a gentle curve instead of lying flush against the head.
Between the songs
- What I love here is how much personality comes from so few moves. The magic ring start and the increase rounds do the heavy lifting on shape, and then the small stuff, the safety eyes set between specific rounds, the embroidered mouth and whiskers, the blush, is what actually makes each piece feel alive. Working through the five designs back to back is satisfying too, since you get to compare how the increase pattern in each one changes the finished silhouette. The ears or back spikes are almost a palate cleanser, a quick chain and slip stitch shape you sew on at the end. By the time you add blush, you are not just finishing a toy, you are giving it an expression.
Listener questions
Can I make just one design instead of all five?
Yes, pick whichever design you like, Strawberry, Cloud, Cat, Star, or Dino. They are worked as separate patterns, not pieces meant to be combined.
What size hook should I use?
Stay within the 2.0-2.5 mm range listed in the materials. A smaller hook keeps your stitches tight enough that the fiberfill stuffing does not peek through.
Do I really need embroidery thread instead of the sport weight yarn?
Yes, embroidery thread is finer and gives cleaner, more defined mouths, whiskers, and seed details than the sport weight yarn would.
Can I skip the safety eyes and embroider the eyes instead?
You can embroider eyes if you prefer, but if you use safety eyes, insert them before stuffing since they cannot be added once the piece is closed up.
How do I keep the Cat's ears the same size?
Crochet both ears one after the other before sewing either one on, then hold them side by side to compare before attaching.
Original pattern: https://onrecip.com/pastel-kawaii-crochet-free-pattern/
About the Author

Marisol QuinteroWho runs Crochet Obsessed, why a stitch count sits at the end of every round, how a pattern gets written here, and the things this site will never do.
More Patterns
- IntermediateNo. 01

Slouchy everyday beanie worked flat in half double crochet
Crochet beanie pattern for a slouchy everyday look worked flat with hdc rows, then seamed into a soft,…
- IntermediateNo. 02
Crochet amigurumi doll with dress, shoes, and hat
Crochet amigurumi doll pattern with dress, shoes, and hat details for a soft, huggable keepsake you build one…
- IntermediateNo. 03
Chunky moss stitch crochet sweater with raglan-free shoulders
Chunky crochet sweater pattern using moss stitch, worked flat with a 10mm hook for a soft, fast, cool-weather…


