- LevelIntermediate
- Time4-6 hours
- YarnWorsted
About This Pattern
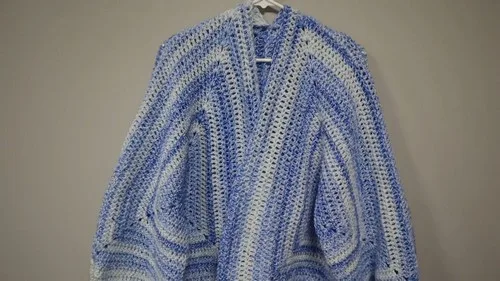
This one has a steady, building-block feeling, like watching a honeycomb take shape one corner at a time. Each hexagon starts small and tight, then opens out into something with real structure. There's a satisfaction in the geometry that makes this piece feel more architectural than the usual cardigan.
Your hands will spend a lot of time circling back to the same corner space, DC after DC, until the shape fills out. It asks for a rhythm more than speed: chain three, work the cluster, land in that chain-2 space, repeat. Then there's the quieter work of seaming two finished halves into one garment.
Picture this draped over the back of a chair by the front door, ready to grab on the way out. The hexagon panels give it a bit of visual texture even when it's just hanging there. It reads as handmade without trying too hard, the kind of piece that gets noticed in a quiet room.
- Start each hexagon with a slip knot and a small chain joined into a ring to work your first round into.
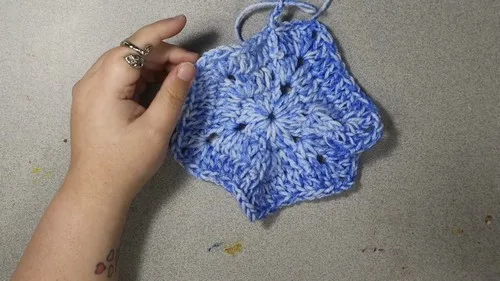
- Build six clusters of double crochet separated by six chain-2 corner spaces to form the hexagon's first round.
- Close that round with a slip stitch into the top of your starting chain.
- Work a second round of double crochet across each side, turning the corner with a [2 DC, chain 2, 2 DC] at every corner space.
- Add flat rows corner-to-corner on the sleeve opening side until the hexagon plus added rows reaches 22 rows total, then work one cinching row of DC skipping every other stitch.
- Chain one and cut the yarn to finish one cardigan half cleanly.
- the matching half, keep your yarn attached instead of cutting it so you can seam straight from that strand.
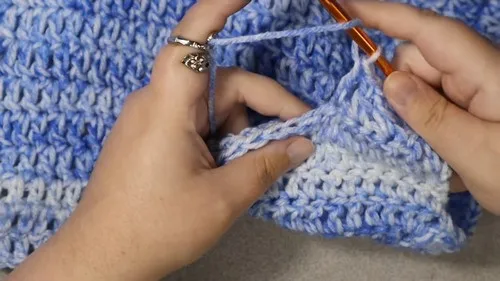
- Lay the two halves right side facing you and slip stitch across the entire top edge to join the shoulder and sleeve seam.
- Fold the piece so the back edges line up, then sew the center back seam from the neck down to the bottom before weaving in ends and turning the cardigan right side out.
On the desk
- Worsted weight yarn
- Crochet hook (size to suit your yarn)
- Yarn needle (for sewing the center back seam)
Stitch shorthand
- sc — single crochet
- dc — double crochet
Two-panel hexagon cardigan you build from a ring
Foundation (Starting Ring)
Make a slip knot .
Chain five .
Slip stitch into the very first chain to form a ring.
- Round 1
The Six Corners Chain three (counts as the first double crochet, DC). Make two more DC into the center ring. This forms your first cluster of three.Chain two (this creates the corner space).
Repeat the cluster and corner: Make three DC, chain two.Continue repeating until you have a total of six clusters and six chain-2 corner spaces .Slip stitch into the top of the initial chain three to close the round. - Round 2
Row 2 and Subsequent Rows (Increasing) Chain three (counts as DC). Do not turn your work.DC into every stitch from the previous row until you reach a corner space.
Corner Pattern: In the chain-2 corner space, work: [2 DC, Chain 2, 2 DC] .
This creates a new corner.
Repeat steps 2 and 3 around the hexagon until you reach the end of the round.
Slip stitch into the top of the initial chain three to close the round.
Repeat this increasing row until you reach the total number of rows required for your size (see chart below).
Remember to skip the slip stitch hole at the end of the row to avoid accidental increases.
Adding Sleeve Length and Cinching
Once both hexagons are completed, you will add length to the arm opening by working a flat row, corner-to-corner, on one side.
The goal is to reach a total of 22 rows for the sleeve's length.
Calculate Rows: Subtract your hexagon row count from 22 (e.g., Size L: 22 - 18 = 4 rows to add).
Attach yarn to one corner of the designated side of the hexagon.
- Sleeve Length Rows
Sleeve Length Rows (Non-Cinching) Chain three (counts as DC). Double crochet across the stitches to the opposite corner. At the end of the row, Chain two (or three) and turn. Repeat this double crochet row until you have one row remaining to meet your goal (e.g., 3 rows for Size L).
- Cinching Row
Last Row (Cinching Row) Chain three and turn. Work a DC, skipping every other stitch across the row. This cinches the sleeve.
First Half
- Round 1
Chain one and cut off the yarn.
Second Half
1st Round. Keep the yarn attached to begin seaming.
Assembly (Seaming)
- Round 1
Shoulder/Top Seam (Slip Stitch)Lay both cardigan halves side-by-side, right side facing you .
- Round 2
Starting from the end of the second sleeve (where your yarn is attached), slip stitch through both panels' stitches (or posts on the flat rows) all the way across the entire top edge, connecting the two halves.
Back Seam (Sewing)
Fold the cardigan so the back pieces are aligned.
Use a yarn needle to sew the two halves together down the center back seam, working from the neck opening to the bottom edge.
Knot and weave in the ends.
Turn the cardigan right side out .
Sleeve Cuff (Ribbing)
This is worked directly around the sleeve opening.
- Round 3
Chain 11 (adjust this number for a shorter or longer cuff).
- Round 4
Single crochet (SC) into the 10 stitches down the chain, starting with the stitch next to the hook.
- Round 5
Attach to Sleeve: Slip stitch into the next three stitches on the sleeve opening.Turn the work.
- Round 6
SC into the back loop only of the 10 stitches going back up the cuff.
- Round 7
Turn: Chain one and turn the work.
- Round 8
SC into the back loop only of the 10 stitches going back down.Repeat Steps 3-7 all the way around the sleeve opening.
- Round 9
Seam Cuff: Match up the first and last rows of the cuff and slip stitch (or SC) them together.
- Round 10
Finish: Chain one and cut off the yarn.Repeat Part 4 for the second sleeve.
Final Touches Weave in all remaining ends.
(Optional) You can add extra length to the body or a border around the entire front opening and bottom.
More shots
Where it goes
- Layer it over a plain sweater or shirt for a textured, structured top layer on cooler days.
- Keep it folded on a shelf or chair as a grab-and-go piece for working from home.
- Wear it over a simple dress to add visual interest without changing the outfit's color palette.
- Pair it with jeans and boots for an everyday outdoor layer that pairs easily with other knits.
Color ideas
- Contrast corners Keep the main hexagon body in a muted denim blue, but work every chain-2 corner space and its [2 DC, chain 2, 2 DC] in a crisp white so the corners pop against the field.
Care
Hand wash in cool water and lay the cardigan flat to dry so the hexagon motifs keep their shape instead of stretching under their own weight.
Smooth out the corner spaces and seams while damp so the finished panels sit flat and the seaming lies straight.
Store it folded along the center back seam rather than on a hanger, which keeps the shoulder seam from sagging over time.
Assembly
- Step 1 Fold the cardigan so the back pieces are aligned.
- Step 2 Use a yarn needle to sew the two halves together down the center back seam, working from the neck opening to the bottom edge.
- Step 3 Knot and weave in the ends.
- Step 4 Turn the cardigan right side out .
Easy to get wrong
Losing track of the corner space
Mark each chain-2 corner space with a stitch marker as you work the first round so you never have to guess where the cluster ends and the corner begins.
Cutting yarn on the wrong half
Double-check which panel is meant to keep its yarn attached before you cut, since one half needs that live strand to start the seaming.
Seaming through the wrong edge
Lay both halves right side facing you before you slip stitch the top edge, and keep the posts or stitches aligned row for row as you go.
Between the songs
- What I love here is the corner. That chain-2 space keeps reappearing round after round, and every time you land in it with your [2 DC, chain 2, 2 DC], the hexagon grows outward in a clean, predictable way. It is the kind of repetition that lets your mind wander while your hands still know exactly what to do. Then the construction shifts entirely: instead of single-piece shaping, you are joining two complete halves with a slip stitch seam across the top and a sewn seam down the center back. That two-stage build, motif work followed by careful seaming, makes this feel like two different crafts in one project, and finishing both well is genuinely satisfying.
Listener questions
Do both cardigan halves work up the same way?
Yes, both halves follow the same hexagon motif and DC rounds. The only difference is at the end, where one half cuts its yarn and the other keeps it attached to begin seaming.
Why does one half keep the yarn attached?
Keeping that strand live means you can move straight into the shoulder seam without rejoining yarn. It also keeps the seam's color consistent since it is the same working yarn.
What happens if I lose count of my corner spaces in the first round?
Stop and count your clusters against the corner spaces before closing the round with the slip stitch. Getting six clusters and six corners even now saves you from a lopsided hexagon later.
Is the seaming done with a hook or a needle?
Both. The shoulder and top edge are joined with a slip stitch seam using your hook, while the center back seam is sewn afterward with a yarn needle.
In what order should I finish the cardigan?
Complete and seam the top edge first while the pieces are flat and easy to align. Then fold for the center back seam, weave in your ends, and turn the whole thing right side out.
How do I know how many extra rows to add before the sleeve opening?
Subtract your hexagon's row count from the target of 22 rows total. For example, a Size L hexagon with 18 rows needs 4 extra flat rows before the final cinching row.
Original pattern: https://crocheteverything.com/solid-crochet-hexagon-cardigan-pattern-for-winter/
About the Author

Marisol QuinteroWho runs Crochet Obsessed, why a stitch count sits at the end of every round, how a pattern gets written here, and the things this site will never do.
More Patterns
- IntermediateNo. 01

Rose Granny Square Tote Crochet Pattern
Rose granny square tote crochet pattern made from 18 dimensional rose squares for a sturdy, romantic everyday bag.
- IntermediateNo. 02
Tropical octopus baby blanket crochet pattern with appliqués
Tropical octopus baby blanket crochet pattern: a cream filet base with coral and turquoise octopus appliqués, leaves, and…
- IntermediateNo. 03
Sunny lemon couple amigurumi crochet pattern
Sunny lemon couple amigurumi crochet pattern with embroidered slices and safety eyes for a cheerful handmade shelf pair.


