- LevelIntermediate
- Time4-6 hours
- YarnWorsted
About This Pattern
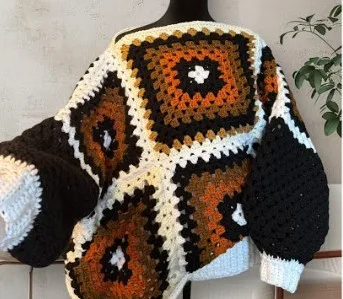
There's something so calm about this one. Two squares grow round by round until they're big enough to wrap around a chest, and that steady repetition feels almost like listening to the same favorite song on a loop. No fuss, no fancy shaping, just corner clusters multiplying into fabric.
Finished, it's the sweater that lives on the back of a chair or folded on a shelf where you can see the texture. The ribbed cuffs and hem give it a shape that reads as intentional, not just squares stitched together. It's the kind of piece that makes a room feel a little more handmade.
- Start each square with a ring of corner clusters, then keep repeating the round until the piece is wide enough.
- Make a second matching square so you have a front and a back piece ready to join.
- Lay the two squares together and slip stitch across the top edges to form the shoulders.
- Leave an opening between the shoulder seams so there's room for the neck later.
- Slip stitch down the side edges, leaving gaps where the armholes will be.
- Attach yarn at each armhole and work the granny stitch in the round to build the sleeves, adjusting the cluster size if you want a narrower fit.
- Work a foundation row of single crochet around the bottom, cuffs, and neck, then build the back-loop ribbing rows across each opening.
- Join the ribbing ends together at each edge to close it up and finish the sweater.
On the desk
- Yarn
- Crochet hook (size to suit your yarn)
Stitch shorthand
- DC — double crochet
- SC — single crochet
- ch — chain
- sl st — slip stitch
- BLO — back loop only
Granny square sweater pattern for beginners
Granny Square (Front & Back)
Make 2- Round 1
The First Corner Clusters Make a slip knot and Chain 4; slip stitch into the first chain to form a circle; Chain 3 (counts as the first double crochet); 2 Double Crochet (DC) into the center ring; Chain 2 (this is a corner space); repeat three times: 3 DC into the center ring, then Chain 2; slip stitch into the third chain of the beginning Chain-3 to close the round. You should have 4 groups of 3 DC separated by Chain-2 corner spaces.
- Round 2
(and Beyond - The Repeat): Slip stitch into the next two DC stitches and then into the first Chain-2 corner space; in the corner space, work the Corner Cluster: (Chain 3, 2 DC, Chain 2, 3 DC); Chain 1; in the next space between the 3-DC clusters from the previous round, work a Side Cluster: 3 DC; Chain 1; repeat the Corner Cluster (3 DC, Ch 2, 3 DC) in the next Chain-2 space; continue this pattern around: Corner Cluster in corners, Side Cluster (3 DC) in side spaces, separated by Chain 1; to close the round: slip stitch into the third chain of the beginning Chain-3.Continue repeating Round 2 until the square is large enough to cover half of your chest/back (from armpit to armpit); the creator made 13 rows for a size Large.
Sleeve (Optional)
Make 2Tip for the corner: when you get to the original corner on the square (top of the shoulder), work a (3 DC, Ch 1, 3 DC) in that space to transition smoothly.
- Round 1
Attach your yarn at the bottom of the armhole; work the granny stitch (3 DC cluster, Chain 1) around the entire armhole opening; slip stitch to join the round.
- Round 2
Continue crocheting in the round (repeating the granny stitch pattern) until the desired sleeve length.
You can slightly decrease the sleeve width by occasionally working a 2 DC cluster instead of a 3 DC cluster in a space.
Ribbing (Bottom, Neck, and Cuffs)
- Round 1
Foundation Row Attach yarn to the bottom edge and work a row of Single Crochet (SC) around the entire opening.
- Round 2
Ribbing Row Chain 8 (or desired ribbing width); SC in the back loop only (BLO) starting from the second chain from the hook, across 7 stitches; slip stitch into the next 2 SC stitches on the sweater body; turn your work, skip the two slip stitches, and SC in BLO across the 7 stitches; Chain 1, turn, and SC in BLO across the 7 stitches; slip stitch into the next 2 SC stitches on the sweater body; repeat the ribbing process around the entire bottom edge.
- Round 3
Final Edge Join the starting and ending ribbing rows together with a slip stitch.Repeat the Foundation Row and Ribbing Process for the sleeve cuffs and the neck opening to finish your sweater.
More shots
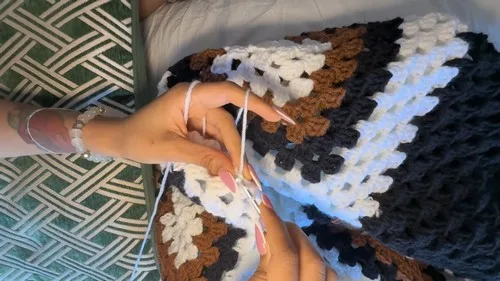
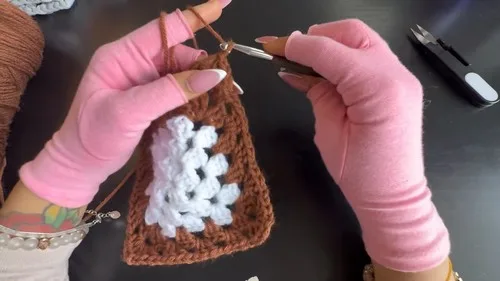
Where it goes
- A layering piece over a simple tank or tee for a coffee run or a slow morning at home, paired with jeans and boots.
- A cozy throw-on for reading in a chair by the window, worn open over a soft base layer.
- A statement piece for a casual gathering, paired with plain trousers so the granny squares stay the focus.
- A travel sweater that packs down small and pairs easily with almost anything already in a suitcase.
Color ideas
- Gradient corners Change color every couple of rounds while building each granny square so the corner clusters shift shade outward, then finish the sleeves and ribbing in the darkest color from the sequence.
Care
Hand wash the sweater in cool water and lay it flat to dry, since the ribbed sections can stretch out of shape if hung wet.
Reshape the squares and ribbing gently while damp, smoothing the corner clusters back into place before it dries completely.
Store it folded rather than on a hanger, so the shoulder seams and neck ribbing keep their shape between wears.
Assembly
- Step 1 Lay the two squares on top of each other, with the wrong sides facing out (or right sides together).
- Step 2 Use the slip stitch method to seam the pieces together.
- Step 3 Starting from an outer corner, slip stitch across the top edge, joining the front and back pieces.
- Step 4 Stop and fasten off, leaving an open space for the Neck Opening; the creator left 4 side cluster spaces open for the neck.
- Step 5 Repeat on the other shoulder.
- Step 6 Starting from the bottom corner, slip stitch up the side edge, joining the front and back pieces.
- Step 7 Stop and fasten off, leaving an open space for the Armholes; the creator left 4 side cluster spaces open for the armhole.
- Step 8 Repeat on the other side.
- Step 9 Turn the garment right-side out.
Easy to get wrong
Losing track of corner spaces
Mark each Chain-2 corner space with a stitch marker as you finish Round 1, so it's easy to find where the Corner Cluster belongs in every later round.
Uneven square sizes
Count your rows on both squares as you go, since the two pieces need to match before you can seam the shoulders and sides evenly.
Ribbing that twists or puckers
Work every ribbing row in the back loop only, not both loops, and check the slip stitch join to the sweater body after every few rows to keep it flat.
Between the songs
- The satisfaction here is structural. You watch a center ring become four corner clusters, then watch those clusters multiply into a proper granny square, and the logic of it never stops making sense. Seaming two squares together with slip stitches is oddly meditative, especially once you see the shoulders and side seams take shape. Then the ribbing shows up and changes the whole feel of the piece: working in back loops only across a strip of single crochet, turning, working back, gives you a stretchy band that looks nothing like the rest of the sweater. That contrast between open clusters and tight ribbing is what makes this project feel finished rather than just stopped. It's a great way to actually understand how a garment gets built, not just how a square gets bigger.
Listener questions
Do I need to make the sleeves?
No, the sleeves are listed as optional, so you can leave the armholes open for a vest-style version. If you skip them, you'll still want to finish the armhole edges with the same ribbing treatment used elsewhere.
How do I know when my granny square is big enough?
Keep repeating Round 2 until the square reaches from armpit to armpit across half your chest or back. The creator worked 13 rows total for a size Large, which gives you a rough reference point.
Can I make the sweater narrower through the sleeves?
Yes, you can work a 2 DC cluster instead of a 3 DC cluster occasionally as you build the sleeve rounds. This gradually decreases the sleeve width without changing the overall pattern.
What's the trickiest part of assembly?
Getting a smooth transition at the shoulder corner when you start the sleeves is the part that takes the most attention. Working a (3 DC, Ch 1, 3 DC) right in that original corner space helps the sleeve round blend into the body cleanly.
How big should I leave the neck opening?
That's up to you, but the creator left 4 side cluster spaces open between the shoulder seams for the neck. You can leave more or fewer spaces depending on how wide you want the neckline to sit.
Original pattern: https://crocheteverything.com/granny-square-sweater-crochet-pattern-for-beginners/
About the Author

Marisol QuinteroWho runs Crochet Obsessed, why a stitch count sits at the end of every round, how a pattern gets written here, and the things this site will never do.
More Patterns
- IntermediateNo. 01

Rose Granny Square Tote Crochet Pattern
Rose granny square tote crochet pattern made from 18 dimensional rose squares for a sturdy, romantic everyday bag.
- IntermediateNo. 02
Tropical octopus baby blanket crochet pattern with appliqués
Tropical octopus baby blanket crochet pattern: a cream filet base with coral and turquoise octopus appliqués, leaves, and…
- IntermediateNo. 03
Sunny lemon couple amigurumi crochet pattern
Sunny lemon couple amigurumi crochet pattern with embroidered slices and safety eyes for a cheerful handmade shelf pair.


