- LevelIntermediate
- Time4-6 hours
- Hook5.5 mm
- YarnWorsted
About This Pattern
There's something calming about a project that repeats itself in a good way. This band builds the same handful of rows over and over, so once the cable rhythm clicks, your hands just go. It's the kind of make you can do while half-listening to a podcast, which is exactly the mood I'm after on a slow evening.
Your hands will spend most of this project learning the difference between front and back post stitches, and getting comfortable reaching around the row below to catch them. There's also a bit of backward reaching when the cable crosses, which asks for patience more than speed. Once that motion settles in, it becomes almost meditative.
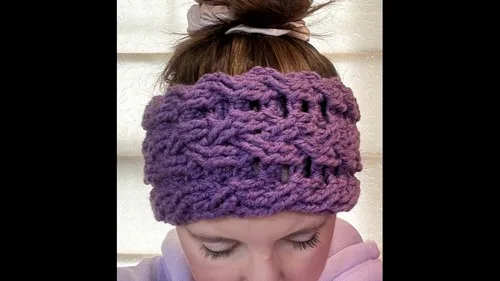
Picture this headband draped over a doorknob or folded on a shelf by the front door, ready to grab on the way out. The diagonal twist running across the band catches the light in a way flat stitches never do. It reads handmade in the best sense, the kind of accessory people ask about.
- Chain a starting length and turn it into a row of single crochet to set your stitch count.
- Build a plain double crochet row on top to give the cables something sturdy to sit on.
- Work a single crochet row to settle the fabric before the cable pattern begins.
- Repeat the cable rows, reaching back to work front post stitches over previous ones to create the crossing twist.
- Keep the border rows going along the top and bottom edges as you repeat the pattern down the length.
- Try the band around your head as you go and keep repeating the cable sequence until the fit feels right.
- Join the two short ends together with a seam or a row of slip stitches to close the loop.
- Weave in the ends and block the piece so the cables relax and lie flat and even.
On the desk
- Worsted weight yarn (size 4), one skein in your chosen color
- 5.5mm crochet hook
- Tapestry needle for seaming and weaving ends
Stitch shorthand
- ch — chain
- st — stitch
- sl st — slip stitch
- sc — single crochet
- hdc — half double crochet
- dc — double crochet
- inc — increase
- dec — decrease
- mr — magic ring
- fo — finish off
Cable stitch crochet ear warmer headband pattern
Foundation
Chain 15 stitches.
- Round 1
Work 1 single crochet in the second chain from the hook and in every chain across.
You will have 14 stitches total.
- Round 2
Chain 1, turn. Work 1 double crochet in the first stitch and in every stitch across.
- Round 3
Chain 1, turn. Work 1 single crochet in each stitch across. Just starting out with crochet? The video tutorial below is a great place to begin, or challenge yourself with the written pattern below!
- Round 4
First Cable Row Chain 1, turn. Cable 1: Skip 2 stitches. Work a front post triple crochet around the 3rd and 4th double crochets from the previous right-side row. Then go back and work a front post triple crochet around each of the 2 skipped stitches.Work a front post triple crochet around each of the next 2 stitches.
Cable 2: Skip 2 stitches. Work a front post triple crochet around each of the next 2 stitches. Then go back and work a front post triple crochet around each of the 2 skipped stitches.Cable 3: Skip 2 stitches. Work a front post triple crochet around each of the next 2 stitches. Then go back and work a front post triple crochet around each of the 2 skipped stitches.
You should still have 14 stitches total at the end of this row.
- Round 5
Chain 1, turn. Work 1 single crochet in each stitch across.
- Round 6
Second Cable Row Chain 1, turn. Work 1 front post triple crochet around each of the first 4 stitches.Cable: Skip 2 stitches. Work a front post triple crochet around each of the next 2 stitches. Then go back and work a front post triple crochet around each of the 2 skipped stitches.
Work 1 front post triple crochet around each of the final 6 stitches. - Round 7
Chain 1, turn. Work 1 single crochet in each stitch across. Continuing and FinishingRepeat Rows 4 through 7 until the band stretches comfortably around your head.
To join the ends, hold them together with right sides touching and either sew across with a tapestry needle or work a row of slip stitches along the edge to seam them.Cut the yarn, weave in all ends, and block the finished headband flat or around a head-sized form.
Tips
Front post triple crochet is a tall stitch and it eats yarn faster than the surrounding single crochets. If your tension on these stitches is tight, the cables will pull inward and the band will narrow at the cable rows. Work them slightly looser than feels natural, especially on the first pass, and the finished piece will lie flat with a consistent width throughout.
Count your stitches at the end of every cable row. Fourteen going in, fourteen coming out — if the count drifts, find it before the next row rather than after three more. The cable cross is easy to misread when you are moving backward to pick up the skipped stitches; slow down at that moment and count before you pull through.
Block matters here more than on a plain fabric. The cables compress during crocheting and a gentle wet block or steam block opens them up, evens the tension across the band, and makes the finished headband look noticeably more polished.
FAQ
How do I know when the band is long enough? Wrap it around your head without stretching and check that the two ends meet comfortably. The seam adds a small amount of bulk, so stop a stitch or two earlier than you think you need to. A band that joins under slight tension sits more securely than one with slack in it.
Can I make this wider or narrower? The 14-stitch foundation fits the cable pattern as written. To go narrower, drop to fewer cables and adjust the starting chain accordingly. To go wider, add stitches in multiples that allow an additional cable column to fit. The single crochet rows on either side of the cable rows will absorb any rounding in the stitch count.
What is the best way to join the ends? Both methods work. The slip stitch join is faster and creates a firm, flat seam that is almost invisible on the wrong side. The sewn mattress stitch gives a slightly softer join and is easier to control if your tension is uneven. Either way, join with right sides touching so the seam sits on the inside of the band when worn.
Where it goes
- A quick layer for dog walks or errands when you want warmth without a full hat messing up your hair.
- A go-to accessory for outdoor workouts, paired with a zip-up fleece and gloves in a matching color.
- A thoughtful handmade gift for someone who always complains their ears get cold on the commute.
- A cozy addition to a reading-by-the-window kit, layered with a chunky cardigan and wool socks.
Color ideas
- Tonal Oat Work the entire foundation and every cable row in one soft oatmeal or cream shade, letting the post stitch texture rather than color contrast do the visual work.
Care
Hand wash the finished headband in cool water with a mild detergent, since worsted weight yarn holds up better with gentle handling than a machine cycle.
Lay it flat to dry on a towel, reshaping the cables gently with your fingers so the twist sits the way it did after blocking.
Store it folded flat in a drawer rather than hung, which keeps the post stitches from stretching out of shape over time.
Assembly
- Step 1 Repeat Rows 4 through 7 until the band stretches comfortably around your head.
- Step 2 To join the ends, hold them together with right sides touching and either sew across with a tapestry needle or work a row of slip stitches along the edge to seam them.
- Step 3 Cut the yarn, weave in all ends, and block the finished headband flat or around a head-sized form.
Easy to get wrong
Cables pulling the band narrow
This usually means the front post triple crochet stitches are worked too tightly, so loosen your tension on those specific stitches. Aim to keep the band the same width at cable rows as at the plain rows.
Losing count during the cable cross
It is easy to miscount when reaching backward to pick up skipped stitches for the cross. Pause and count your stitches at the end of every cable row before starting the next one.
Skipping the blocking step
Cables compress naturally while you crochet them and look tighter than the finished result should be. A gentle wet or steam block opens the twist and evens out the tension across the whole band.
Between the songs
- The appeal here is the front post triple crochet doing real work. Instead of sitting flat, those tall stitches lean and cross over their neighbors, and that crossing is what builds the diagonal cable look across the whole width of the band. There's a small thrill in reaching back to grab a skipped stitch and watching the fabric fold into a twist. It's also a forgiving shape to practice cables on, since you're working a flat panel rather than fussing with shaping or a garment. Add a simple border row to keep the edges tidy, and you get a piece that looks far more technical than the actual stitch count suggests.
Listener questions
Can I make this headband wider or narrower than the pattern gives?
The foundation chain sets your width, so changing it will shift how the cable pattern lines up across the row. I would stick to the given chain the first time through so the crossing sequence works out evenly.
Why does my band feel narrower at the cable rows than the plain rows?
That is almost always tension on the front post triple crochet stitches, which are tall and eat more yarn than the single crochet rows around them. Work those stitches a little looser than feels natural and the width should stay consistent.
How do I know when the band is long enough to stop repeating the cable rows?
Wrap the growing panel around your head as you work and keep repeating the cable row sequence until it wraps comfortably. There is no fixed row count here, since head sizes vary.
What is the best way to join the two ends together?
You can either sew the short ends together with a tapestry needle for an invisible finish, or work a row of slip stitches along the edge for a slightly more textured seam. Both hold up well once the piece is worn a few times.
Does blocking really make a noticeable difference on this pattern?
Yes, more than it would on a plain fabric. The cables compress while you work them, and a gentle wet or steam block opens the twist and evens the tension so the finished band looks noticeably more polished.
Original pattern: https://crocheteverything.com/crochet-ear-warmer-headband-free-pattern-with-front-post-cables/
About the Author

Marisol QuinteroWho runs Crochet Obsessed, why a stitch count sits at the end of every round, how a pattern gets written here, and the things this site will never do.
More Patterns
- IntermediateNo. 01

Slouchy everyday beanie worked flat in half double crochet
Crochet beanie pattern for a slouchy everyday look worked flat with hdc rows, then seamed into a soft,…
- IntermediateNo. 02
Crochet amigurumi doll with dress, shoes, and hat
Crochet amigurumi doll pattern with dress, shoes, and hat details for a soft, huggable keepsake you build one…
- IntermediateNo. 03
Chunky moss stitch crochet sweater with raglan-free shoulders
Chunky crochet sweater pattern using moss stitch, worked flat with a 10mm hook for a soft, fast, cool-weather…


