- LevelEasy
- Time3-5 Hours
- Hook3.5 mm
- YarnBulky
About This Pattern
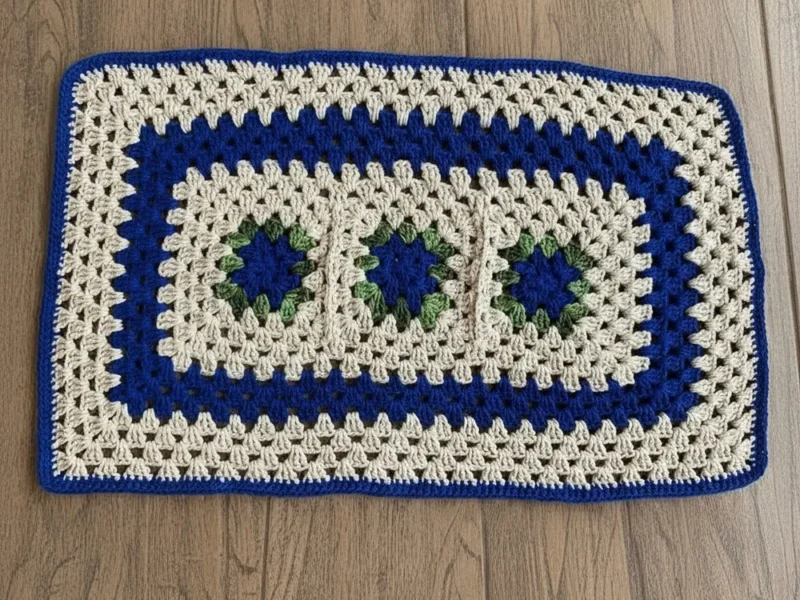
This free crochet rectangular rug pattern turns humble cotton twine into a floor piece that actually earns its spot in your home. Instead of a round doily-style mat, you get a proper rectangle — the shape that fits in front of a sink, along a hallway, or just inside a doorway where a circle would look awkward. Stepping onto a plush, handmade surface adds an instant sense of warmth to a room, and the dense, repetitive stitches create a sturdy barrier against cold floors while offering a soft landing for your feet.
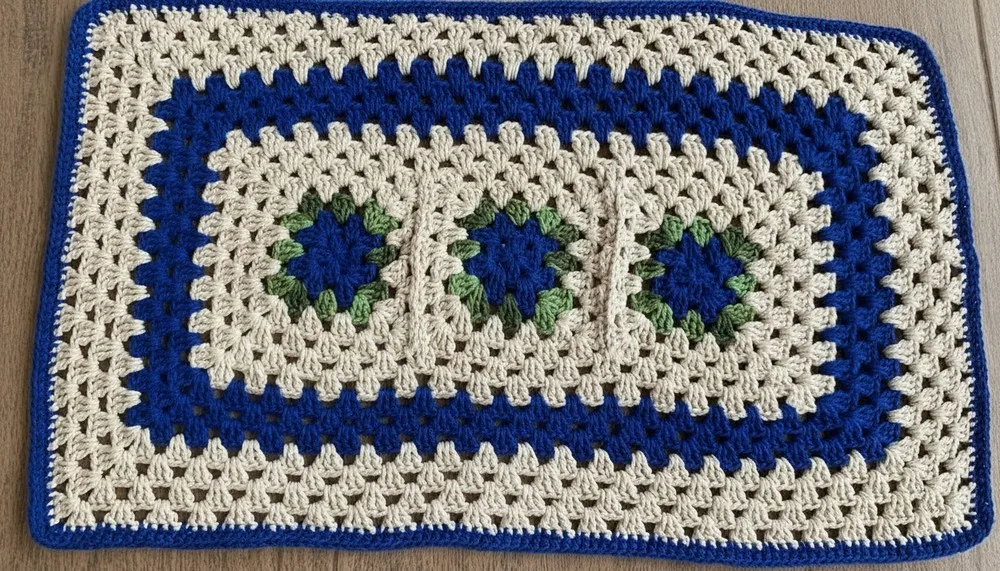
The build is refreshingly simple and completely modular. You make three flat flower squares: a blue center worked from a magic ring in granny blocks of 3 dc, then a green round that reads as leaves, then two rounds of white. The second and third squares are joined to their neighbour as you work that second white round, so there is no sewing at the end. One transition round travels around all three squares to straighten the edge, and from there the rug simply grows in the established pattern — shells in the four corners, 3-dc blocks on every side. Skill-wise this sits comfortably at beginner level: it is a solid introduction to joining motifs and working in rounds to make something much larger than one square.
What you end up with is a firm, chunky rug with real weight to it. Barbante number 6 worked on a 3.5 mm hook produces a dense, tightly packed fabric that lies down flat and doesn't slide around underfoot the way thin yarn mats do. The flat flower design keeps the surface level and comfortable to stand on, unlike raised 3D flowers. It is fully washable and long-lasting, so it stays fresh even in busy households with pets or children, and it makes a genuinely useful housewarming gift — something practical the recipient will actually put on their floor.
- Start each flower center with a magic ring in blue and work two granny rounds — 3-dc blocks with ch-2 corners, then a shell in every corner.
- Attach green at a corner and work the leaf round — shells in the corners, 3 dc in the side spaces — to finish the flat flower square. Make three.
- Work two full white rounds around the first square in the same shell and block pattern.
- Join the second and third squares as you work their second white round, holding the pieces back-to-back and replacing the ch-2 corners and ch-1 spaces with sc into the finished square.
- Work the transition round around all three joined squares, adding 1 dc at each corner and 1 dc in the center join to keep the edge straight.
- Grow the rug in the established pattern following the color sequence: 3 white rounds, 1 pink, 3 more white, 1 final pink.
- Edge the rug with a round of sc, working (1 sc, ch 1, 1 sc) in each corner space, then a second sc round directly over the first for stability.
- Thread the tails onto a tapestry needle, weave them deep into the dense fabric, trim close, and put the rug where you need it.
Materials
- Barbante (cotton twine) number 6 in blue — for the flower centers.
- Barbante (cotton twine) number 6 in green, plain or variegated — for the leaves.
- Barbante (cotton twine) number 6 in white/raw — for the main body.
- Barbante (cotton twine) number 6 in pink/purple — for the accent rows and the border.
- 3.5 mm crochet hook.
- Tapestry needle for assembly.
- Scissors.
Crochet Abbreviations
- ch
- chain
- st
- stitch
- sl st
- slip stitch
- sc
- single crochet
- dc
- double crochet
- shell
- shell stitch — (3 dc, ch 2, 3 dc) worked in one corner space
Free Crochet Rectangle Rug Pattern for Cozy Floor Decor
Step-by-Step Pattern
Flat Flower Square 1. The Flat Flower Square (make 3). The whole rug is built from three flat flower squares worked in the granny stitch — blocks of 3 dc — which is why it is rated beginner. The flat flower keeps the rug level and comfortable underfoot, unlike raised 3D flowers, and the design is highly modular: you can make the rug longer simply by adding more squares.
Center (Blue) Center (Blue): Start with a magic ring. The first two rounds of every square are worked in blue and form the flower center.
- Round 1
Ch 3 (counts as 1st dc), 2 dc, ch 2. 3 dc, ch 2. Repeat 3 times to create 4 blocks of 3 dc. Join and sl st to the corner.
- Round 2
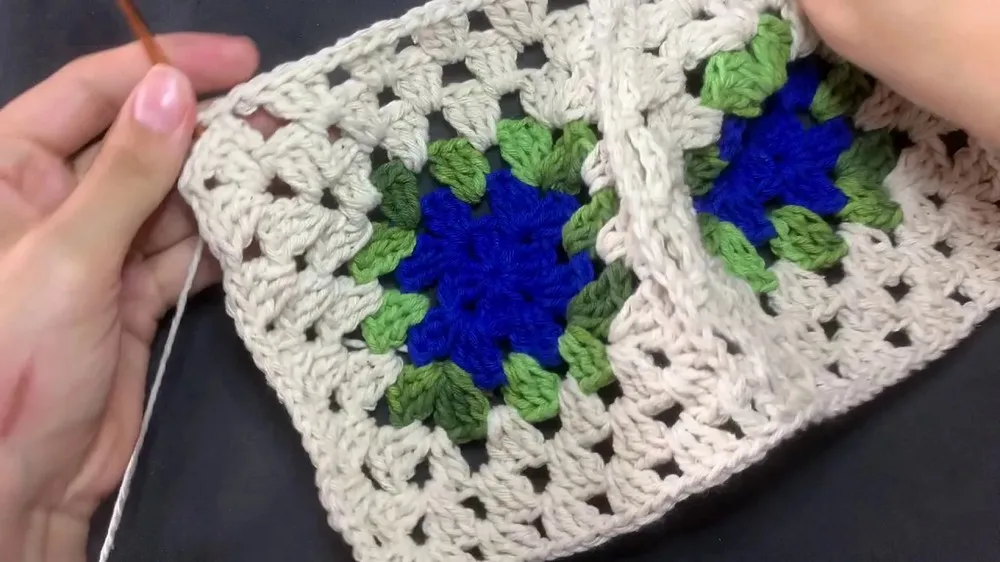
In each ch-2 corner, work a “shell”: (3 dc, ch 2, 3 dc). Separate shells with ch 1. Fasten off.Leaves (Green) Leaves (Green): the next round is worked in green — plain or variegated — attached to any corner of the finished blue center. It frames the flower with leaves and takes the motif out to its full square shape.
- Round 3
Attach green yarn to any corner. Work a shell: (3 dc, ch 2, 3 dc). In the side spaces, work 3 dc. Separate all blocks with ch 1.Main Body 2. Main Body and Joining. Base (White): attach the white/raw twine to a finished square. The white rounds repeat exactly the same shell and block pattern as the green round, so nothing new to learn here.
- Rounds 4-5
Attach white yarn. Work the same shell and block pattern as the green round. Complete two full rounds for the first square.Transition Round Transition Round: with all three squares joined into a rectangle, this round travels around the whole piece for the first time and evens out the two joining seams so the edge runs straight.
Joining Step by step: Joining. As you work the second white round for the next two squares, join them to the previous square as you go. Replace the ch-2 in the corner with a single crochet (sc) into the corner of the finished square. Replace the ch-1 on the sides with a sc into the side space of the finished square. Always place the pieces back-to-back (wrong sides together) so the single crochet joins sit on the back of the work and the front surface of the rug stays perfectly smooth.
- Round 6
Once all three squares are joined, work one continuous round of shells in the corners and 3-dc blocks in every side space. At the joining points, work 1 dc in each corner and 1 dc in the center join to keep the row straight.Growing the Rug 3. Growing the Rug. Body Rows: continue working rounds in the established pattern — shells in the 4 corners, 3-dc blocks on the sides. The color sequence below is the one used in the original: 3 rows of white, 1 row of pink, 3 more rows of white, 1 final row of pink.
- Rounds 7-9
3 rows of white — continue working rounds in the established pattern (shells in 4 corners, 3-dc blocks on sides).
- Round 10
1 row of pink, worked in the same established pattern.
- Rounds 11-13
3 more rows of white, worked in the same established pattern.
- Round 14
1 final row of pink, worked in the same established pattern.The Border 4. The Border. Finishing (Purple/Pink): the rug is edged with two rounds of single crochet in the accent color. The first round squares off the shells and the corner increase stops the edge curling inward; the second adds thickness and stability.
- Round 15
Work a round of single crochet around the entire rug. In each corner chain space, work: (1 sc, ch 1, 1 sc) to prevent the rug from curling inward.
- Round 16
Work a second round of sc directly over the first to add thickness and stability to the edge.Finishing Fasten off, then weave in every tail with the tapestry needle and trim close. The rug is ideal as a kitchen sink mat, a bathroom rug or an entryway runner — and because it is modular, more squares make it longer whenever you want a bigger one.
More photos
Important Notes
- 💡 The 3.5 mm hook is smaller than you might expect for barbante number 6, and that is intentional — the tight gauge is what gives this rug its stiffness and keeps it lying flat on the floor. Going up several hook sizes will produce a floppy, gappy mat that shifts underfoot.
- 💡 Barbante is hard on your hands. It has no give, and the small hook means real force on every stitch. Take a five-minute break each round, stretch your fingers, and consider a padded or ergonomic hook handle if you feel any strain in your wrist.
- 💡 Mark the four corner spaces with large, contrasting stitch markers. In dense cotton twine the ch-2 corner spaces disappear fast, and the markers are the difference between square corners and a rug that slowly spirals.
- 💡 Keep the twine feeding freely. Barbante cakes tangle and jam if you let them roll around on the floor — pull from the outside and drop the ball into a bowl or bag so it can turn without catching on furniture legs.
- 💡 Make the three squares match before you join them. Lay them on top of each other after the green round and again after the two white rounds — if one is noticeably tighter or larger, redo it now, because a mismatched square pulls the whole rectangle out of true once it is joined in.
- 💡 Have your tapestry needle ready before you finish — it needs a large eye to take cotton twine. With four colors there are a lot of tails. Weave each one at least a couple of inches into the body of the rug, going in two different directions so they cannot work loose with foot traffic and washing.
Common Mistakes and Fixes
- Joining the squares with the right
When you join the squares, always place the pieces back-to-back — wrong sides together. That puts the single crochet joins on the back of the work and keeps the front surface of the rug perfectly smooth. Check the orientation before you make the first joining sc, because unpicking a join through dense barbante is slow work.
- Missing a corner shell, which makes
Every round travels a longer distance than the one before it, and the (3 dc, ch 2, 3 dc) shell in each of the four corners is what covers that extra distance. Count your four corner shells at the end of every round and place them in the same spot every time. Lay the piece on a flat floor as you go — if the edges are lifting, you are short a corner shell, not stitching too loosely.
- Adding extra 3-dc blocks
This is the opposite problem and it is just as common with thick twine, because ruffling is hard to spot until it's obvious. Work exactly one 3-dc block in each side space and nothing more. If the edge is fluting, rip back to the last flat round and re-count the blocks along each side. A rug that ruffles will never sit flat on the floor, and blocking will not save it.
- Losing the corner spaces in the dense barbante fabric.
Cotton twine hides stitch definition much more than smooth yarn does, and once the rug grows the ch-2 corner spaces become hard to see. Drop a stitch marker into each of the four corner spaces and move them up as you go. Without them you will drift, and the corners will slowly rotate around the rug.
- Changing color at the very end
This rug changes color four times — blue to green, green to white, white to pink, pink to the border — so it pays to do it cleanly. Work the last stitch before the change until two loops remain on the hook, then yarn over with the new color and pull it through to finish that stitch. The color break comes out crisp instead of muddy, which really matters where the pink accent row meets the white body.
- Knotting a new ball of twine
Knots in thick barbante create a hard lump you will feel through the rug every time you step on it. Join new twine by starting it a few stitches early and carrying both strands, or split the plies and splice them together. Leave generous tails and weave them deep into the fabric with the tapestry needle before trimming close.
Variations
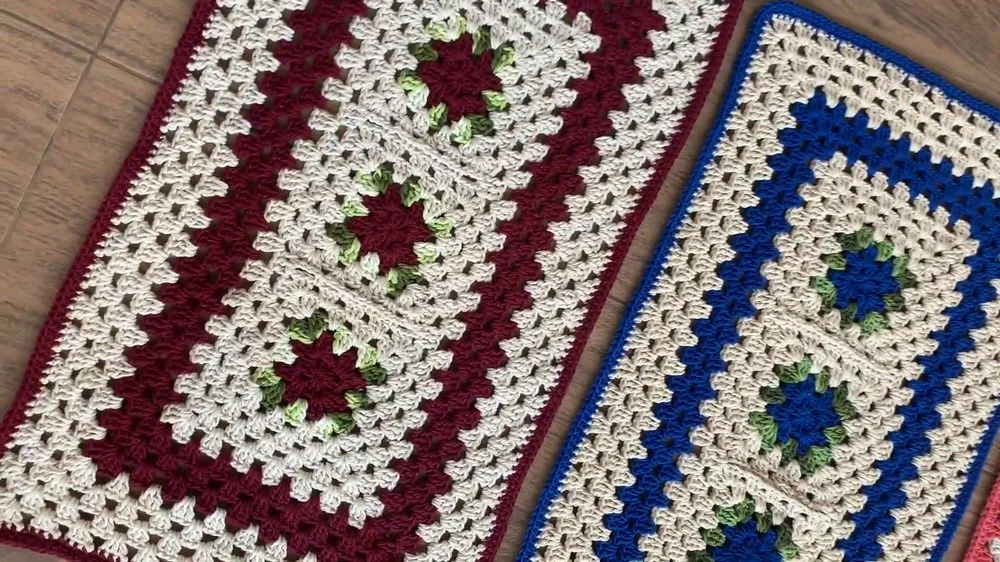
- The blue-and-green flower on a white ground is a starting point, not a rule. Swap the centers for deep terracotta with a cream body for a warm Mediterranean kitchen look, or go tonal with three shades of the same blue moving light to dark from the flower outward — that ombre effect costs you nothing extra and looks far more expensive than it is. For a monochrome bathroom, work the flowers in charcoal and the body in soft grey. A variegated green for the leaf round, exactly as the pattern suggests, gives every square a slightly different personality for free. Size is easy to control here because the design is modular: three squares make the rectangle shown, and adding a fourth or fifth square makes the rug longer, while extra body rounds after the transition round make it wider. Just keep a shell in each of the four corners every round or the fabric will start to dome. For substitutions, any cotton twine or fabric-style yarn in a comparable thickness works — recycled t-shirt yarn gives a plusher, squishier rug with more give underfoot, while polyester macramé cord makes a version that shrugs off water and suits a bathroom or entryway better. Rope-style cord will feel harsher on the hands but produces the most rigid, mat-like result. You can also change the accent rhythm: instead of one pink row between the white bands, run two narrow accent rows, or edge the whole thing in the accent color only. A set of two rugs in coordinating colorways makes a lovely matched pair for a galley kitchen.
- I have a soft spot for projects that give you a finished object at the end of one sitting, and this rug is exactly that. What I love most is the moment the third square gets joined on and the rectangle suddenly exists — three small motifs you could hold in one hand become an actual rug. Working with barbante number 6 is its own kind of satisfying too. The twine has body, so every granny block stands up crisply instead of flopping, and you can feel the fabric getting sturdier as the rounds build. The 3.5 mm hook keeps things tight and structured, which is the whole reason this rug lies flat instead of rippling at the edges. And then there is the blue flower center with its green leaf round — that little bit of intentional color makes the piece read as designed rather than improvised. I finished mine, laid it in front of the kitchen sink, and stood on it for a good minute just enjoying how solid it felt. Simple project, honest materials, immediately useful. That's my favorite combination.
Frequently Asked Questions
What exactly is barbante, and can I use something else?
Barbante is a Brazilian cotton twine sold by number, with number 6 being a thick, rope-like weight that's popular for rugs, bags and baskets. Any comparable cotton twine, macramé cord, or fabric-style yarn of similar thickness will work. Just expect the drape and stiffness to change a little with each substitute.
A 3.5 mm hook seems small for twine this thick — is that right?
Yes, and it's deliberate. Rugs need a firm, dense fabric so they hold their shape and don't shift when you step on them, and a smaller hook is exactly how you get that. Your hands will work harder, but the finished rug will be far more durable.
How do I make the rug bigger or change its proportions?
The design is modular, so length is set by the number of squares: three squares give the rectangle shown, and a fourth or fifth makes it longer. Width comes from the body rounds after the transition round — just keep repeating the established pattern for as many rounds as you like before you work the border. Keep a shell in each of the four corners in every added round so it stays flat.
My edges are curling or lifting off the floor. What went wrong?
Check the corners first — each corner needs its full (3 dc, ch 2, 3 dc) shell every round, and a missed shell makes the piece cup. On the border, the (1 sc, ch 1, 1 sc) corner increase is there specifically to stop the edge curling inward, so don't skip it. Rip back to the last round that sat flat and fix it early; cupping only gets worse as the rug grows.
Can I wash this rug?
Cotton twine washes well, which is one of the best things about this project — the rug stays fresh even in busy households with pets or children. Machine wash cold on a gentle cycle and lay it flat to dry, reshaping the rectangle with your hands while it's damp. Expect a small amount of shrinkage and a slightly softer feel after the first wash.
Original pattern: https://redagapeblog.com/free-crochet-rectangle-rug-pattern/
About the Author

Marisol QuinteroWho runs Crochet Obsessed, why a stitch count sits at the end of every round, how a pattern gets written here, and the things this site will never do.
More Patterns
- IntermediateNo. 01

Slouchy everyday beanie worked flat in half double crochet
Crochet beanie pattern for a slouchy everyday look worked flat with hdc rows, then seamed into a soft,…
- IntermediateNo. 02
Crochet amigurumi doll with dress, shoes, and hat
Crochet amigurumi doll pattern with dress, shoes, and hat details for a soft, huggable keepsake you build one…
- IntermediateNo. 03
Chunky moss stitch crochet sweater with raglan-free shoulders
Chunky crochet sweater pattern using moss stitch, worked flat with a 10mm hook for a soft, fast, cool-weather…


