- LevelIntermediate
- Time4-6 hours
- Hook3.5 mm
- YarnFingering
About This Pattern
This one feels like a lullaby you can hold in your hands. It is small, it is quiet, and it comes together fast enough to finish in a single quiet afternoon. There is something calming about a project sized for a newborn, where every stitch feels tender instead of tedious.
Your hands will spend most of the time in back loop only stitches, building rows of double crochet and single crochet that stack into a soft ribbed texture. It asks for steady tension more than speed, since the ribbing only looks right if your loops stay even. Turning at the end of each row becomes a small rhythm you settle into.
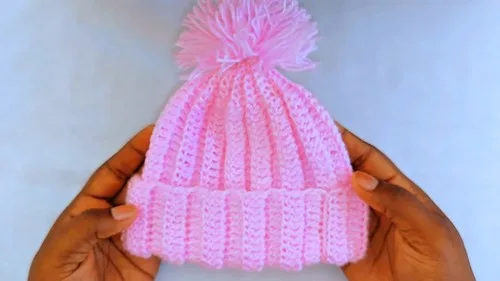
Once it is folded and seamed, this hat sits like a little knit cap on a shelf or in a bassinet, its ribbed brim catching the light in soft ridges. It looks tailored, not fussy, the kind of thing that makes a nursery corner feel finished. A pom-pom on top gives it just enough personality to stand out in a stack of onesies.
- Start with a slip knot and a long chain to set the width of your panel.
- Work the first row into that chain, mixing double crochet and single crochet stitches.
- Turn and begin working every following row in the back loop only for that ribbed texture.
- Repeat the double crochet and single crochet sequence across each row until the panel is the right length.
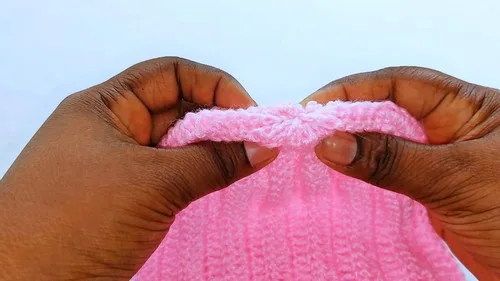
- Fold the finished panel in half lengthwise so the ribbing lines run the right direction.
- Sew the short sides together with a yarn needle to form a simple tube shape.
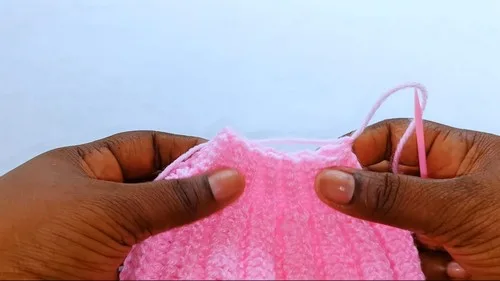
- Weave yarn around the top opening and pull it snug to close the crown.
- Weave in your ends and add a pom-pom if you want a little extra flair.
On the desk
- 3.5mm crochet hook
- 3 ply yarn
- Yarn needle
- Scissors
- Pom-pom (optional)
Stitch shorthand
- dc — double crochet
- sc — single crochet
- BLO — back loop only
- ch — chain
Fold over ribbed baby hat crochet pattern for newborns
Main Pattern
Start with a slip knot.
Chain 42 stitches.
- Row 1
Establishing the Hat Shape Begin in the 3rd chain from the hook; Work 1 double crochet (dc) into the next 36 chains; Make 6 single crochets (sc) in the remaining 6 stitches; Chain 1 and turn your work.
- Row 2
Work 6 single crochets in the back loop only (BLO); Then work 34 double crochets in the back loop only; Chain 2 and turn your work.
- Row 3
Work 34 double crochets in the back loop only; Work 6 single crochets in the back loop only; Chain 1 and turn your work.
- Row 4
Work 6 single crochets in the back loop only; Then work 34 double crochets in the back loop only; Chain 2 and turn your work.
- Row 5
Work 34 double crochets in the back loop only; Work 6 single crochets in the back loop only.Repeat Rows 2 to 5 until you have a total of 30 rows; Chain 1 and fasten off the yarn.
More shots
Where it goes
- A go-to gift for a new parent, paired with a matching set of booties in the same yarn.
- A soft prop piece for newborn photo sessions, especially layered with a simple wrap blanket.
- A everyday layer for stroller walks, worn under a hood on cooler mornings.
- A keepsake piece for a memory box, stored alongside a onesie or hospital bracelet.
Care
Hand wash in cool water with a gentle soap, since fine yarn like this can felt or lose its softness with rough agitation.
Lay the hat flat on a towel to dry rather than hanging it, so the ribbed rows keep their shape instead of stretching out.
Store it folded flat in a drawer rather than on a hook, which keeps the brim from creasing in the wrong direction over time.
Assembly
- Step 1 Fold the crocheted panel in half lengthwise.
- Step 2 Use a yarn needle to sew the short sides together to form a tube.
- Step 3 With the yarn needle, weave the yarn around the top edge of the tube.
- Step 4 Gently pull the yarn to cinch and close the top opening of the hat.
- Step 5 Secure the yarn and weave in all ends.
- Step 6 Attach a pom-pom to the top for added charm (optional).
Easy to get wrong
Losing track of BLO
It is easy to slip back into working both loops out of habit, especially after a break. Check your first stitch of every row before continuing, since one missed back loop only stitch flattens the ribbing right there.
Uneven chain 1 versus chain 2 turns
The pattern alternates between chaining 1 and chaining 2 at the end of rows, and mixing them up throws off your row height. Glance at the row you just finished before deciding how many chains to make.
Sewing the seam on the wrong sides
It is simple to seam the long edges by mistake instead of the short sides, which changes the whole shape of the hat. Lay the folded panel flat and confirm which edges are the short ones before threading your yarn needle.
Between the songs
- The real satisfaction here is in the back loop only technique, which turns plain double crochet and single crochet rows into a stretchy, ridged fabric that behaves almost like knit ribbing. Watching those front loops stack up into visible texture as you work is genuinely rewarding, especially once you see the pattern repeat click into place row after row. Folding a single flat panel into a finished hat, rather than working in the round from the start, feels like a clever shortcut once you get to the assembly step. Seaming the short sides into a tube and cinching the top closed is quick, so you get a full, wearable result without a long commitment. It is a small piece that teaches a technique worth keeping in your back pocket.
Listener questions
Why does the pattern use back loop only for most of the rows?
Working in the back loop only leaves the front loops exposed as a visible ridge on every row. Stacked over several rows, those ridges create the stretchy, rib-like texture that makes this hat look knit rather than crocheted.
Can I use a different fiber than the 3 ply yarn listed?
You can, but the drape and softness of the finished hat depend a lot on that lightweight yarn choice. A heavier yarn with the same 3.5mm hook will make a denser, less stretchy fabric.
Why does the panel get folded instead of worked in the round?
Working flat rows keeps the back loop only ribbing easy to see and count as you go, which is trickier to track in the round. The fold and seam step at the end turns that flat ribbed panel into a proper hat shape quickly.
Is the pom-pom necessary to finish the hat?
No, the pom-pom is listed as optional in the materials. The hat is fully finished and functional once the top is cinched and the ends are woven in.
What if my rows come out a different stitch count than expected?
Since this is a ribbed panel worked in back loop only, a missed stitch here or there will show up as a slight width change by the last row. Counting your double crochet and single crochet stitches at the end of each row before turning helps catch that early.
Original pattern: https://crocheteverything.com/easy-fold-over-crochet-ribbed-baby-hat-pattern-for-newborns/
About the Author

Marisol QuinteroWho runs Crochet Obsessed, why a stitch count sits at the end of every round, how a pattern gets written here, and the things this site will never do.
More Patterns
- IntermediateNo. 01

Rose Granny Square Tote Crochet Pattern
Rose granny square tote crochet pattern made from 18 dimensional rose squares for a sturdy, romantic everyday bag.
- IntermediateNo. 02
Tropical octopus baby blanket crochet pattern with appliqués
Tropical octopus baby blanket crochet pattern: a cream filet base with coral and turquoise octopus appliqués, leaves, and…
- IntermediateNo. 03
Sunny lemon couple amigurumi crochet pattern
Sunny lemon couple amigurumi crochet pattern with embroidered slices and safety eyes for a cheerful handmade shelf pair.


