- LevelIntermediate
- Time4-6 hours
- YarnWorsted
About This Pattern
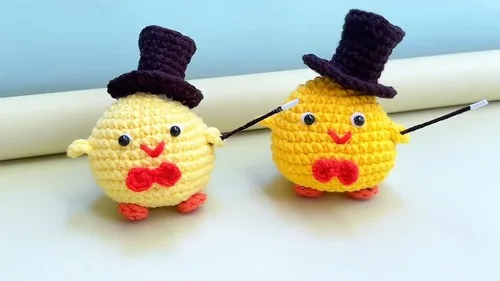
There is something cheerful about a tiny chicken that is small enough to ride along in your bag. This one has a round little body, a jaunty hat, and a bow that gives it a bit of personality. It is the kind of make that feels playful from the very first magic ring.
Once it is stuffed and finished, this chicken sits happily on a keyring, a backpack zipper, or a shelf next to other small amigurumi. It has enough roundness to feel huggable even at a small scale. Set it on a desk and it looks like it is about to say something.
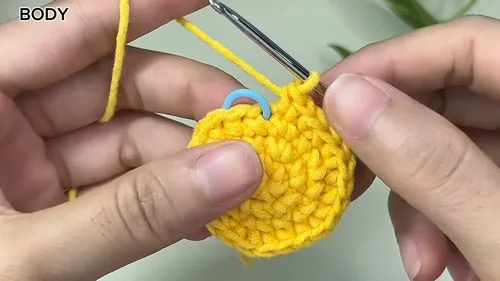
- Start the body with a magic ring and build it outward through steady rounds of single crochet increases.
- Keep increasing on a staggered schedule so the body grows into a smooth, rounded sphere rather than a cone.
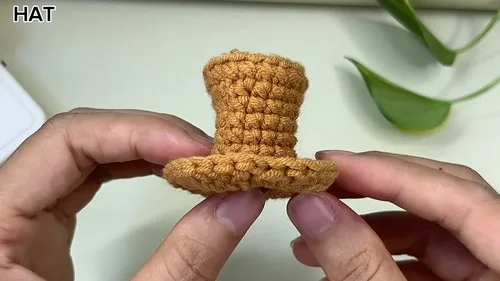
- Move on to the hat, starting it the same way with a magic ring closed with a slip stitch.
- Work a back loops only round on the hat to create a subtle ridge before shaping the top with decreases.
- Make the two legs quickly, each one just a magic ring closed and fastened off with no extra shaping.
- Put together a simple bow piece using chains, double crochet, and slip stitches worked around a center point.
- Stuff the body before closing it up so the chicken holds its round shape once assembled.
- Attach the legs, hat, and bow to the body, then glue on the eyes and any extra details you like.
On the desk
- Worsted weight yarn
- Crochet hook (size to suit your yarn)
Stitch shorthand
- st — stitch
- sts — stitches
- sc — single crochet
- hdc — half double crochet
- dc — double crochet
Fluffy crochet chicken amigurumi keychain pattern
Body
- Round 1
Start with a magic ring, make 6 single crochets (sc) into the ring. Pull the yarn tail to tighten the ring.
- Round 2
Crochet in continuous rounds. Make an increase in each st around (12 sc). Use a marker to mark the first st of each row.
- Round 3(18)
1 sc in the first st, 1 increase in the next st. Repeat around (18 sc).
- Round 4(24)
1 sc in the first 2 sts, 1 increase in the next st. Repeat around (24 sc).
- Round 5(30)
1 sc in the first 3 sts, 1 increase in the next st. Repeat around (30 sc).
- Round 6(30)
1 sc in each st around (30 sc).
- Round 7(36)
1 sc in the first 4 sts, 1 increase in the next st. Repeat around (36 sc).
- Round 8(36)
& 9: 1 sc in each st around (36 sc).
- Round 10(42)
1 sc in the first 5 sts, 1 increase in the next st. Repeat around (42 sc).
- Round 11(42)
& 12: 1 sc in each st around (42 sc).
- Round 13
1 sc in the first 5 sts, then 1 decrease. Repeat around.
- Round 14
1 sc in the first 4 sts, then 1 decrease. Repeat around.
- Round 15
1 sc in the first 3 sts, then 1 decrease. Repeat around.
- Round 16
1 sc in the first st, then 1 decrease. Repeat around (total 8 decreases). Stuff the body after this row.Last Row for the Body: Make 1 decrease in each st around, then fasten off, leaving a long tail for sewing. Weave the tail through the front loops of the remaining stitches, pull to tighten, and secure to close the body.
Hat
- Round 1
Magic ring, 6 sc into ring. Slip stitch to close.
- Round 2
Chain 1, increase in every stitch (12 sc). Slip stitch to close.
- Round 3
Chain 1, 1 sc, 1 increase. Repeat around (18 sc). Slip stitch to close.
- Round 4
Chain 1, working in back loops only, 1 sc in each st around (18 sc). Slip stitch to close.
- Round 5
Chain 1, 1 sc in the next four sts, 1 decrease. Repeat 2 more times. Slip stitch to close.
- Round 6
to 10: Chain 1, 1 sc in each st around. 15 sc in each row.
- Round 11
Final Chain 2, working in front loops only, make 1 dc increase in each st around (30 dc). Slip stitch to close, then fasten off and weave in the ends.
Legs (Make 2)
Start with a magic ring, 6 sc into the ring. Pull tight, 1 slip stitch into the first sc, then fasten off.
Bow
Start with a slip knot, chain 3.
In the first chain, make 1 half double crochet (hdc), chain 2, then 1 slip stitch in the same chain.
Chain 2, make 1 hdc in the same chain, then chain 2 and slip stitch again.
Fasten off, wrap the leftover yarn around the middle of the bow and tie.
More shots
Where it goes
- Clip it to a backpack or tote so it swings along on daily errands and school runs.
- Thread it onto a keyring to make a plain set of keys easier to spot in a bag.
- Set it on a bookshelf or desk with other small amigurumi for a cheerful little lineup.
- Pair it with a plain zipper pouch or pencil case as a small matching accent.
Color ideas
- Classic barnyard Work the body in warm yellow, the hat in a soft red, the bow in white, and keep the legs in a muted orange.
- Soft pastel coop Make the body in pale cream, the hat in dusty pink, the bow in light lavender, and the legs in a gentle peach.
Care
Hand wash the finished chicken in cool water if it is made from acrylic worsted weight yarn, since machine washing can felt the fibers and flatten the fluffy texture.
Lay it flat to air dry rather than wringing it, so the stuffing settles evenly and the round shape stays intact.
Reshape the body gently while it is still damp, smoothing the rounds with your fingers, then store it somewhere it will not get squashed under other items.
Assembly
- Step 1 Attach the legs, hands, and bow to the body as described. Glue the eyes onto the face at the specified positions, and don't forget to add any additional decorative elements as per the video instruction for your Chicken Magician.
Easy to get wrong
Losing track of the increase placement
Use a stitch marker at the first stitch of every round on the body, since the increase shifts one stitch later each time and is easy to misplace.
Skipping the back loops only round on the hat
Slow down on that single round and crochet only into the back loop, since it is what gives the hat its defined edge.
Overstuffing the body before closing
Add stuffing gradually and check the roundness as you go, since a tightly packed sphere can distort the final rounds and make the last decreases hard to close evenly.
Listener questions
Can I make the chicken without the keychain hardware?
Yes, the body, hat, legs, and bow all stand on their own without any hardware attached. It works just as well as a small decorative amigurumi for a shelf.
Why does the hat use back loops only on one round?
Working in back loops only on that single round leaves the front loops free, which creates a visible ridge line. It gives the hat a crisp, defined edge instead of a smooth, seamless curve.
Do the legs need any shaping at all?
No, each leg is just a magic ring closed with a slip stitch and fastened off. There is no increasing or decreasing involved, which makes them quick to finish.
In what order should I assemble the pieces?
Finish and stuff the body first, then attach the hat, legs, and bow once the body holds its shape. Glue the eyes on last so you can check the placement against the other features.
What is the bow made from?
The bow is built from a short sequence of chains, double crochet, and slip stitches worked around a center point. It is one of the quickest pieces in the whole pattern.
Original pattern: https://crocheteverything.com/crochet-chicken-amigurumi-keychain-pattern/
About the Author

Marisol QuinteroWho runs Crochet Obsessed, why a stitch count sits at the end of every round, how a pattern gets written here, and the things this site will never do.
More Patterns
- IntermediateNo. 01

Rose Granny Square Tote Crochet Pattern
Rose granny square tote crochet pattern made from 18 dimensional rose squares for a sturdy, romantic everyday bag.
- IntermediateNo. 02
Tropical octopus baby blanket crochet pattern with appliqués
Tropical octopus baby blanket crochet pattern: a cream filet base with coral and turquoise octopus appliqués, leaves, and…
- IntermediateNo. 03
Sunny lemon couple amigurumi crochet pattern
Sunny lemon couple amigurumi crochet pattern with embroidered slices and safety eyes for a cheerful handmade shelf pair.


