- LevelIntermediate
- Time4-6 hours
- Hook3.0 mm
- YarnWorsted
About This Pattern
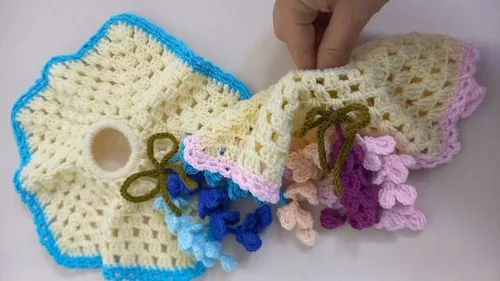
This one has that sunny, low-stakes feeling of a Saturday morning make. Light yellow anchors the center like a little sun, and I love how fast the shape reads as a flower once those double crochet clusters start stacking up. It is playful without being fussy, the kind of project you can finish while a podcast plays in the background.
Your hands get to settle into a rhythm here: sc around the tie first, then dc clusters with chain spaces building outward round after round. It is repetitive in the best way, the kind of repeat where you stop counting and just feel the pattern. There is a nice bit of finger dexterity needed to keep the dc stitches even as the rounds grow.
Once it is finished, this little flower cluster sits right at the edge of a ponytail or braid, catching light in yellow, blue, and green. It reads as handmade but tidy, the sort of thing that makes someone ask where you got your hair tie. Small, bright, and useful all at once.
- Start by securing your first color directly onto the hair tie with a slip knot.
- Work single crochet stitches all the way around the tie to cover it evenly.
- Join the round and begin building double crochet clusters separated by chain spaces.
- Repeat the cluster-and-chain sequence around the circle to shape the first flower layer.
- Continue working additional rounds, increasing the repeats each time to widen the flower.
- Finish the final round with a slip stitch to close the shape neatly.
- Make additional flowers and leaves in your other colors following the same approach.
- Arrange and attach the finished pieces to the hair tie base in a design you like.
On the desk
- 3.0 mm crochet hook
- Hair tie
- Yarn in light yellow, blue, and green
Stitch shorthand
- ch — chain
- dc — double crochet
- sc — single crochet
- hdc — half double crochet
- sl — slip stitch
Crochet a flower-filled hair tie with dc granny rounds
Part 1: Base (Light Yellow Yarn)
- Round 1(45)
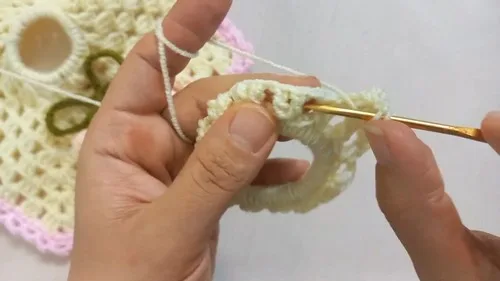
Attach the light yellow yarn to the hair tie with a slip knot. Work 45 single crochet (sc) stitches around the hair tie. Join with a slip stitch to the first sc to form a circle.
- Round 2
Chain 2 (counts as first double crochet). Work 2 double crochet (dc) stitches in the next stitch. Chain 1. Skip 2 stitches. Repeat the pattern (2 dc, 1 ch, skip 2 stitches) 15 times around the circle. Join with a slip stitch to the top of the initial chain 2.
- Round 3
Chain 3 (counts as first double crochet). Work 2 double crochet (dc) stitches in the same space. Chain 2. Work 3 double crochet (dc) stitches in the next space. Chain 1. Repeat the pattern (3 dc, 2 ch, 3 dc, 1 ch) 2 times. Continue this pattern around the circle, adjusting as needed to create a square shape.
Part 1: Base (Light Yellow Yarn) - Rounds 4-7
Continue the pattern from Round 3, increasing the number of (3 dc, 1 ch) repetitions in each side of the square as follows:
- Round 4
(3 dc, 2 ch, 3 dc, 1 ch), (3 dc, 1 ch) * 3
- Round 5
(3 dc, 2 ch, 3 dc, 1 ch), (3 dc, 1 ch) * 4
- Round 6
(3 dc, 2 ch, 3 dc, 1 ch), (3 dc, 1 ch) * 5
- Round 7
(3 dc, 2 ch, 3 dc, 1 ch), (3 dc, 1 ch) * 6 Finish the last round with a slip stitch to the beginning chain.
Part 2: Border (Blue Yarn)
- Border(85)
Attach the blue yarn to any stitch on the edge of the crocheted square. Work 1 single crochet (sc). Chain 3. Skip 1 stitch. Repeat the pattern (1 sc, 3 ch, skip 1 stitch) 85 times around the entire border of the square. Join with a slip stitch to the first sc.
Part 3: Flowers (Blue Yarn)
- Flower Petals
Chain 3. Work 2 double crochet (dc) stitches into the first chain. Chain 3. Slip stitch (sl) into the same first chain. Repeat this sequence (3 ch, 2 dc, 3 ch, sl) 4 times to create a flower with 4 petals. Make multiple flowers in varying shades of blue.
Part 4: Leaves (Green Yarn)
- Leaf Shape
Chain 10. Work a slip stitch into the second chain from the hook. Work a single crochet into the next chain. Work a half double crochet into the next chain. Work a double crochet into the next 3 chains. Work a half double crochet into the next chain. Work a single crochet into the next chain. Work a slip stitch into the last chain. Repeat on the other side of the chain to form a leaf shape. Make multiple leaves.
More shots
Where it goes
- Wear it as a statement hair tie with a low ponytail or messy bun where the flower sits visible at the base.
- Clip it onto a wrist as a spare hair tie that doubles as a bracelet between wears.
- Give it as a small handmade gift tucked into a card, since it works up in a single sitting.
- Pair a few together on a dresser tray as a tiny display of color while you decide which to wear.
Color ideas
- Sunny garden Light yellow for the center rounds, blue for the outer dc rounds, green worked separately as the leaf accents
- Cool bloom Blue as the center rounds, light yellow for the middle dc rounds, green reserved for leaves tucked behind the petals
Care
Hand wash the finished flowers gently in cool water if they need cleaning, since yarn fibers can felt or shrink with agitation and heat.
Lay the piece flat to dry on a towel, gently smoothing the dc clusters back into their rounded shape while damp.
Store finished hair ties in a small pouch or dish rather than looped tightly, so the flower shape keeps its form between wears.
Assembly
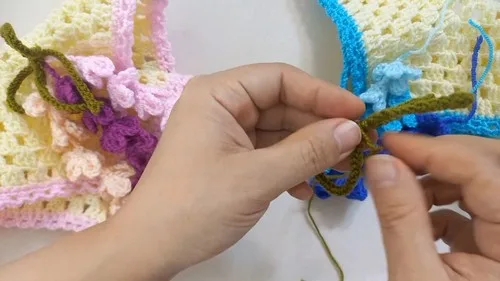
- Step 1 Attach the crocheted flowers and leaves to the hair accessory base, arranging them as desired to create a decorative design.
Easy to get wrong
Uneven sc count around the tie
Space your single crochet stitches evenly as you go rather than checking only at the end, since a crowded section will pull the base out of round.
Losing track of chain spaces
Pause after each (3 dc, 1 ch) repeat and count your completed sets before moving on, since it is easy to lose your place mid-round.
Skipping the join slip stitch
Always slip stitch into the top of the starting chain before beginning the next round, or the spiral will drift and the corners will misalign.
Between the songs
- What makes this satisfying is watching a plain hair tie disappear under structured dc rounds until it becomes something floral. The chain-2 and chain-3 turning chains keep each round crisp, and the 2 ch corner spaces in the later rounds give the piece its petal-like points. I like that the skip-2 pattern from the early rounds trains your eye to see the chain spaces forming before you even finish the round. By the time you are repeating the (3 dc, 1 ch) sequence across rounds 4 through 7, you are not just following instructions anymore, you are reading the shape. Attaching the crocheted flowers and leaves at the end turns a technical exercise into a designed piece, and that final arranging step is where the project actually becomes yours.
Listener questions
Can I use a hair tie of any thickness for this?
A standard elastic hair tie works well since the 45 sc stitches are meant to cover it fully. A much thicker or thinner tie may need a slightly different stitch count to look neat.
Do I need to make the leaves in a separate step?
Yes, the leaves are worked as their own small pieces in green and then attached during the final assembly step. They are not part of the main round sequence.
Why does the shape start round and end up more square?
The early rounds build a circle with even dc and chain repeats, while the later rounds with 2 ch corners begin pulling the shape toward a flatter, more angular silhouette. That shift is part of how the petal layers form.
Can I make just the flower without the hair tie base?
You could work the same rounds as a standalone motif for another project, though this pattern is specifically built starting from the hair tie foundation. Skipping the base means adjusting how you begin the first round.
How many flowers do I need for one hair tie?
The pattern gives quantities for one full set of rounds, and the assembly step lets you arrange as many flowers and leaves as you like. It really comes down to how full you want the design to look.
Original pattern: https://crocheteverything.com/how-to-crochet-flower-filled-hair-tie-tutorial-for-stylish-ladies/
About the Author

Marisol QuinteroWho runs Crochet Obsessed, why a stitch count sits at the end of every round, how a pattern gets written here, and the things this site will never do.
More Patterns
- IntermediateNo. 01

Slouchy everyday beanie worked flat in half double crochet
Crochet beanie pattern for a slouchy everyday look worked flat with hdc rows, then seamed into a soft,…
- IntermediateNo. 02
Crochet amigurumi doll with dress, shoes, and hat
Crochet amigurumi doll pattern with dress, shoes, and hat details for a soft, huggable keepsake you build one…
- IntermediateNo. 03
Chunky moss stitch crochet sweater with raglan-free shoulders
Chunky crochet sweater pattern using moss stitch, worked flat with a 10mm hook for a soft, fast, cool-weather…


