- LevelIntermediate
- Time4-6 hours
- Hook6 mm
- YarnWorsted
About This Pattern
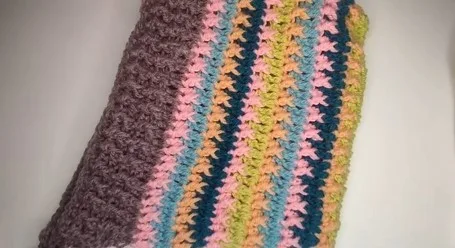
There's something about a hat with ear flaps that feels like it's already looking out for someone. This one starts flat, on a simple starting chain, and grows into a ridged, textured band before it folds into shape. It's a practical piece with a little bit of personality built right into the stitch pattern.
Picture it draped over the back of a chair by the front door, ready to grab on the way out. The ribbed band catches the light differently than the plain rows above it, giving it a hand-finished look. Add a pair of braided ties and it reads as something made for exactly one head.
- Start with a foundation chain sized to the head you're making it for.
- Work your first row of double crochet across, with extra stitches at the final chain to turn the corner.
- Come back along the other side of that starting chain to finish the foundation row.
- Return to plain double crochet rows, increasing at each end to keep the piece growing evenly.
- Alternate the increase row with the next row until the piece reaches close to its final width.
- Break the yarn, weave in ends, and shape the piece into the finished hat.
- Add braided ties to the ear flaps if you want that finishing detail.
On the desk
- Scissors
- Yarn needle (large enough for your yarn)
- Measuring tape in centimeters
- Medium weight (#4) yarn (Aran/Worsted)
- Crochet hook size 6mm (or size needed for desired softness)
Optional
- Different colors of yarn for stripes and braids
Stitch shorthand
- ch — chain
- st — stitch
- dc — double crochet
- hdc — half double crochet
- fpdc — front post double crochet
- bpdc — back post double crochet
- inc — increase
Flap-front crochet winter hat with braided ties
Main Pattern
- Round 1
Starting Chain Make a slip knot; chain until you reach the required length for the size you're making (e.g., for 4-5 years old, start with a 23cm chain).
- Round 2
First Row Chain one additional chain; skip the first two chains and double crochet into the third chain from the hook; continue with one double crochet into each subsequent chain; when you reach the last chain, make three double crochets into this final chain.
- Round 3
Turning the Row Working on the other side of the starting chain, make the same number of double crochets as you did for the first half of the starting chain; ensure to have an odd number of stitches total.
- Round 4
Next Row Change yarn color if desired, chain one and cut the previous color yarn; join new yarn with a slip knot; chain two and turn your work; start with a front post double crochet around the second double crochet from the previous row; alternate with a half double crochet into the next stitch; continue the pattern of front post double crochet, half double crochet till the end of the row.Alternate Round 5 and Round 6 for the main body of the hat.
- Round 5
(Repeat Row 1): Chain two for the first double crochet, make one increase in the second stitch, and double crochet in each stitch across, ending with an increase in the second-to-last stitch and a double crochet in the last stitch.
- Round 6
(Repeat Row 2): Chain two, turn your work, and follow the pattern of front post and half double crochet, as established.Continue these repeats until you are about 5-6cm from the desired final width of the hat.
- Round 7
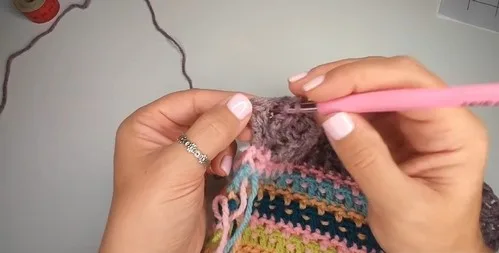
Ribbing Finish on a double crochet row; start the ribbing with chaining two and turning your work; make increases at the beginning and end of each row as before, but now use front post and back post double crochets for the ribbing pattern.
More shots
Where it goes
- An everyday walk-to-school or walk-to-work hat that keeps ears covered under the flaps.
- A car-seat or stroller layer, since the flat construction sits close and doesn't bulk up under a hood.
- A photo-ready accessory paired with a chunky scarf or a wool coat in a matching tone.
- A gift piece for a specific size, since the starting chain adjusts easily to the person wearing it.
Color ideas
- Tonal texture Keep the same color throughout so the front post double crochet band and the plain double crochet rows read as texture rather than color blocking.
Care
Hand wash the finished hat in cool water since Aran/worsted weight yarn holds its shape better without machine agitation.
Lay it flat to dry on a towel, easing the ear flaps and ribbed band back into place while damp.
Store it folded rather than hung, so the front post texture doesn't stretch out of shape over time.
Assembly
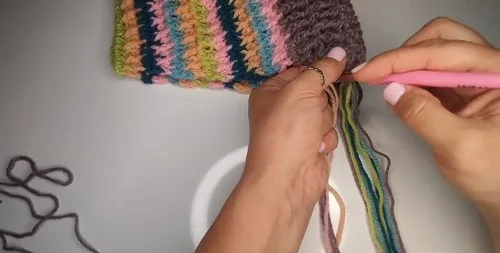
- Step 1 Once you've reached the desired width, break off yarn and weave in all ends.
- Step 2 Create braids or any other type of tie for the ear flaps if desired. Attach them securely.
- Step 3 Weave in any loose ends with your yarn needle.
- Step 4 Secure all knots and trim any excess yarn from your finishing touches.
Easy to get wrong
Losing the odd stitch count
Count carefully when you turn the starting chain and work the second half, since the pattern depends on an odd number of stitches. Recount before you move into the front post row.
Working into the wrong part of the post
Front post double crochet means reaching around the stitch below, not into its top loops. Slow down on the first few and check that the post, not the stitch head, is what your hook is wrapping.
Uneven edges from missed increases
Each increase row needs one added stitch near the start and one near the end, and skipping either will pull the piece off-center. Mark both edges with a stitch marker until the rhythm feels automatic.
Between the songs
- What makes this one satisfying is the front post double crochet band — you're working around the stitch itself, not into it, and that little bit of relief gives the hat a ribbed, structured edge that plain double crochet just can't fake. Pairing it with half double crochet in the same row keeps the texture from feeling heavy. Working the body flat, with increases built into each row, means you can watch the shape grow in front of you rather than trusting an invisible round. And because it starts and ends with a simple chain, it's an easy pattern to pick up mid-project without losing your place.
Listener questions
Can I make this hat in a different size than the chart shows?
Yes, the starting chain length is what controls the size, so you adjust that number for the head you're fitting. The rest of the pattern follows the same shaping regardless of the starting length.
Do I need to use a different color for the front post row?
No, that color change is optional and purely a design choice. The stitch pattern works exactly the same in a single color.
What if I don't want ear flaps or ties?
You can skip the braid step entirely and finish the piece as a plain wrapped hat. Everything through the shaping rows stays the same either way.
How do I know when to stop increasing?
Keep alternating the two body rows until the piece measures about 5-6cm short of your final desired width. That gap gives you room for the folding and seaming that shapes the finished hat.
Is a 6mm hook required or can I go smaller?
The pattern calls for 6mm, but you can size the hook to get the softness you want in the fabric. A smaller hook will make a denser, less drapey band.
Original pattern: https://crocheteverything.com/crochet-winter-hat-hood-pattern-cozy-piece-for-looking-stylish/
About the Author

Marisol QuinteroWho runs Crochet Obsessed, why a stitch count sits at the end of every round, how a pattern gets written here, and the things this site will never do.
More Patterns
- IntermediateNo. 01

Rose Granny Square Tote Crochet Pattern
Rose granny square tote crochet pattern made from 18 dimensional rose squares for a sturdy, romantic everyday bag.
- IntermediateNo. 02
Tropical octopus baby blanket crochet pattern with appliqués
Tropical octopus baby blanket crochet pattern: a cream filet base with coral and turquoise octopus appliqués, leaves, and…
- IntermediateNo. 03
Sunny lemon couple amigurumi crochet pattern
Sunny lemon couple amigurumi crochet pattern with embroidered slices and safety eyes for a cheerful handmade shelf pair.


