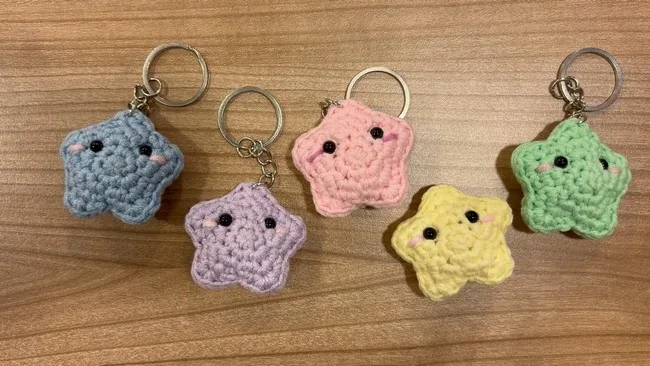
- LevelBeginner
- Time1-2 hours
- Hook3.0 mm
- YarnWorsted
About This Pattern
This project has the cheerful, no-fuss energy of a handmade market find, something you'd spot on a table and pick up just to hold. Two crocheted star discs, worked in a handful of quick rounds, join into a soft little charm with real personality. It's playful rather than precious, the kind of make that feels like a treat rather than a commitment.
Your hands get to practice the basics that make amigurumi click: a tight magic circle, clean single crochet increases, and a rhythm of stitch clusters and slip stitches that shapes each point almost by itself. There's a satisfying seam to sew at the end, whipstitching the two star pieces together while you tuck in just enough fiberfill to give the shape some life. None of it is fussy, but all of it teaches you something useful.
Once it's stuffed and sewn, this little star holds its shape on a shelf, dangles happily from a bag zipper, or sits quietly among other small softies on a windowsill. The flat-ish silhouette keeps it from looking bulky, so it reads more like a charm than a toy. Add a loop at one point and it becomes something you can hang, carry, or give away without a second thought.
The star is worked in joined, unturned rounds. Make two identical star pieces, decorating one before joining them. Gauge is not critical, but keep your stitches tight so the stuffing does not show through, and adjust your hook size if you're using a thinner or thicker yarn. Safety eyes are added before final assembly.
- Start each star piece with a magic circle and build it up through a couple of quick increase rounds.
- Shape the five points by alternating small clusters of single crochet with a slip stitch around the last round.
- Make two matching star pieces total, since one becomes the front and one the back.
- Decorate the front piece with safety eyes and a bit of pink yarn for cheeks while it still lies flat.
- Lay the two stars wrong sides together and line up the points before you start sewing.
- Whipstitch or mattress stitch around the edge using the tail from the front piece, working point by point.
- Pause a couple of points before the end to add a little fiberfill, then finish the seam and weave in your ends.
On the desk
Yarn
- Worsted or DK weight yarn in two colors
- Main color for star
- Pink (or color of choice) for cheeks
- Crochet Hook: 3.0 mm
Stuffing
- Polyester fiberfill or similar
Safety Eyes
- Two, 5 mm
- Stitch Marker
- Scissors
- Darning/tapestry needle
Stitch shorthand
- MC — Magic Circle
- ch — chain
- sc — single crochet
- sl st — slip stitch
- st — stitch
- inc — increase (2 sc in same stitch)
- rep — repeat
- rnd — round
A five-pointed amigurumi star keychain for beginners
STAR (Make 2)
- Round 1
Create a magic circle (MC) , work 5 sc into MC. Pull circle closed. (5 sts)
- Round 2
Inc in each st around — [2 sc in each st] × 5 (10 sts)
- Round 3
Rep [ 3 sc in next st, sl st in next st ] x 5 times
You will have 5 points; each point starts with a cluster of 3 sc and is followed by a sl st.
- Round 4(20)
For each repeat: sc in first st, 3 sc in next st, sc in next st, sl st in next st. Repeat this sequence five times total (once per "star point"). At end of rnd, you should have 20 sts: (4 sts x 5 points)
- Round 5
For each repeat: Skip 1 st, sc in next st, 5 sc in next st, sc in next st, Skip 1 st, sl st in next st. Repeat this sequence five times total. At the end of this round, fasten off on the first piece leaving a short tail. For the second, leave a long tail for sewing.Tighten and weave in any beginning tails on the wrong side of the second star piece. Tie the tail ends together with a knot, trim excess close to the knot.
FACING & DETAILS
Face Placement: Safety Eyes: Place eyes between rounds 3 and 4, one on each side of center. Test placement for symmetry.
Cheeks: Thread small lengths of pink yarn (or color of choice) below each eye.
Pull ends to the back and tie gently, trim excess.
Secure Eyes: Attach the backs of the safety eyes after cheek placement.
More shots
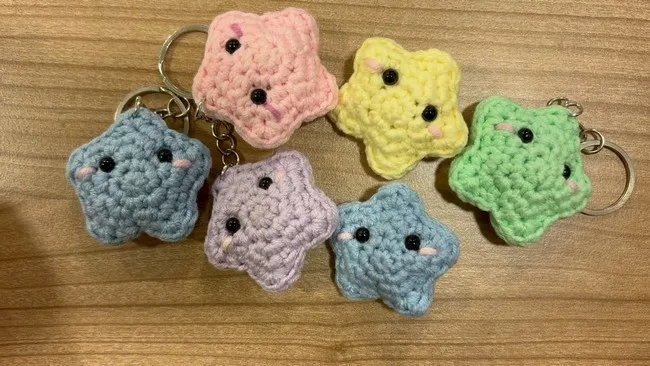
Where it goes
- Clip one onto a backpack or diaper bag zipper for a small, colorful grab-and-go charm.
- String several along a length of twine to make a simple hanging garland for a nursery or craft room.
- Tie one onto a wrapped gift as a topper that doubles as a keepsake once the paper comes off.
- Set a few on a shelf or windowsill among other small softies for a bit of low-key handmade decor.
Color ideas
- Sunshine Classic Work all three rounds of the star body in a warm yellow main color, then add cheeks in soft pink.
- Ocean Pop Work the star body in a teal or blue main color and use a coral pink for the cheek details.
Care
Hand wash gently in cool water if the yarn and fiberfill get dirty, then press out excess water in a towel rather than wringing.
Lay the star flat to dry and gently reshape the points with your fingers so it dries in its proper star silhouette.
Store it flat or loosely in a box rather than squished in a bag, since flattened fiberfill can be slow to bounce back.
Assembly
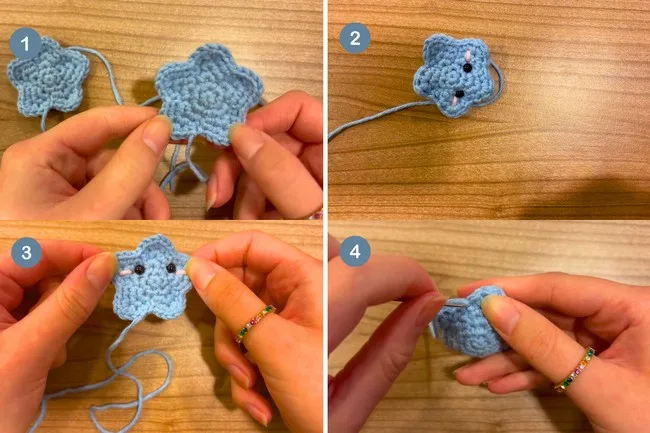
- Step 1 Place the two stars wrong sides together, aligning points.
- Step 2 Using the long tail from the front star and a darning needle, begin whipstitching or mattress stitching through both layers, matching up the stitches point by point.
- Step 3 When about 2–3 points remain unsewn, gently stuff the star with fiberfill using crochet hook, scissors, or your fingers. Do not overstuff — the star should remain mostly flat but with some dimension.
- Step 4 Finish sewing the star closed.
- Step 5 Fasten off, weave in any remaining tail by pulling through the body of the star and trimming flush.
Easy to get wrong
Loose magic circle center
Pull the starting tail snug before you move into round two, or the center hole will show once the piece is stuffed.
Losing track of the point pattern
Drop a stitch marker at the start of each point cluster so the three single crochets and slip stitch stay in rhythm around the round.
Star points not lining up for sewing
If the front and back points do not match, undo a few stitches on the piece that's off and recheck your stitch count and placement before continuing.
Between the songs
- What I love about this one is how much technique fits into something so small. You get a magic circle start, two clean increase rounds, and then that clever point pattern, three single crochets followed by a slip stitch, repeated around, which turns a plain circle into a proper five-pointed star with almost no counting stress. Joining the two pieces with a whipstitch or mattress stitch is a small skill that pays off everywhere else in amigurumi. Placing safety eyes between specific rounds and tucking cheek color underneath teaches you to think about symmetry before you commit. And because the pieces are worked flat before assembly, you can fix mismatched points before you ever pick up your needle to sew.
Listener questions
Do I need safety eyes, or can I embroider the face instead?
Either works, and the pattern notes embroidering the eyes and cheeks by hand as a safer choice if the star is meant for a small child. Embroidery also lets you skip a hardware step entirely.
How many star pieces do I actually need to make?
You'll make two identical star pieces, one for the front and one for the back. Only the front piece gets the eyes and cheeks before you join them.
Is the hanging loop required?
No, it's an optional add-on at one of the star points if you want to hang the piece rather than just clip or carry it. You can leave it off entirely for a plain keychain or ornament.
How much fiberfill should I use?
Keep the stuffing minimal so the star stays mostly flat with just a little dimension, rather than puffing up round. Overstuffing will pull the points out of their crisp shape.
What do I do if the two stars don't match up when I go to sew them?
Stop and carefully undo a few stitches on whichever piece is off, then recount and reposition before you keep whipstitching. It's much easier to fix a few stitches early than to unpick a finished seam.
Original pattern: https://redagapeblog.com/how-to-crochet-a-mini-amigurumi-star-keychain-tutorial-for-beginners/
About the Author

Marisol QuinteroWho runs Crochet Obsessed, why a stitch count sits at the end of every round, how a pattern gets written here, and the things this site will never do.
More Patterns
- IntermediateNo. 01

Slouchy everyday beanie worked flat in half double crochet
Crochet beanie pattern for a slouchy everyday look worked flat with hdc rows, then seamed into a soft,…
- IntermediateNo. 02
Crochet amigurumi doll with dress, shoes, and hat
Crochet amigurumi doll pattern with dress, shoes, and hat details for a soft, huggable keepsake you build one…
- IntermediateNo. 03
Chunky moss stitch crochet sweater with raglan-free shoulders
Chunky crochet sweater pattern using moss stitch, worked flat with a 10mm hook for a soft, fast, cool-weather…


