- LevelIntermediate
- Time6-8 Hours
- Hook3 mm
- YarnWorsted
About This Pattern
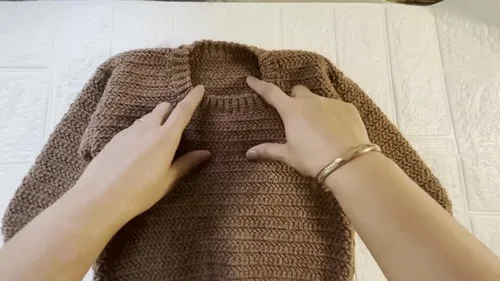
This easy crochet sweater is built entirely from half double crochet, making it one of the most approachable garment projects you can hand-make for an older child. Two flat panels form the back and front, two sleeves are worked in the round from the armhole down, and everything comes together with simple seaming. It's perfect for a crocheter who has made scarves or blankets before and wants to level up into wearable garments without diving into complicated shaping or charts.
The techniques here are refreshingly straightforward: chaining a foundation row, working HDC across in straight rows, and later working HDC in the round for the sleeves with simple decrease rounds. The trickiest part is the neck shaping on the front panel, where you split the work into two shoulder sections, but even that follows a clear, repeatable pattern. Expect to spend several relaxed evenings on this, with the back panel going fastest and the sleeves offering easy, portable rounds you can crochet anywhere.
The finished sweater lands around a 25-inch chest with roughly 13 inches of body length, giving it a relaxed, true-to-size fit for an older child rather than a snug baby-style garment. The HDC fabric has a soft, slightly textured drape that feels sturdy without being stiff, and the finished neckline gives it a tidy, store-bought look. It makes a wonderful handmade gift for a birthday, a back-to-school treat, or simply a cozy staple to keep a favorite kid warm all season.
- Chain a wide foundation row and work straight rows of half double crochet to build the back panel to its full length.
- Repeat a similar flat HDC panel for the front, but stop partway to split the stitches into two shoulder sections.
- Work each shoulder side separately around the neck opening, then finish both to matching row counts.
- Fasten off the panels and set them aside once both reach the same total row count and length.
- Join the two panels at the shoulders using slip stitches or a sewn seam for a clean connection.
- Measure down from each shoulder to mark where the armhole should begin, then seam the sides up to that mark.
- Join yarn at each underarm and work the sleeves in continuous rounds, decreasing gradually to taper them toward the cuff.
- Finish the neckline with a simple slip stitch border worked around the opening for a tidy, ribbed-look edge.
Materials
- Approx. 200 grams of yarn
- 3 mm crochet hook
- Chest measurement target 25 inches
Crochet Abbreviations
- ch
- chain
- hdc
- half double crochet
- sl st
- slip stitch
- sc
- single crochet
Easy crochet sweater pattern for older kids
Back Panel
Chest measurement target 25 inches.
Length should be about 13 inches.
Fasten off.
- Round 1
Chain 56, measuring about 12.5 inches.
- Round 2
Skip 2 chains and make HDC in the third chain from the hook; make one HDC in each chain across. Chain 2 and turn.
- Round 3
47 Repeat HDC rows, keeping straight edges by working into the turning chain, for a total of 47 rows of HDC.
Front Panel And Neck Shaping
Join yarn on the other side and repeat the same shaping for the second shoulder.
- Round 1
Start the same way as the back panel (chain 56, skip 2 chains, HDC in third chain from hook, HDC in each chain across, chain 2 and turn).
- Round 2
35 Make 35 rows of HDC.
- Round 36
Mark 17 stitches on each side for shoulders.
- Round 37
Work only up to the neck opening for the first side and complete the row. Chain 2 and turn.
- Round 38-47
Continue HDC rows until reaching 47 total rows.
Sleeves
Make 2- Round 1
Join yarn at the center of the underarm. Make 51 HDC around the armhole. Slip stitch to join the round. Chain 1 and turn. (51 hdc)
- Round 2-3
Make 51 stitches around. (51 hdc)
- Round 4
Decrease row: HDC two together at the start and end of the round.
- Round 5-30
Work 3 rounds regular and 1 decrease row (HDC two together at start and end) repeating this pattern until 30 rows are complete, leaving 37 stitches. (37 hdc)
Assembly Instructions
- Step 1 Place both panels with wrong sides out.
- Step 2 Join shoulder stitches using slip stitches or sewing.
- Step 3 Mark 5.5 inches from the shoulder for armholes.
- Step 4 Join side seams from the bottom up to the mark using slip stitches.
- Step 5 Neck Border: Join yarn at the back of the neck. Chain 6 and make slip stitches in the next 5 chains. Slip stitch into the next two stitches of the neckline. Turn and make 4 slip stitches in the back loop then secure the last stitch. Chain 1 and turn then make 5 slip stitches in the back loop. Slip stitch into the next two neckline stitches and turn. Repeat around the neckline. Join the ends with slip stitch seam.
- Step 6 Sleeve Cuff: Make one row of SC around the sleeve, reducing slightly for tightening. Chain 11 and make slip stitch back-loop ribbing around the cuff, then join ends.
- Step 7 Bottom Border: Repeat the same ribbing technique at the bottom of the sweater after chaining 11.
Important Notes
- Work a gauge swatch in HDC with your chosen yarn and 3mm hook before starting, since the finished 25-inch chest measurement depends on accurate tension.
- Keep your turning chains consistent throughout the back and front panels so both pieces end up the same length and seam together evenly.
- When marking the 17 shoulder stitches on the front panel, count from the outer edges inward so the remaining neck opening stays centered.
- Block both panels lightly before seaming; HDC fabric can curl slightly at the edges and blocking helps everything lie flat for assembly.
- Measure 5.5 inches from the shoulder seam for the armhole marker before joining side seams, and check both sides match before you start seaming.
- When picking up stitches for the sleeves at the underarm, distribute your 51 HDC evenly around the opening so the sleeve caps sit smoothly without puckering.
Common Mistakes and Fixes
- Losing count of the 47 total rows on the back and front panels.
Use a row counter or tally marks on paper after every 5 rows so you don't have to recount from row one when you lose your place.
- Turning chains counted inconsistently, causing wavy or uneven edges.
Decide from the start whether your chain-2 turning chain counts as a stitch, and apply that rule the same way on every single row.
- Misplacing the shoulder stitch markers on the front panel's neck shaping.
Lay the piece flat and measure evenly from each side before marking 17 stitches, then double-check both sides match before continuing.
- Joining the sleeve's foundation round unevenly, leading to a twisted first round.
Lay your starting chain flat and untwisted before slip stitching to join, and check the round isn't spiraled before working round two.
- Skipping or misplacing the decrease rounds in the sleeves, leaving them too wide.
Mark every decrease round on paper as you complete it so the sleeve tapers correctly down to the finished 37-stitch count.
- Seaming the shoulders and sides with mismatched stitch alignment.
Pin or clip the pieces together first, matching row for row, before sewing or slip stitching so the seam lies flat instead of puckering.
Variations
- I love this pattern because it proves you don't need fancy stitches to make something that looks genuinely polished. Every panel is worked in half double crochet, so once you've got your tension dialed in on the first few rows of the back panel, the rest just flows — no counting complicated stitch patterns, no juggling colorwork charts. The front panel's neck shaping is the one moment that asks for real focus, but splitting off those 17 stitches per shoulder feels so satisfying once you see the neckline take shape. Working the sleeves in the round straight from the armhole means no separate sleeve seams to sew in later, which is a genuine time-saver. And that finishing touch — the slip stitch neckband worked in the back loops — gives the whole sweater a clean, ribbed-looking edge that elevates it instantly. It's the kind of project where every session brings visible progress, which keeps me motivated to pick it back up night after night until it's ready for a very lucky kid to wear.
Frequently Asked Questions
What size does this sweater fit?
The finished sweater measures about 25 inches around the chest and 13 inches in body length, which suits an older child rather than a toddler. You can adjust the foundation chain and row count to size it up or down as needed.
Do I need to know how to work in the round for this pattern?
Yes, but only for the sleeves — the back and front panels are worked flat in straight rows. The sleeves are joined with a slip stitch and worked in continuous rounds, which is a great way to practice that skill if you're newer to it.
How do I know if I'm doing the neck shaping correctly?
After marking 17 stitches for each shoulder on the front panel, you'll work one side at a time, stopping at the neck opening and turning. Both shoulder sections should mirror each other in row count and stitch count when finished.
Is this pattern beginner-friendly?
It's a great next step for a confident beginner who already knows chain, HDC, and slip stitch. The stitches themselves are simple, but the neck shaping and sleeve decreases ask for a bit more attention than a basic scarf or blanket.
Original pattern: https://crocheteverything.com/easy-crochet-sweater-pattern-for-older-kids/
About the Author

Marisol QuinteroWho runs Crochet Obsessed, why a stitch count sits at the end of every round, how a pattern gets written here, and the things this site will never do.
More Patterns
- IntermediateNo. 01

Slouchy everyday beanie worked flat in half double crochet
Crochet beanie pattern for a slouchy everyday look worked flat with hdc rows, then seamed into a soft,…
- IntermediateNo. 02
Crochet amigurumi doll with dress, shoes, and hat
Crochet amigurumi doll pattern with dress, shoes, and hat details for a soft, huggable keepsake you build one…
- IntermediateNo. 03
Chunky moss stitch crochet sweater with raglan-free shoulders
Chunky crochet sweater pattern using moss stitch, worked flat with a 10mm hook for a soft, fast, cool-weather…


