- LevelIntermediate
- Time6-10 Hours
- Hook8 mm
- YarnAran (Medium)
About This Pattern
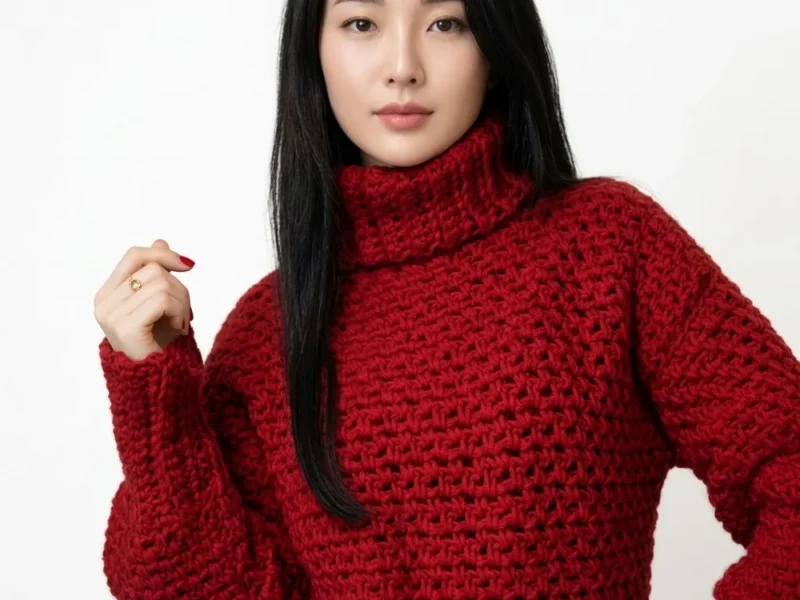
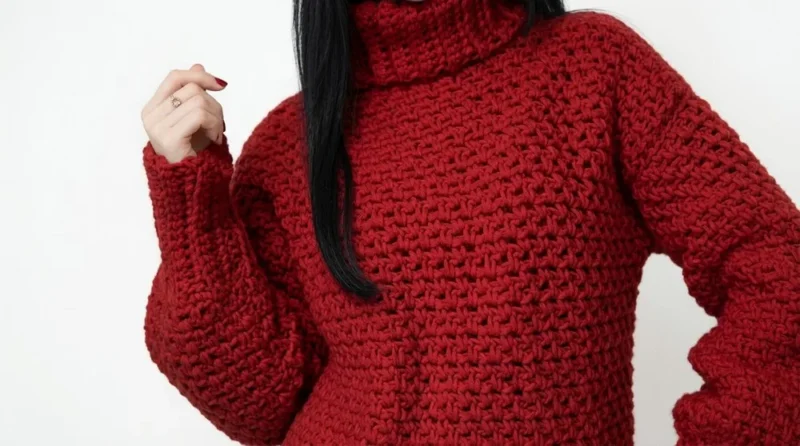
This crochet sweater pattern is all about texture and comfort — a cozy, wearable piece built around the beautifully bumpy Textured Rice Grain Stitch and finished off with stretchy Back Loop Only ribbing at the cuffs and waistband. It's the kind of make that looks far more complex than it actually is, which makes it perfect for confident beginners who've got the basics down and are ready to try something a little more textured. If you love pieces that feel handmade in the best way, this one's for you.
The two signature techniques here are the BLO ribbing (worked in rows to create that classic stretchy rib look) and the rice grain stitch, which combines chain spaces with single crochets for a nubby, oatmeal-like texture across the body and sleeves. You'll want basic comfort with single crochet, chain spaces, and simple increases/decreases before diving in. Expect somewhere between 6 and 10 hours total, depending on your size and how chatty your hook hand feels that day.
The finished sweater is soft, textured, and effortlessly cozy — equally at home styled over leggings for errands or paired with jeans for a relaxed weekend look. Made in Thesis Barry or a similar wool-acrylic Aran blend, it has just enough drape to feel like real clothing rather than a craft project. Because the panel and sleeve widths are fully adjustable, this makes a genuinely thoughtful handmade gift for almost anyone on your list.
- Start with the ribbed waistband, working in rows through the back loop only to build a stretchy, elastic base.
- Work the Textured Rice Grain Stitch across the body panels, alternating chain spaces and single crochets for that signature bumpy texture.
- Repeat the same rice grain texture and hook size for the sleeve panels, adjusting width to fit your desired size.
- Return to the smaller 8mm hook to work the ribbed cuffs at the end of each sleeve for a snug wrist finish.
- Check that all ribbed sections have an even stitch count before assembly to keep the texture balanced.
- Sew the finished panels together, joining the body and sleeves at the shoulder and side seams.
- Work a ribbed neckline by single crocheting around the opening, then attaching a BLO ribbed collar with slip stitches for a clean, stretchy finish.
- Weave in all loose ends neatly, then lay the sweater flat to check the fit before wearing.
Materials
Yarn
- Thesis Barry or similar medium-weight (Aran) yarn
Composition
- 30% wool, 70% acrylic
- Approx. 100g per skein, 150m per skein
Total yarn
- 5 skeins (approx. 500g) for size Small (S)—adjust for other sizes
Crochet Hooks
- 8mm (US L-11): For ribbing
- 9mm (US M-13): For the main body and sleeves
- Scissors
Tape Measure
- For checking panel dimensions and ensuring a custom fit
Tapestry Needle
- For sewing panels together and weaving in ends
Stitch Markers (optional)
- To mark key points (e.g., shoulder seams, sleeve placement, etc.)
Crochet Abbreviations
- ch
- Chain
- sc
- Single crochet
- sl st
- Slip stitch
- st(s)
- Stitch(es)
- hdc
- Half-double crochet
- dc
- Double crochet
- yo
- Yarn over
Easy Crochet Sweater Pattern with Textured Rice Grain Stitch
Ribbed Waistband
Hook: Use the 8mm hook .
Foundation Chains: Chain 15 ch.
- Row 1
Work sc into the 2nd chain from the hook and across the row. You’ll have 14 sc .
- Row 2
Ch 1, turn. Work sc in the back loop only (BLO) across the row. Repeat Row 2 until the ribbing measures 36cm (14″) wide (or adjust for your size).Do not fasten off. Proceed to collect stitches for the main panel.
Collecting Stitches for the Main Panel: Switch to the 9mm hook for the main panel. - Collect Sts(54 sc)
Work 1 sc for every row of ribbing, ensuring an even number of stitches. For size S, collect 54 sc.Once you've collected the stitches, move on to the rice grain pattern.
Textured Rice Grain Stitch
- Row 1
Ch 2 , skip the first sc, and work 1 sc into the next st. Ch 1 , skip 1 st, work 1 sc into the next st.Repeat: (Ch 1, skip 1, sc in next st) across the row.
- Row 2 & Beyond
Ch 2, turn. Work 1 sc into each ch-1 sp from the previous row. After each sc, chain 1 , and skip the sc from the previous row.Repeat: (Sc in ch-1 sp, ch 1, skip sc) across.
Repeat the Rice Grain Stitch Rows until the entire panel, including the ribbed waistband, measures 50cm (19.5″) in height.Fasten off and weave in ends.Make a second panel following the same instructions.
Ribbed Cuff
Hook: Use the 8mm hook.
Foundation Chains: Chain 15 ch.
- Row 1
Work sc into the 2nd chain from the hook and across. You’ll have 14 sc.
- Row 2
Ch 1, turn. Work sc in the back loop only (BLO) across the row. Repeat Row 2 until the ribbing measures 20cm (8″) wide.Do not fasten off. Proceed to collect stitches for the sleeve.
Collecting and Increasing Stitches for the Sleeve: Switch to the 9mm hook for the sleeve. - Collect Sts(38 sc)
Collect sc stitches evenly along the edge of the ribbing, while working some increases to shape the sleeve. For size S, collect 38 sc, ensuring you have an even number of stitches.Work the Textured Rice Grain Stitch: Follow the same instructions (Rows 1 and 2) for the rice grain stitch as described for the main panels. Work the rice grain stitch for 36cm (14″) to form the sleeve's length. Fasten off and weave in ends. Create the second sleeve by repeating these instructions.
More photos
Assembly Instructions
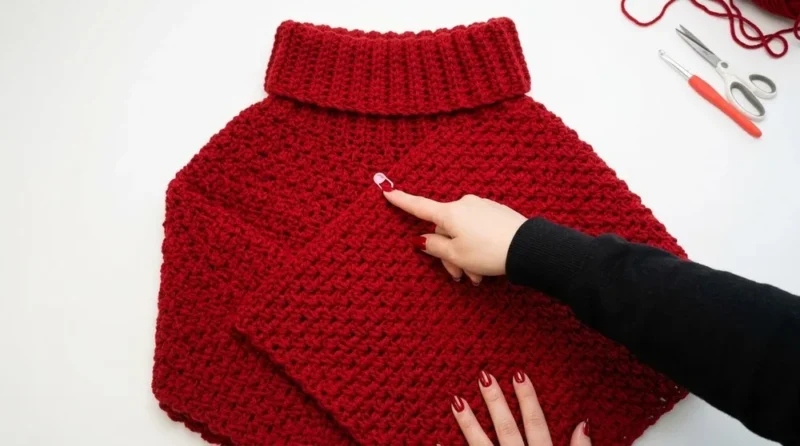
- Step 1 Sew Shoulders: Place the two main panels together, with the right sides facing inward. Leave a 23cm (9″) head opening at the top of the sweater for the neckline. Sew the shoulders together on both sides using a tapestry needle and whip stitch or mattress stitch.
- Step 2 Attach Sleeves: Fold each sleeve in half to find the center. Match the center of the sleeve to the shoulder seam. Sew the sleeve seam to the body, working from the center outward on each side.
- Step 3 Sew the Side Seams and Underarms: Fold the sweater inside out, with the sleeves aligned. Sew the side seams and underarm seams in one continuous motion. Fasten off and weave in all loose ends.
- Step 4 Neckline Ribbing: Attach yarn to any neckline point using the 8mm hook. Work sc around the neckline as evenly as possible. Ribbed Collar: Ch 18, work sc in the 2nd ch from the hook, and sc across (17 sc). Slip stitch into the next neckline stitch to secure. Work back in BLO for each sc row, attaching it to the neckline with a sl st after each row. Repeat for the entire neckline. Sew the ribbed edges together to finish.(17 sc)
- Step 5 Weave in all loose ends using a tapestry needle.
- Step 6 Lightly block the sweater if needed to shape and soften the stitches.
Important Notes
- 💡 Place a stitch marker at the start of every rice grain stitch round so you can quickly spot where your chain-space pattern repeat begins if you need to pause and come back later.
- 💡 Double-check that your ribbing rows land on an even stitch count before moving forward — this keeps the BLO texture symmetrical on both the cuffs and waistband.
- 💡 Since the design is meant to be custom-fit, take your measurements and adjust panel and sleeve widths before you start crocheting rather than trying to fix fit issues after assembly.
- 💡 When substituting yarn, look for a soft, medium-weight (Aran) yarn with good drape — stiffer yarns will make the rice grain texture feel bulky instead of soft and cozy.
- 💡 Wash gently — hand wash or a gentle cold machine cycle, then lay flat to dry so the wool-acrylic blend keeps its shape and the ribbing doesn't stretch out.
- 📏 Full sweater dimensions (size S): Front and Back Panels — Elastic Waistband 36cm (14″) wide x 14cm (5.5″) high; Panel (after waistband) 51cm (20″) wide x 50cm (19.5″) high. Sleeves — Elastic Cuff 20cm (8″) wide x 14cm (5.5″) high; Sleeve Panel Length 36cm (14″); Head Opening approx. 23cm (9″) wide. Adjust dimensions for different sizes as needed.
Common Mistakes and Fixes
- Working ribbing rows into both loops
BLO ribbing depends on working consistently into the back loop only — check your work every few rows by looking for the visible front loop 'ridge' running horizontally across the ribbing.
- Losing track of chain spaces in
Since this stitch alternates chain spaces with single crochets, use a stitch marker at the start of each round or row to keep your pattern repeat aligned, especially across wider body panels.
- Ending up with an odd stitch count in the ribbing sections.
The pattern specifically calls for an even number of stitches in the ribbing — count your foundation chain or starting row twice before working your first ribbing row to avoid having to frog it later.
- Not adjusting panel width before
Because this pattern is designed to be custom-fit, measure your intended chest/sleeve width against your gauge swatch before starting the main panels, not after they're finished.
- Skipping a gauge swatch when substituting yarn.
Since the pattern relies on a specific wool-acrylic Aran weight for drape, always swatch your substitute yarn in both the ribbing and rice grain stitch to confirm it behaves similarly before committing skeins.
Variations
- This pattern is basically begging to be made in multiple colorways, so here are some ideas. For a warm, autumnal feel, try a rust or burnt orange Aran yarn like Wool-Ease or Bernat Softee Chunky in a similar weight. For something softer and more spring-ready, a sage green or oatmeal cream reads beautifully in the rice grain texture since the stitch already mimics a nubby oat-like look. Want a colorblock version? Work the body panels in one shade and the ribbed cuffs, waistband, and neckline in a contrasting color — it's an easy way to add visual interest without changing a single stitch pattern. For sizing, remember the pattern is built to adjust the panel and sleeve widths, so if you're sizing up, add stitches in even numbers to your ribbing rows (since the pattern calls for an even stitch count) and widen your rice grain panels proportionally before assembly. If you're making this for a child or petite adult, scale down by narrowing the panels and shortening the sleeve length before you begin the ribbed cuffs. Yarn-wise, any medium-weight Aran-equivalent with good drape works — try a cotton-acrylic blend for warmer climates, or a chunky alpaca blend for extra warmth up north, just double-check your gauge with the 9mm hook first. For a cozy holiday-adjacent gift version, try a deep cranberry red or forest green with cream ribbing for a classic, giftable palette. However you customize it, keep swatching your rice grain stitch with your chosen yarn before committing to the full panels — texture-heavy stitches can behave differently across yarn weights and fibers.
Frequently Asked Questions
What makes the Textured Rice Grain Stitch different from a regular single crochet fabric?
It combines chain spaces with single crochet stitches in a specific pattern, which creates a bumpy, textured surface rather than the smooth look of straight single crochet rows. This texture is what gives the sweater its cozy, oatmeal-like visual interest.
How do I make sure my ribbing has the right stretch?
Working Back Loop Only consistently is key — it's what creates the elastic, knit-like ridges in the ribbing. Also make sure you're working an even number of stitches, as an odd count can throw off the symmetry of the rib pattern.
Can I resize this pattern for a different size than Small?
Yes, this pattern is specifically designed with adjustable panel and sleeve widths so you can customize the fit for any size. Just be sure to adjust your yarn quantity accordingly since the given 5-skein estimate is based on a Small.
What yarn works best if I can't find the exact one used in the pattern?
Any medium-weight Aran yarn with good drape and softness will substitute well, ideally with a similar wool-acrylic blend for warmth without stiffness. Always swatch your ribbing and rice grain stitch with the substitute before starting the full panels.
Original pattern: https://redagapeblog.com/simple-free-crochet-sweater-pattern/
About the Author

Marisol QuinteroWho runs Crochet Obsessed, why a stitch count sits at the end of every round, how a pattern gets written here, and the things this site will never do.
More Patterns
- IntermediateNo. 01

Slouchy everyday beanie worked flat in half double crochet
Crochet beanie pattern for a slouchy everyday look worked flat with hdc rows, then seamed into a soft,…
- IntermediateNo. 02
Crochet amigurumi doll with dress, shoes, and hat
Crochet amigurumi doll pattern with dress, shoes, and hat details for a soft, huggable keepsake you build one…
- IntermediateNo. 03
Chunky moss stitch crochet sweater with raglan-free shoulders
Chunky crochet sweater pattern using moss stitch, worked flat with a 10mm hook for a soft, fast, cool-weather…


