- LevelIntermediate
- Time4-6 hours
- Hook6.0 mm
- YarnWorsted
About This Pattern
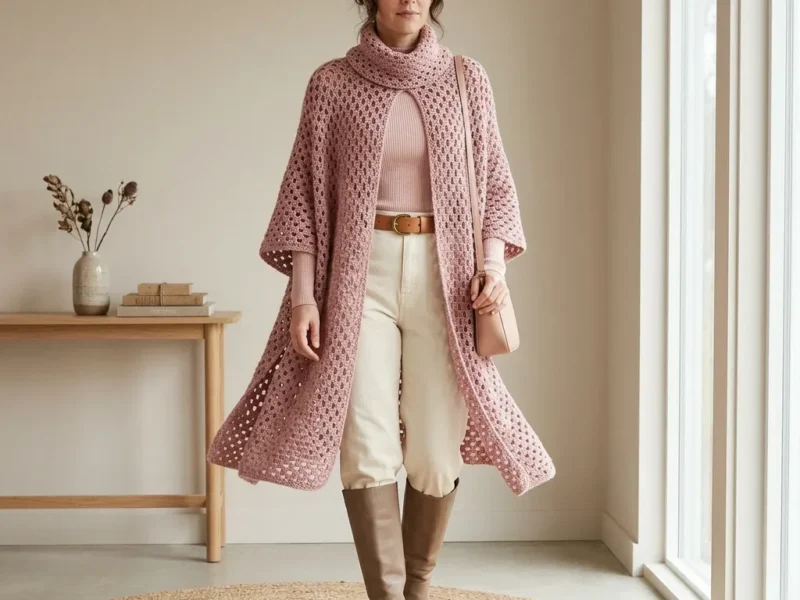
This is the piece you reach for when you want to look a little finished without trying very hard. The dusty rose color sits quiet instead of loud, and the open shell lace lets light move through it. I think of it as the crochet version of a good exhale.
Your hands get a real workout here, but a rhythmic one. You will settle into the shell-and-chain-space pattern fast, counting ch-sps instead of individual stitches once the repeat clicks in. Blocking does the heavy lifting at the end, pinning that lace open into its full drape.
Two panels seamed into a poncho shape read as one continuous piece once it is on a hook by the door or draped over a chair back. The hem pools wide and soft, the shoulder line sits narrower and cleaner. It looks like something you own, not something you made last week.
- Start each panel with a long foundation chain and a plain double crochet row to anchor the hem edge.
- Work the first lace row by alternating single double crochets with chain-1 gaps to open up the fabric.
- Build the signature shell row by fanning five double crochets into each chain space across the panel.
- Repeat the shell-and-gap pattern upward, letting the chain spaces shift slightly with each row for texture.
- Keep working the alternating lace and shell rows until the panel reaches its full length from hem to shoulder.
- Make a second panel that matches the first exactly, since the poncho is built from two identical pieces.
- Block both panels flat with pins to open the shell lace fully and set the finished width and length.
- Seam or arrange the two blocked panels into the draped poncho shape once they are dry.
On the desk
- Option 1: Lion Brand Yarn Heartland (100% Acrylic, 251 yards per 5 oz skein). You will need approximately 8 skeins. Try color "Great Smoky Mountains" or a similar dusty mauve. This yarn is machine washable and produces clean stitch definition.
- Option 2: Paintbox Yarns Simply DK held double (100% Acrylic, 137 yards per 50g ball). Holding two strands together brings it to worsted weight. You will need approximately 16 balls.
- Option 3: Malabrigo Rios (100% Superwash Merino Wool, 210 yards per 100g skein). You will need approximately 9 skeins in colorway "Dusty Baby Pink" or "English Rose." This is the luxury option with beautiful drape.
- Avoid very fuzzy or boucle yarns because the lace pattern openings will be obscured.
Yarn
- Approximately 1,800 yards / 1,645 meters of worsted-weight yarn (Category 4). Choose a smooth yarn with a slight halo or a plied wool-acrylic blend for the best drape.
Hook
- US Size J-10 / 6.0 mm, or whatever size you need to achieve gauge.
Notions
- Yarn needle with a large eye
- Rust-proof pins for blocking
- Blocking mats or a large towel
- Scissors
- 4 stitch markers
Stitch shorthand
- ch — chain: wrap yarn over hook and pull through the loop on your hook
- ch-sp — chain space: the hole or gap created by a chain stitch in the previous row
- dc — double crochet: yarn over, insert hook, pull up a loop, yarn over and pull through 2 loops, yarn over and pull through remaining 2 loops
- hdc — half double crochet: yarn over, insert hook, pull up a loop, yarn over and pull through all 3 loops
- sc — single crochet: insert hook, pull up a loop, yarn over and pull through both loops
- sk — skip: pass over the indicated stitch without working into it
- sl st — slip stitch: insert hook, pull up a loop, and pull it directly through the loop on your hook
- sp — space
- st(s) — stitch(es)
- rep — repeat
- beg — beginning
- RS — right side: the side that faces outward when worn
- WS — wrong side: the side that faces your body
- t-ch — turning chain: the chain stitches at the beginning of a row that bring your hook up to the correct height
- yo — yarn over: wrap the yarn over your hook from back to front
- pm — place marker
Dusty Rose Openwork Poncho With Draped Shell Panels
Panel
Make 2The lace pattern repeat is a multiple of 6 stitches plus 2; the foundation chain must respect this multiple.
Side tapering begins after Row 20: replace the full 5-dc shell at each outer edge with a 3-dc half-shell, removing 2 dc from each side edge on shell rows. Execute the decrease on every 10th row (Rows 21, 31, 41, 51, 61, and 71).
The turning chain at the start of every row counts as the first dc and is treated as a stitch in all counts.
Always place your hook into chain spaces (ch-sp) rather than into individual chain stitches when working into the previous row's structure.
Block before seaming; pinning out to the finished measurements will open the lace significantly and is essential for achieving the pictured drape.
The panel begins at the hem, which is the widest part (36 inches after blocking). Chain 129 to start.
- Row 1
(RS): Ch 3 (counts as dc here and throughout), dc into 4th ch from hook and into each ch across. (127 dc)
Row 1 is a plain dc foundation row, not part of the visible lace pattern, providing a solid base edge for the hem.
- Row 2
(WS): Ch 3, turn; dc in next dc; ch 1, sk 1 dc, dc in next dc; rep from * to last dc, dc in last dc. (65 dc)
- Row 3
(RS): Ch 3, turn; work shell (5 dc) into next ch-sp, ch 1, sk next dc, dc into next ch-sp, ch 1, sk next dc; rep from * across, ending dc into last dc. (122 dc)
The repeat for shell rows is [shell into ch-sp, ch 1, dc into ch-sp, ch 1]; each repeat consumes 6 units from the previous row; work 20 complete repeats plus an edge dc at each end.
- Row 4
(WS): Ch 3, turn; dc into next dc; ch 1, sk next dc, dc into next dc, ch 1, sk next dc, dc into next dc, ch 1, dc into next dc, ch 1, sk next dc, dc into next dc; rep from * across to last st, dc in last dc. (65 dc)Row 4 creates a mesh above the shells, setting up the staggered shell placement for Row 5.
- Row 5
(RS): Ch 3, turn; dc in next dc; ch 1, sk next dc; shell into next ch-sp, ch 1, sk next dc, dc into next ch-sp, ch 1, sk next dc; rep from * across, ending dc in last dc. (122 dc)
- Row 6
(WS): Rep Row 4. (65 dc)
- Row 7
(RS): Rep Row 3. (122 dc)
- Row 8
(WS): Rep Row 4. (65 dc)
- Row 9
(RS): Rep Row 5. (122 dc)
- Row 10
(WS): Rep Row 4. (65 dc)Checkpoint 1: After Row 10, panel should measure approximately 5 inches from the bottom of Row 2, with 4 complete horizontal bands of shells alternating in a staggered brick formation.
- Rows 11–20
Continue repeating the pattern sequence, alternating between the Row 3 shell alignment and the Row 5 shell alignment, with mesh rows between. RS shell rows: 122 dc. WS mesh rows: 65 dc.Checkpoint 2: After Row 20, panel should measure approximately 10 inches tall and 36 inches wide (pre-blocking, approximately 32 inches).
- Row 21
(RS, Taper Row 1): Ch 3, turn; work 3 dc (half-shell) into first ch-sp instead of full shell; continue pattern across; at the final ch-sp before the last dc, work 3 dc (half-shell) instead of full shell; dc into last dc. (118 dc)
- Row 22
(WS): Ch 3, turn; dc into next dc; ch 1, sk next dc, dc into next dc; rep from * adjusting to fit the 118-dc row; end dc in last dc.
The source text is incomplete; instructions end mid-pattern at Row 22 and do not continue through the cowl-scarf or full tapering sequence.
Where it goes
- Throw it over a plain tank and jeans for an evening out when you want texture without heavy layers.
- Wear it over a long-sleeve top on a cool afternoon walk, pairing it with ankle boots and simple jewelry.
- Drape it over a dining chair or the arm of a sofa as a soft accent piece in a neutral room.
- Pack it for travel as a lightweight layer that dresses up a plain dress or wide-leg trousers.
Color ideas
- Single dusty rose Work both panels entirely in the dusty mauve shade so the shell lace is the only texture, with no color changes across any row.
Care
Hand wash each panel in cool water with a gentle detergent, since the openwork lace holds its shape better without agitation.
Lay the poncho flat on a towel to dry rather than hanging it, so the wet fiber does not stretch out of shape under its own weight.
Store it folded flat in a drawer rather than on a hanger, and re-block gently with pins if the shell pattern flattens over time.
Assembly
- Step 1 Wet Blocking Method (Recommended): 1. Submerge the panels and scarf in cool water with a small amount of gentle wool wash. 2. Gently press out excess water without wringing or twisting. 3. Roll in a clean dry towel and press firmly. 4. Lay panels flat on blocking mats. 5. Pin each panel to finished dimensions: 36 inches wide at hem, 28 inches wide at shoulder, 40 inches tall. 6. Pin the cowl-scarf to 72 inches long and 8 inches wide. 7. Allow to dry completely (24 to 48 hours).
- Step 2 Steam Blocking (For Acrylic Yarns): Hold a steam iron approximately 1 inch above the fabric surface. Do not touch the iron to the yarn. Move slowly across the full surface. Pin to finished dimensions while still warm.
Easy to get wrong
Losing track of chain spaces
Mark the chain space at the start of each shell row with a stitch marker before you begin, so you never mistake a ch-1 gap for a stitch to crochet into.
Skipping the foundation dc row
Work the first plain dc row in full before starting the lace pattern, since it gives the hem a stable edge instead of a floppy, stretched-out starting chain.
Skipping blocking before seaming
Pin and block each panel flat first, because the shell lace needs blocking to open into its full width and length before the two panels are joined.
Between the songs
- The satisfaction here is in the shell stitch doing double duty: five double crochets fanning into a ch-sp, then settling back into a calm ch-1, sk-1 rhythm. Once row 3's shell lands, every odd row after echoes it, so your hands recognize the pattern before your eyes finish reading the row. The plain dc foundation row at the hem feels almost like a palate cleanser before the lace starts, giving you a clean edge to build from. I like that the openwork is not fussy lace with a dozen stitch types, it is one repeat, worked with intention, that blooms with blocking. Working two identical panels also means you get to fix your own small inconsistencies on the second one.
Listener questions
Can I use a different yarn weight than worsted?
The pattern is written for worsted-weight yarn at the given gauge, so swapping weights will change the finished measurements. Stick to a smooth or lightly plied worsted for the cleanest shell definition.
Why does the stitch count change so much between rows?
The count shifts naturally as plain dc rows transition into shell rows, since each shell uses five stitches worked into one chain space. This is expected and matches the lace structure, not a sign of a mistake.
Do I need to block the panels before seaming them together?
Yes, blocking each panel first is what opens the shell lace to its full finished width and length. Seaming unblocked panels will leave the openwork tight and uneven.
Is this a good project if I have never worked a shell stitch?
The shell repeat is straightforward once you work row 3 for the first time, since it is just five double crochets fanned into a chain space. I would call this an intermediate project, approachable if you are comfortable with basic dc and chain-space reading.
How different are the three yarn options in the materials list?
All three options land in the same worsted-weight category, but the fiber content ranges from acrylic to superwash merino wool, which changes drape and washing needs. Choose based on how much natural fiber feel versus easy care you want in the finished poncho.
Original pattern: https://bunnypatterns.com/dusty-rose-openwork-draped-poncho-free-crochet-pattern/
About the Author

Marisol QuinteroWho runs Crochet Obsessed, why a stitch count sits at the end of every round, how a pattern gets written here, and the things this site will never do.
More Patterns
- IntermediateNo. 01

Blush pink bow front cardigan crochet pattern
Blush pink bow front crochet cardigan pattern builds a V-neck mesh cardigan with ribbed trim and soft tie…
- IntermediateNo. 02
Flamingo, pineapple and monstera leaf charm trio pattern
Flamingo pineapple monstera leaf charm trio: tiny thread crochet and amigurumi shaping turn small motifs into three charming…
- IntermediateNo. 03
Sage green daisy bow bucket bag crochet pattern
Sage green daisy bow bucket bag crochet pattern with a sculpted bucket base, gathered rim, and a petaled…