- LevelIntermediate
- Time4-6 hours
- Hook4 mm
- YarnWorsted
About This Pattern
This one has the feel of a short song between the news and the weather — tidy, quick, satisfying. I think of it as a palm-sized project, the kind you can start on a Tuesday and finish before the coffee gets cold. There's nothing fussy about it, just a clean little rectangle that turns into something useful.
Your hands get to do two different jobs here, and that's part of the fun. First the plain back-and-forth rows that let your mind wander, then the back loop only single crochets and cross pop stitches that ask you to slow down and actually look at what you're doing. By the time you're sewing in the zipper, your fingers have earned the right to feel proud.
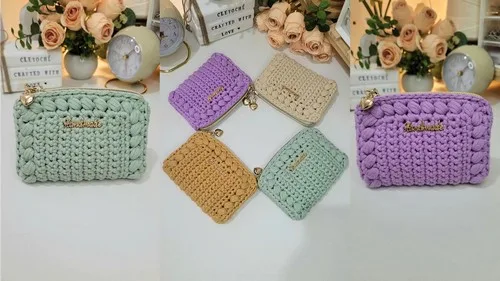
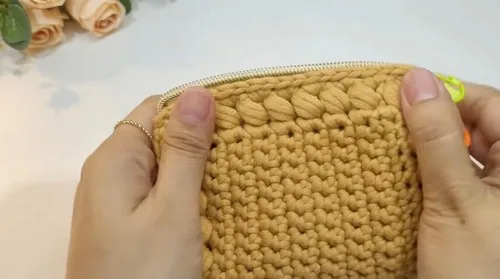
Finished, it sits on a dresser or a desk like a small, confident object — not trying to be anything more than what it is. It holds its shape because of that cross box stitch border, so it doesn't slouch next to your keys or your phone charger. It's the kind of thing people pick up and ask who made it.
- Continue the panel in plain single crochet rows, turning and chaining one at the start of each row.
- Work the edging round around the panel, adding single crochet increases at each corner to keep it square.
- Build the cross pop stitch border along all four sides, letting the corners form their own V shape.
- Finish the border with a round of double crochets, stacking extra stitches into each corner space.
- Repeat the whole panel process so you have a matching second side.
- Pin the zipper tape along one edge with even seam allowance, then hand sew it in with a running stitch.
- Fold the panel, slip stitch the edges closed, attach the zipper slider, and sew the metal tag to the center.
On the desk
- 50g of medium size 4 yarn (68% cotton, 32% nylon)
- 4mm and 5mm crochet hooks
- Metal tag embellishment
- Zipper tape and slider
- Ball head pins
- Sewing thread and needle
- Scissors
- Darning needle
- Stitch markers
Stitch shorthand
- ch — chain
- st — stitch
- sl st — slip stitch
- sc — single crochet
- dc — double crochet
- inc — increase
Little zippered coin purse you crochet in an evening
Creating the Rectangular Panel
- Foundation Chain
Use a 5mm hook to chain 23.
- Row 1
Switch to a 4mm hook, skip the first chain, and single crochet into the back ridge of each chain across.
- Rows 2–14
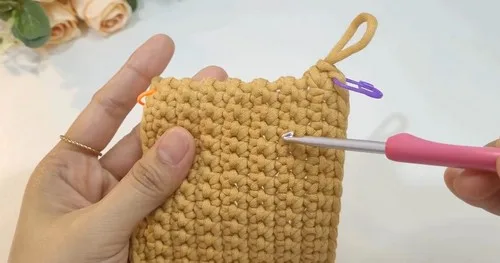
Chain 1, turn, and single crochet in each stitch across.
Panel Edging and Cross Box Stitch Border
- Round 1
Edging Turn and make 21 single crochets across, then work single crochets around the panel, making three single crochet increases at each corner.
- Round 2
Cross Box Stitch Begin the cross pop stitch border. Create 12 cross pop stitches along the long sides and 8 along the short sides, forming V-shape stitches at the corners.
- Round 3
Work a stacked double crochet into the corner space, then two double crochets into each cross pop stitch space, with three double crochets in each corner space.
Zipper Installation
- Step 1
Position the zipper along the edge of the panel, ensuring even seam allowance.
- Step 2
Pin and sew the zipper in place using a running stitch, following the zipper guideline.
Side Panels
- Step 1
Chain 1 and single crochet into the first stitch.
- Step 2
Work single crochets in the back loop only, with regular single crochets at the beginning and end.
- Step 3
Fold the panel in half and join the edges with a slip stitch.
- Step 4
Attach the zipper slider.
- Step 5
Repeat for the other side panel.
More shots
Where it goes
- Carry it in a bigger tote as a coin purse, tucked alongside a phone or a set of keys.
- Hand it over as a quick-finish gift for someone who collects small zippered pouches.
- Use it on a desk to corral earbuds, SD cards, or loose change from the day.
- Pair it with a matching crochet keychain or bag charm for a little set that travels together.
Color ideas
- Two-tone contrast Keep both panels in a deep navy, and work the edging round plus the cross box stitch border in a bright mustard for a graphic pop before adding the metal tag.
Care
Hand wash in cool water since the yarn is a cotton and nylon blend, and skip the washing machine to protect the zipper tape.
Lay the purse flat to dry, gently reshaping the panel edges and corners with your fingers while it's still damp.
Store it unzipped in a drawer or pouch so the zipper teeth and the cross pop stitch border don't stay under tension.
Assembly
- Step 1 Attach the metal tag to the center of the coin purse.
Easy to get wrong
Losing the back loop only habit
It's easy to slip back into working through both loops partway across a row. Place a stitch marker at the start of the row as a visual reminder to check your hook placement.
Uneven corner increases
Skipping or doubling up on the corner increases during the edging round throws the whole panel out of square. Mark each corner stitch with a stitch marker before you start the round so you know exactly where the three increases belong.
Rushing the zipper pinning
A zipper pinned without even seam allowance will pucker once it's sewn and folded. Use the ball head pins generously along the whole zipper tape before you pick up the needle, checking the edge lines up evenly as you go.
Listener questions
What exactly is a cross pop stitch?
It's the textured stitch that builds the border in round 2, worked in a set count along the long and short sides so the corners naturally form V shapes. It's what gives this little purse its raised, dimensional edge.
Do I need to be experienced with zippers to finish this?
No prior zipper experience is required, since the pattern walks through pinning with even seam allowance and sewing with a running stitch. A darning needle and some patience with the ball head pins get you through it.
Where exactly does the metal tag go?
It's attached to the center of the coin purse as the final assembly step, after both panels are joined and the zipper slider is in place. It's a small detail, but it's the one that makes the piece feel finished.
Original pattern: https://crocheteverything.com/crochet-coin-purse-with-zipper-pattern-step-by-step-guide/
About the Author

Marisol QuinteroWho runs Crochet Obsessed, why a stitch count sits at the end of every round, how a pattern gets written here, and the things this site will never do.
More Patterns
- IntermediateNo. 01

Blush pink bow front cardigan crochet pattern
Blush pink bow front crochet cardigan pattern builds a V-neck mesh cardigan with ribbed trim and soft tie…
- IntermediateNo. 02
Flamingo, pineapple and monstera leaf charm trio pattern
Flamingo pineapple monstera leaf charm trio: tiny thread crochet and amigurumi shaping turn small motifs into three charming…
- IntermediateNo. 03
Sage green daisy bow bucket bag crochet pattern
Sage green daisy bow bucket bag crochet pattern with a sculpted bucket base, gathered rim, and a petaled…