
- LevelIntermediate
- Time4-6 Hours
- Hook4 mm
- YarnFingering
About This Pattern
This Crochet Tulip Bag starts as humble as any amigurumi—a tidy magic ring—but blossoms round by round into a sturdy, flower-inspired base perfect for a market tote or everyday carryall. What makes it special is how the simple single crochet increase pattern builds a wide, flat circle that reads like an open tulip bloom before the sides ever go up. It's ideal for crocheters who love projects that feel purposeful from the very first stitch, and for anyone who wants a bag that says 'handmade' without shouting it.
The techniques here are refreshingly straightforward: a magic ring foundation, single crochet increase rounds that grow the base from 6 stitches all the way to 48, and a dedicated flower-edge round that adds the decorative finish. Because you're working with light fingering yarn and a 4mm hook, tension and stitch count matter more than usual, so this sits comfortably at an intermediate level. Expect to spend somewhere in the 4-6 hour range, depending on how quickly you fly through those increase rounds.
Once the Building the Flower Bed rounds are complete and the Flower Edges round is worked, you're left with a wide, textured base with a soft, floral silhouette—lightweight thanks to the fingering yarn, yet substantial enough to hold its shape. It's the kind of piece that looks lovely slung over a shoulder for a farmers' market run or gifted to a friend who appreciates a bag with a story stitched into every round.
- Begin with a magic ring and work six single crochets into it to form the tiny starting circle.
- Join the round with a slip stitch, then chain one to prepare for the first increase round.
- Work a round of all increases to double your stitch count from six up to twelve total.
- Continue through several increase rounds, spacing plain stitches between increases so the circle grows evenly.
- Keep building the flower bed section until your base reaches a full forty-eight stitches around.
- Finish the outer edge with the dedicated flower-edge round to give the bag its signature blooming look.
- Follow the assembly steps to shape and complete the bag from the finished flat base.
- Weave in any loose ends and gently steam or block the piece so the flower edge sits flat.
Materials
- Light Fingering Yarn (Fibre Milk recommended)
- 4mm Crochet Hook
Crochet Abbreviations
- ch
- chain
- st
- stitch
- sl st
- slip stitch
- sc
- single crochet
Crochet Tulip Bag Pattern: A Sweet Spring-Ready Carryall
Ring Creation
Make a magic ring.
- Round 1
Make 6 single crochet (sc) stitches into the magic ring. Then, pull the ring closed.Slip stitch (sl st) into the first single crochet to join the round.
Building the Flower Bed
- Round 2
(Increase Round): Chain 1 (ch 1). In this round, you will make 2 single crochets in each stitch around for a total of 12 stitches. Join with a slip stitch to the first sc.
- Round 3
(Pattern Repeat Begins): Ch 1. Make 1 single crochet in the next stitch, then make 2 single crochets in the following stitch (increase). Repeat - around for a total of 18 stitches. Join with a sl st.
- Round 4
Ch 1. Make 1 single crochet in each of the next 2 stitches, then increase by making 2 single crochets in the following stitch. Repeat this pattern around. You will have a total of 24 stitches.
- Round 5
Ch 1. Continuing the pattern, make 3 single crochets, followed by an increase. By the end of this round, you'll have 30 stitches.
- Round 6
Ch 1. This round follows the pattern: make 4 single crochets, then an increase. You will have 36 stitches when you finish.
- Round 7
Ch 1. The pattern extends: 5 single crochets and then an increase, leading to a total of 42 stitches.
- Round 8
Ch 1. Follow the pattern by making 6 single crochets, then an increase, resulting in 48 stitches in total.
Creating the Flower Edges
- Round 9
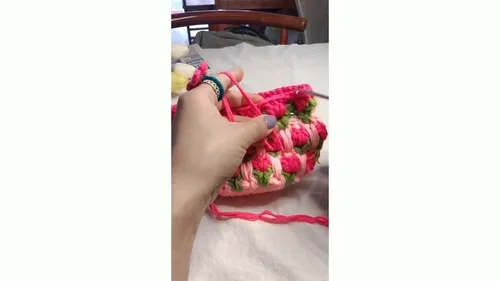
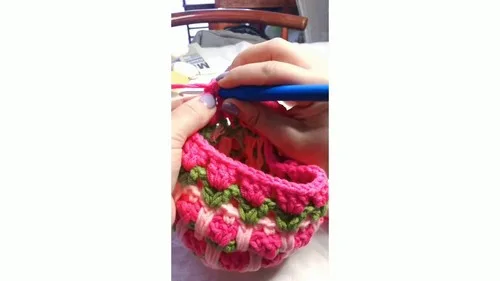
(Petal Formation Begins): Slip stitch into the first stitch of the previous round, then chain 4. This counts as your first double crochet and chain-1 space. Make a double crochet in the same stitch. Skip 3 stitches, then in the next stitch (4th), make a double crochet, chain 1, and another double crochet. Repeat - around. Join with a slip stitch to the initial chain space.
More photos
Assembly Instructions
- Step 1 Leaves:: Using green yarn, attach it to any of the spaces between the 'petals' created in the last round. Chain 4, then double crochet into the same space. Repeat this around each space between petals to create leaves.
- Step 2 Flower Creation:: Switch to the flower color. Insert your hook into any space between petals, chain 3, and make 2 double crochets in the same space. Chain 1, then make 3 double crochets in the next space. Repeat around.
- Step 3 Final Edges:: For the last rows, create a pattern that simulates the flower's edges and leaves at your discretion, following a similar increase pattern and stitch style as previously done.
- Step 4 Finishing:: Secure and weave in all tails. To complete the look, you might need to create more rows depending on the desired size and finish of your flower bed.
- Step 5 Optional Chain Loop:: For a hanging loop or to join multiple flowers, chain a length as desired, slip your hook into a part of the flower where you wish to attach the loop, and secure it with a slip stitch.
Important Notes
- 💡 Use a stitch marker on round 1 of the magic ring circle so you can always find your starting point as the rounds multiply.
- 💡 Since you're going from 6 stitches up to 48, count out loud or on your fingers after each increase repeat to catch mistakes before they compound.
- 💡 Light fingering yarn splits more easily than worsted, so work with a smooth, non-fuzzy yarn like the recommended Fibre Milk to keep your increases crisp.
- 💡 Block your finished base gently with a light steam or spray-block to help the flower edge lie flat and show off its shape.
- 💡 Keep your yarn tail from the magic ring long enough to weave in securely later, since fingering weight can slip loose more easily than bulkier yarns.
- 💡 Work in good light when you reach the Flower Edges round—the stitch definition here is subtle and easy to misjudge in dim lighting.
Common Mistakes and Fixes
- Losing track of stitch count
Place a stitch marker at the start of each round and pause every 2-3 stitches to count your increases—especially past round 4 when the repeats get longer and easier to lose track of.
- Pulling the magic ring closed
Tug each of the 6 single crochet stitches individually before pulling the tail tight, and give the tail one final firm pull once all stitches are in place to fully close the ring.
- Forgetting to slip stitch to join at the end of each round.
Make joining the round part of your rhythm—count your stitches, then immediately slip stitch into the first sc of that round before chaining 1 to start the next.
- Increasing in the wrong stitch
Double-check you're increasing into the stitch that follows your plain single crochets each time, not the first or last one in the repeat, and recount after every round to confirm you hit the target stitch total.
- Using a hook or yarn combination that's
Stick with the recommended 4mm hook and light fingering yarn; if your fabric looks holey or floppy, size down half a millimeter to tighten up the stitch definition.
- Rushing the Flower Edges round without keeping tension even.
Slow down on this finishing round since uneven tension here is the most visible—work at a steady pace and check your edge lies flat against the base as you go.
Variations
- I adore how this bag tricks you into thinking you're just making another amigurumi base—until it keeps growing and growing into something you can actually carry! Starting with a magic ring and working those single crochet increase rounds (6, 12, 18, 24, 30, 36, 42, all the way to 48 stitches) is so satisfying because you can literally watch the tulip shape bloom under your hands round after round. There's a rhythm to counting your increases every few stitches that becomes almost meditative once you get into the groove. Then the Flower Edges round swoops in and turns a plain circle into something with real personality and texture. I also love that light fingering yarn and a 4mm hook keep the fabric soft and drapey rather than stiff, so the finished bag feels wearable, not craft-fair rigid. It's a project that rewards patience during the increase rounds but never gets boring, and the payoff—a bag base with genuine floral charm—makes every stitch worth it. This is the kind of pattern I keep coming back to when I want something with real texture but not a ton of finishing fuss.
Frequently Asked Questions
What yarn weight works best for this tulip bag?
The pattern calls for light fingering yarn, with Fibre Milk specifically recommended for its smooth texture and lovely stitch definition. If you substitute, look for another light fingering or sock-weight yarn to keep the drape and gauge consistent.
What size hook do I need?
A 4mm crochet hook is used throughout this pattern. If your fabric feels too loose or holey with fingering yarn, sizing down slightly can help tighten your gauge.
How many rounds does the base take to reach full size?
The Building the Flower Bed section covers 7 rounds (Rounds 2-8), taking the stitch count from 12 up through 48 stitches, following the Ring Creation round and preceding the Flower Edges round.
Is this pattern good for a beginner?
It leans intermediate because of the steady increase rounds and the need for accurate stitch counting, but if you're comfortable with magic rings and basic single crochet, you can absolutely work up to it.
Can I make this bag bigger or smaller?
Yes—since the pattern is built on a repeating single crochet plus increase formula, you can add or stop a round earlier to change the finished diameter before starting the Flower Edges round.
Original pattern: https://crocheteverything.com/stay-comfy-free-crochet-tulip-bag-pattern-great-addition-to-your-keepings/
About the Author

Marisol QuinteroWho runs Crochet Obsessed, why a stitch count sits at the end of every round, how a pattern gets written here, and the things this site will never do.
More Patterns
- IntermediateNo. 01

Slouchy everyday beanie worked flat in half double crochet
Crochet beanie pattern for a slouchy everyday look worked flat with hdc rows, then seamed into a soft,…
- IntermediateNo. 02
Crochet amigurumi doll with dress, shoes, and hat
Crochet amigurumi doll pattern with dress, shoes, and hat details for a soft, huggable keepsake you build one…
- IntermediateNo. 03
Chunky moss stitch crochet sweater with raglan-free shoulders
Chunky crochet sweater pattern using moss stitch, worked flat with a 10mm hook for a soft, fast, cool-weather…


