- LevelIntermediate
- Time8-12 Hours
- Hook5.5 mm
- YarnWorsted
About This Pattern
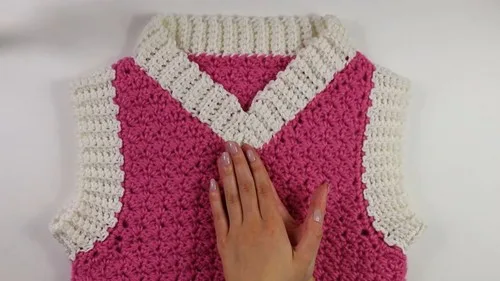
This crochet vest is built around the gorgeous Suzette stitch, a textured combo of single and double crochet that creates a lofty, almost woven fabric unlike anything a basic granny stitch can offer. It's worked as two flat panels — a back and a front — that come together with ribbed borders and clean shoulder seams. The two-color design lets the ribbing pop against the main body, making this the kind of piece that looks like it came from a boutique rack. It's perfect for crocheters who want a statement layer that still feels wearable every day.
You'll use straightforward stitches — SC, DC, HDC decrease, and back bar single crochet for the ribbed sections — but the way they combine into the Suzette stitch pattern gives the whole project a satisfying rhythm once you get the hang of it. This is a great next-level project for confident beginners ready to try garment shaping, or a relaxing weekend build for intermediate crocheters. Expect to spend several sessions on it, since the ribbing alone requires dozens of short rows before the fun texture work even begins.
The finished vest has a structured yet flowy drape thanks to the panel construction, with a shaped neckline, ribbed armhole edging, and a tidy collar border that frames the whole look. It's the kind of piece you can throw over a t-shirt or layer under a jacket, and the two-tone color choice makes it feel intentional and current rather than like a leftover-yarn project. Handmade and textural, it also makes a wonderful gift for anyone who loves cozy, fashion-forward layers.
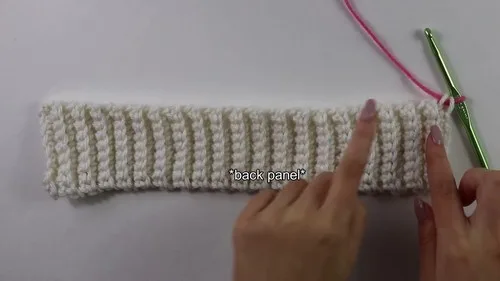
- Crochet a ribbed border strip for both the back and front panels using short repeated rows.
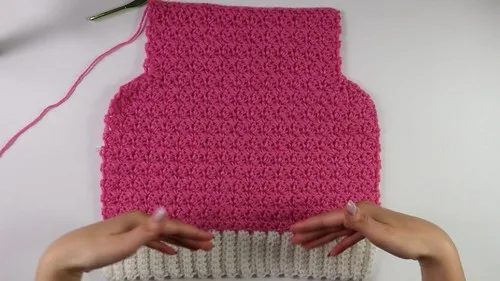
- Build the main body of the back panel upward from its ribbing using the textured Suzette stitch pattern.
- Shape the back panel with a few decrease rows, then continue straight rows until the back panel is complete.
- Work the front panel body a couple of rows before splitting it into two separate neckline sides.
- Shape each side of the front neckline separately so the opening comes out even on both shoulders.
- Seam the front and back panels together at the sides and shoulders, then flip the vest right side out.
- Add ribbed armhole edgings and a neckline collar border, seaming each in place before weaving in ends.
Materials
Yarn
- Category 4 Medium Weight Yarn (two colors)
- Hook: 5.5 mm
Crochet Abbreviations
- SC
- Single Crochet
- DC
- Double Crochet
- BBSC
- Back Bar Single Crochet (into back loop only)
- HDC Dec
- Half Double Crochet Decrease
- Suzette Stitch
- (1 SC, 1 DC) in same stitch, skip next stitch
Crochet Suzette Stitch Vest: A Textured Two-Tone Layer
Bottom Border (Ribbing)
Make 2Change to your main color in the last stitch of the final row.
This border is worked once for the Back Panel and once for the Front Panel.
- Round 1
Chain 9. Skip first chain, SC in second chain and in each chain across. (8 SC)
- Round 2
Chain 1, turn. BBSC in each stitch across.Repeat Row 2 until the required number of rows for your size (e.g., 39 rows for size Small).
Main Body Back Panel
- Round 1
Chain 1, turn. Work (SC, DC) into the first row of the border, skip next row, (SC, DC) into following row; continue this pattern across until two rows remain, then skip second to last row and SC in the last.
- Round 2
Chain 1, turn. Skip first stitch, (SC, DC) in next stitch, repeat pattern to last two stitches, skip second to last and SC in last.Repeat Row 2 for the required number of rows (e.g., 18 rows for size Small).
Back Panel Decreases
Cut and fasten off after completing the back panel.
- Round 1
Chain 1, turn. HDC Dec over first 2 stitches and next 2 stitches, continue Suzette Stitch pattern until 6 stitches remain, skip one, SC in next, HDC Dec over last 4 stitches.Repeat Row 1 for a total of 3 decrease rows.
Work 21 more rows in straight Suzette Stitch pattern.
Front Panel Neckline First Side
Cut and fasten off.
- Round 1(13)
Chain 1, turn. Work Suzette Stitch until 12 stitches are made, skip next, SC in following stitch. (13 stitches)
- Round 2
Chain 1, turn. HDC Dec over first 2 stitches, continue pattern until 2 remain, skip one, SC in last.
- Round 3
Chain 1, turn. Continue pattern until 3 remain, skip next, HDC Dec over last 2.Repeat Rows 2 and 3 until you have 12 rows total for shoulder shaping.
Armhole Edging (Ribbed Border)
Make 2Change to border color after joining Round 1.
Cut and fasten off after completing the edging.
Repeat this entire section for the other armhole.
- Round 1
Join yarn at underarm seam, chain 1, SC evenly around edge, slip stitch to join.
- Round 1
Chain 7, skip first chain, SC in next 6, slip stitch up 2 stitches on armhole to join. (6 SC)
- Round 2
Turn, BBSC across all 6 stitches, chain 1, turn.Repeat Rows 1 and 2 around the armhole.
Main Body Front Panel
Do not cut yarn.
Repeat the Bottom Border and Main Body Back Panel instructions (including the 3 decrease rows) for the front panel.
Stop when you have the required number of rows after decreases (e.g., 12 rows for size Small).
Front Panel Neckline Second Side
Cut and fasten off.
- Round 1
Count one unworked stitch in the center and join yarn in the next stitch.Work the mirrored decrease pattern (as in the Front Panel Neckline First Side) to complete 12 rows of shoulder shaping.
Collar or Neckline Border
Cut, leaving a long tail for seaming.
- Round 1-5(6)
Work BBSC increases until you have 6 stitches total. (6 BBSC)
- Round 6
65 Continue straight BBSC rows for 60 rows.
- Round 66-70(2)
Work BBSC decreases until 2 stitches remain. (2 BBSC)
More photos
Assembly Instructions
- Step 1 Place front and back panels right sides together.
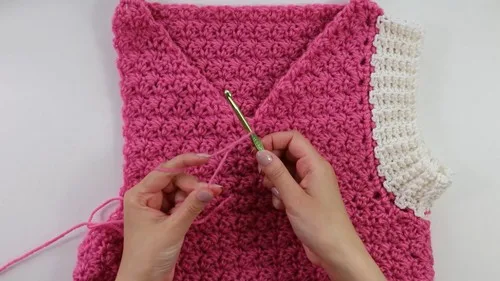
- Step 2 Use whip stitch to join along both side edges and shoulder straps.
- Step 3 Flip vest right side out to hide seams.
- Step 4 Seam the beginning and ending edges of each armhole edging.
- Step 5 Flip project inside out and whip stitch the collar flap around the neckline evenly.
- Step 6 Weave in all remaining ends to finish.
Important Notes
- This pattern uses two colors of Category 4 medium weight yarn, so decide on your color-blocking plan before you begin — the ribbing, main body, and trim can all be styled with contrast or tonal shades.
- The 5.5mm hook keeps the fabric structured but not stiff; if you crochet tightly, consider sizing up half a millimeter to keep the Suzette stitch fabric from becoming too dense.
- Color changes should be made in the last stitch of the final ribbing row, so pull your new color through on the last yarn over to keep the transition clean.
- The Front Panel Neckline is worked in two separate sides after the initial rows, so keep your stitch markers or scrap yarn handy to mark where the split occurs.
- Because the armhole edging and collar border are worked and seamed separately, save time by working both armhole edgings back to back before moving on to the collar.
- Weave in ends as you finish each panel rather than waiting until the very end — with two colors and multiple pieces, loose ends can add up quickly.
Common Mistakes and Fixes
- Losing track of which stitch to skip in the Suzette stitch pattern.
Place a stitch marker in the first stitch of each row so you always know your starting point and can keep the (SC, DC), skip rhythm consistent across the row.
- Working the back bar single crochet into the wrong loop during the ribbing rows.
Double check you're inserting your hook into the back loop only (the horizontal bar behind the visible top loop) — this is what gives the ribbing its stretchy, corduroy-like texture.
- Rushing the HDC decrease rows and shifting the stitch count.
Count your stitches after each decrease row in the Back Panel Decreases section to confirm you're removing stitches evenly on both sides before continuing.
- Joining the front and back panels with the wrong sides facing.
Always place the panels right sides together before whip stitching the side seams and shoulders, then flip right side out afterward to hide the seam allowance.
- Skipping a gauge swatch before starting the ribbing.
Since the number of ribbing rows is size-dependent, swatch first with your chosen yarn and 5.5mm hook to make sure your row counts will actually produce the fit you want.
Variations
- The two-color setup is where this vest really shines, so have fun experimenting. Try a bold contrast like charcoal ribbing with a warm rust or mustard main body for an autumn-ready look, or keep it soft with cream ribbing against a dusty sage body for something more subtle. A monochrome version in two shades of the same color family — think navy ribbing with a lighter denim-blue body — gives a tonal, elevated look that still shows off the Suzette stitch texture beautifully. For sizing, remember the ribbing row counts and Suzette stitch row repeats given in the pattern are size-dependent, so recalculate your row totals based on your gauge swatch and desired chest measurement rather than guessing. If you want a cropped version, simply work fewer straight rows in the Main Body Back Panel and Front Panel sections before starting your shaping — just be sure to keep the decrease and neckline shaping sections intact so the fit still works. Yarn-wise, this pattern was designed with Category 4 medium weight yarn, but you could size down to a worsted-weight cotton blend for a cooler, drapier summer vest, adjusting your hook to match your gauge. A wool-blend yarn will give you a warmer, more structured fall layer, while a cotton-acrylic mix keeps things lightweight and machine washable. If you want to get playful, work the armhole edging and collar border in your contrast color instead of matching the bottom ribbing, so the trim details tie the whole piece together at the neckline and arms too.
Frequently Asked Questions
Can I make this vest in one color instead of two?
Yes, you can absolutely work the entire vest in a single color if you prefer a more subtle look. Just skip the color-change instruction in the ribbing and continue with your one yarn throughout.
What does the Suzette stitch actually look like once finished?
It creates a bumpy, textured fabric with little raised dimples from the paired SC and DC stitches worked into the same spot. It has more depth and visual interest than a plain single or double crochet fabric.
Do I need to know how to do HDC decreases before starting?
It helps, but the Back Panel Decreases section is a great place to practice if you're newer to shaping. Just take it slow and count your stitches after each decrease row to stay on track.
Why is the front panel neckline worked in two separate sides?
Splitting the front panel into a first side and second side allows you to shape each shoulder and neckline edge independently, which creates a clean, symmetrical opening. It's a common technique for garment necklines worked flat.
How do I know how many rows to work for my size?
The pattern gives row counts for a size Small as an example, but your actual totals will depend on your gauge and desired measurements. Always swatch first and adjust your row repeats to match the finished size you want.
Original pattern: https://crocheteverything.com/crochet-trendy-sweater-pattern-vest-using-the-suzette-stitch/
About the Author

Marisol QuinteroWho runs Crochet Obsessed, why a stitch count sits at the end of every round, how a pattern gets written here, and the things this site will never do.
More Patterns
- IntermediateNo. 01

Slouchy everyday beanie worked flat in half double crochet
Crochet beanie pattern for a slouchy everyday look worked flat with hdc rows, then seamed into a soft,…
- IntermediateNo. 02
Crochet amigurumi doll with dress, shoes, and hat
Crochet amigurumi doll pattern with dress, shoes, and hat details for a soft, huggable keepsake you build one…
- IntermediateNo. 03
Chunky moss stitch crochet sweater with raglan-free shoulders
Chunky crochet sweater pattern using moss stitch, worked flat with a 10mm hook for a soft, fast, cool-weather…


